In-depth Guide on How to Boost Staking
Sabai Ecoverse is launching a unique income-boosting promotion for staking, increasing your earnings by 110 times! Join the project and start earning!
Table of contents
- Terms and conditions
- How to boost your staking income?
- Step 1: Register your Sabai ID
- Step 2: Create a MetaMask crypto wallet
- Step 3: Connect MetaMask to Sabai ID
- Step 4: Purchase $SABAI tokens
- Step 4.1. Sign up on BitMart
- Step 4.2. Complete the verification
- Step 4.3. Set up 2FA protection
- Step 4.4. Deposit to BitMart
- Step 4.4.1. Deposit with cryptocurrency
- Step 4.4.2. Buying cryptocurrency with fiat money
- Step 4.5. Buy USDT and MATIC tokens on BitMart
- Step 4.6. Withdraw USDT and MATIC to your MetaMask wallet
- Step 4.7. Exchange USDT for SABAI on Uniswap
- Step 5. Level up your rank in Sabai Light to level 5 - 25
- Step 6. Start staking
- Step 7. Activate the booster
Terms and Conditions
The boost activation is available to users who have reached Sabai Light levels 5 through 25.
The higher your rank, the greater your earnings! Farming rewards are calculated daily based on your current rank in Sabai Light. So, even after activating the boost, you can continue playing Sabai Light, increasing your rank and earnings.
After activating the boost, tokens from staking cannot be withdrawn for the entire duration.
The minimum staking amount to activate the boost is 3,500 SABAI tokens, and the maximum is 30,000 SABAI tokens.
How to Boost Your Staking Income?
❗️ Important! You can skip some of the steps listed below if they've already been completed.
Step 1: Register Your Sabai ID
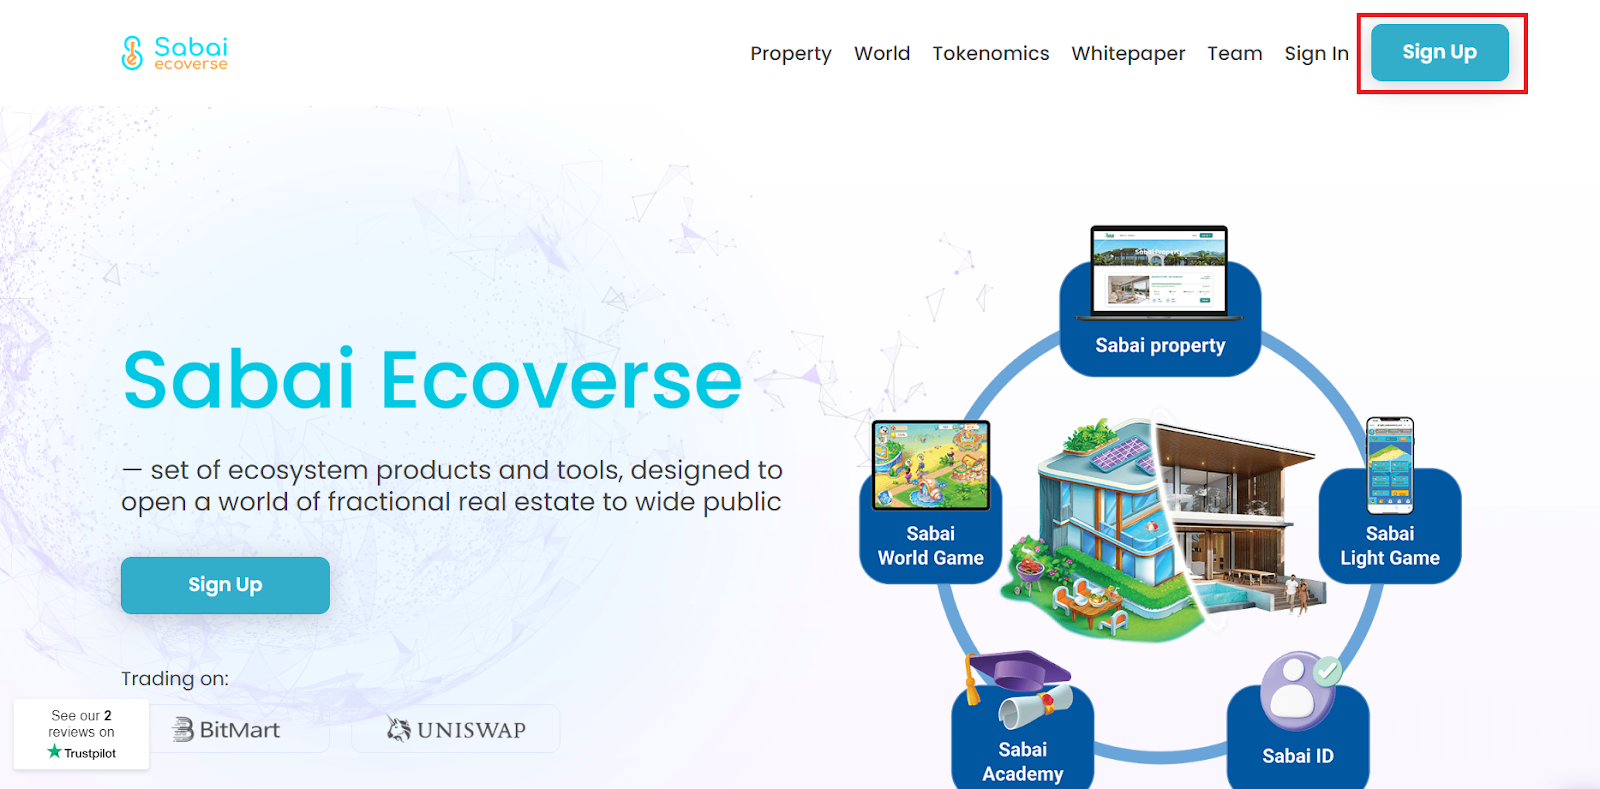
1. Go to the Sabai Ecoverse website and click "Sign Up" in the top right corner of the page.
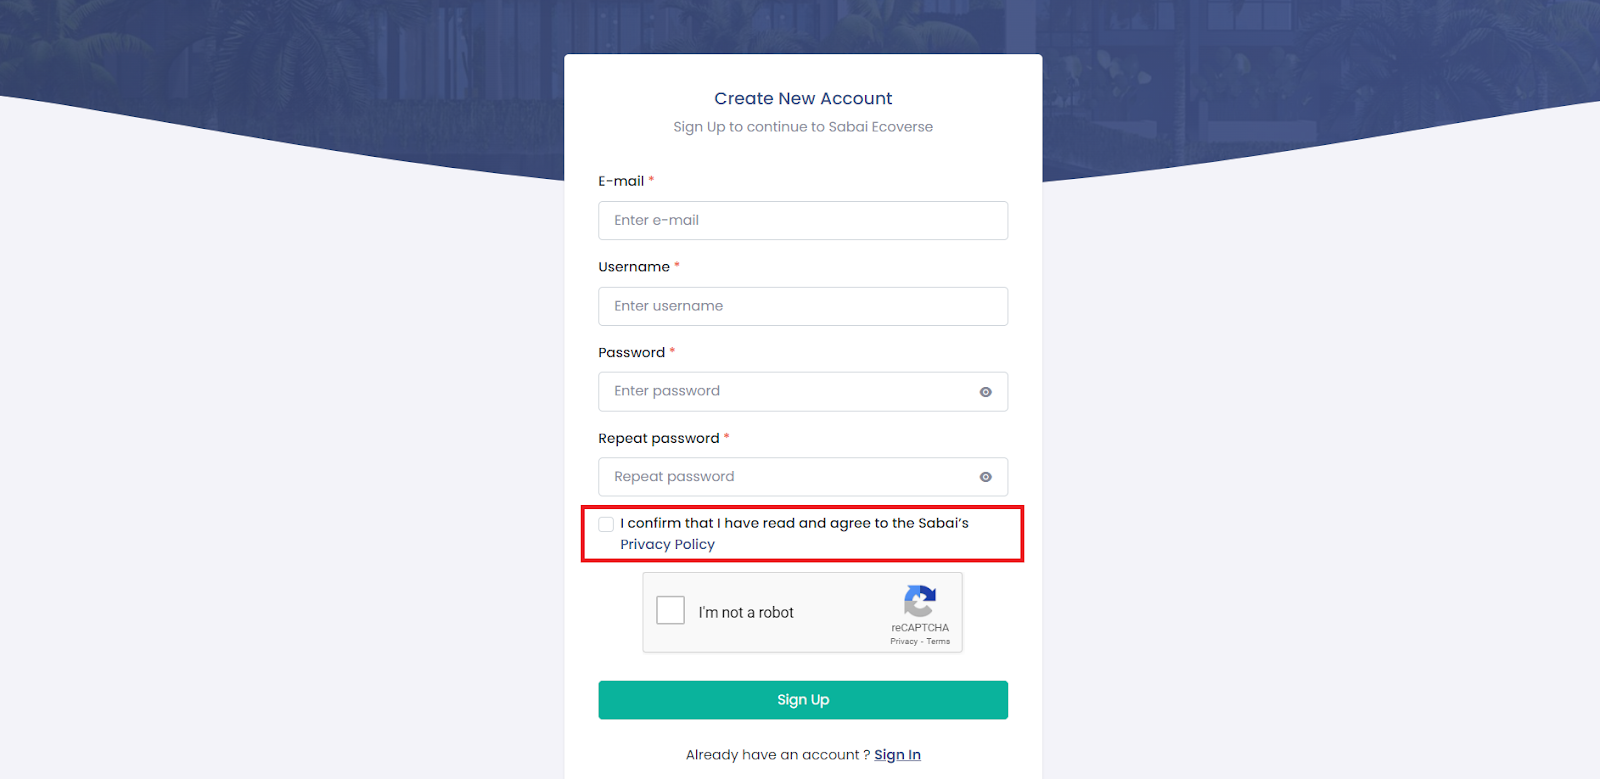
2. Enter your email, username, password, and repeat the password.
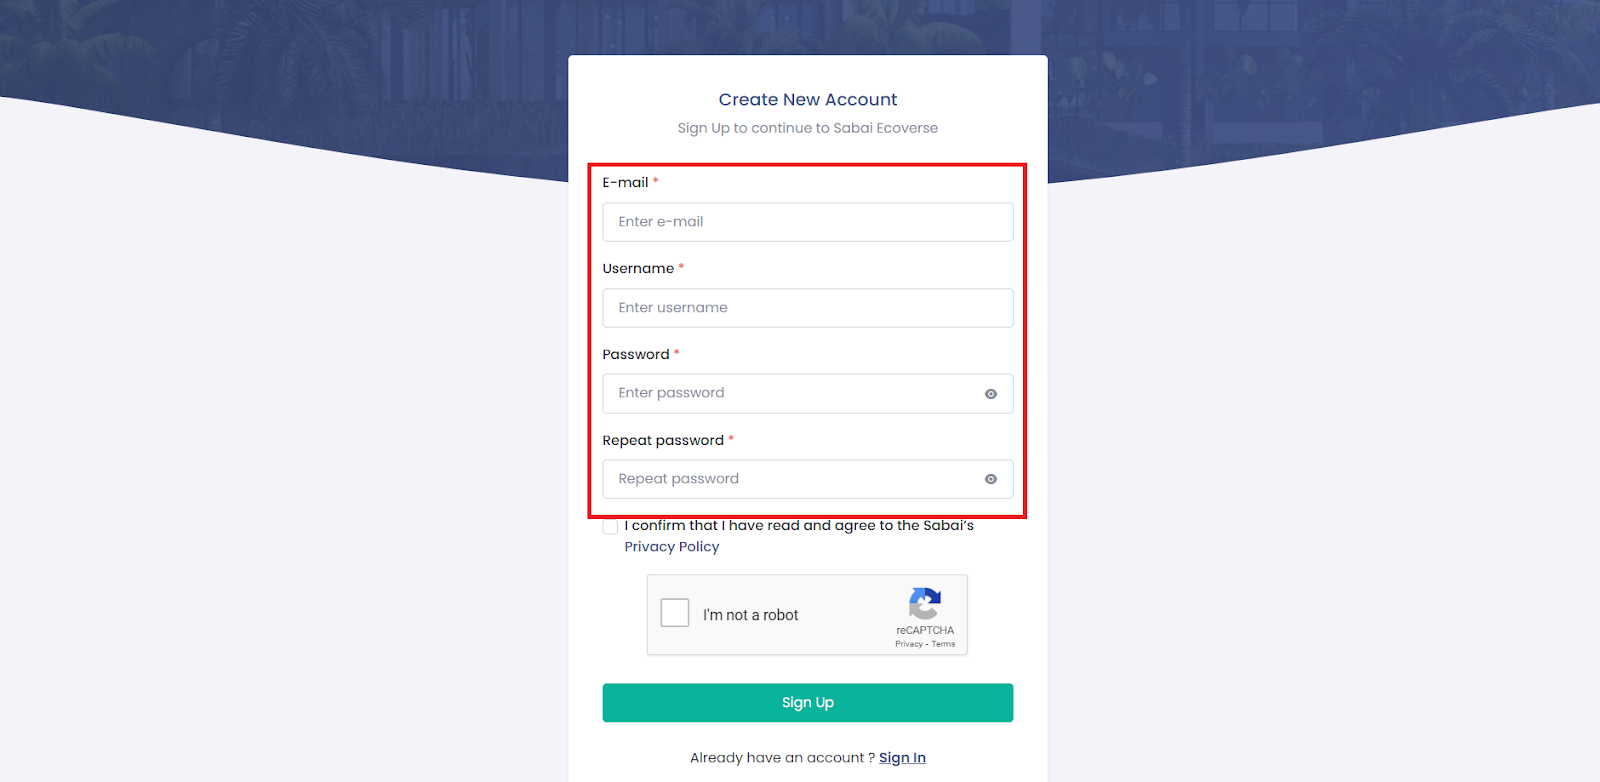
3. Review the Privacy Policy and check the corresponding box.
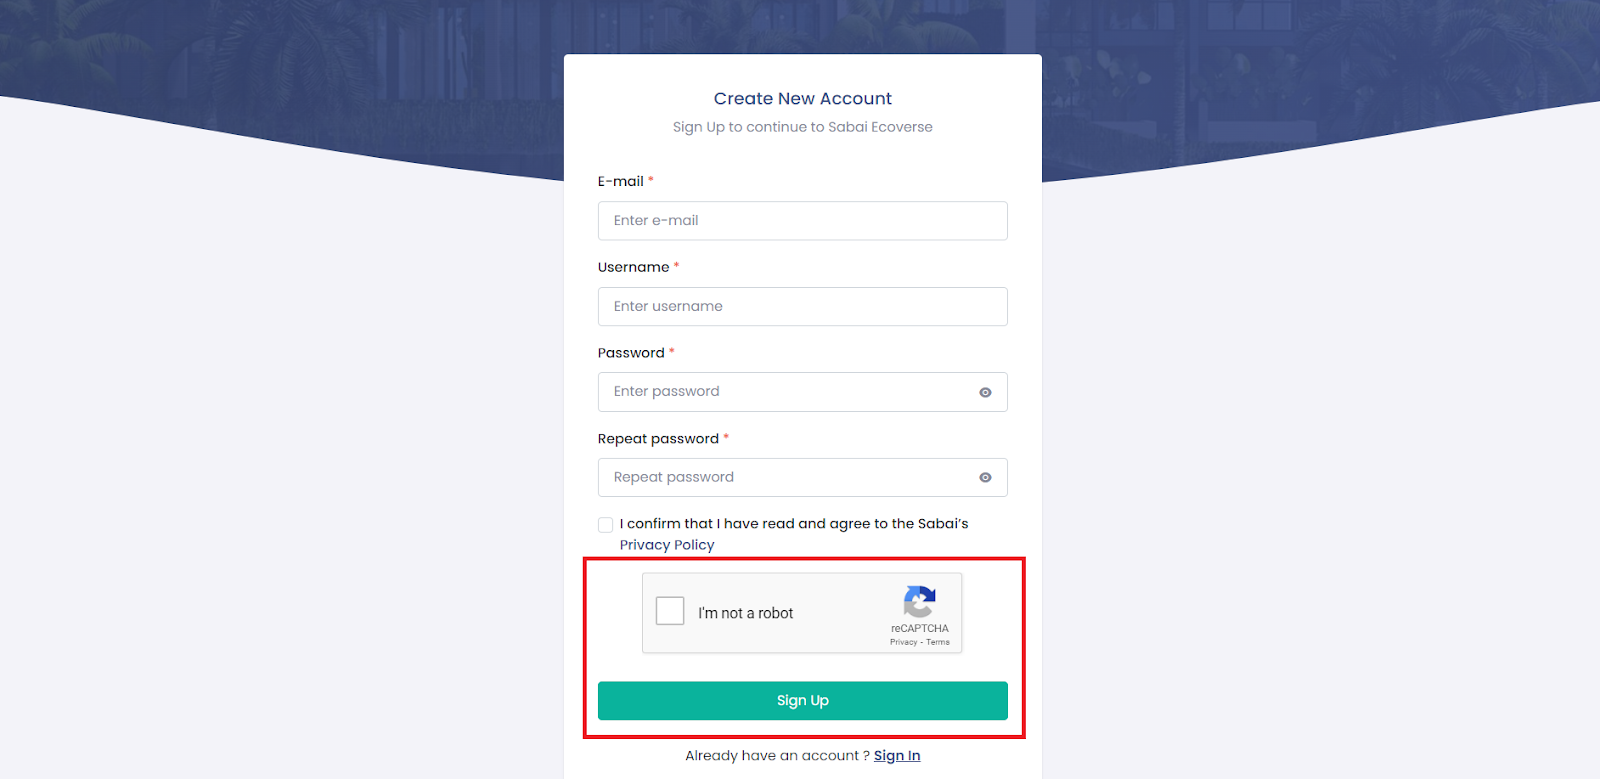
4. Complete the CAPTCHA and click "Sign Up" at the bottom of the form.
5. Enter the confirmation code from the email sent to your provided email address and click "Confirm".
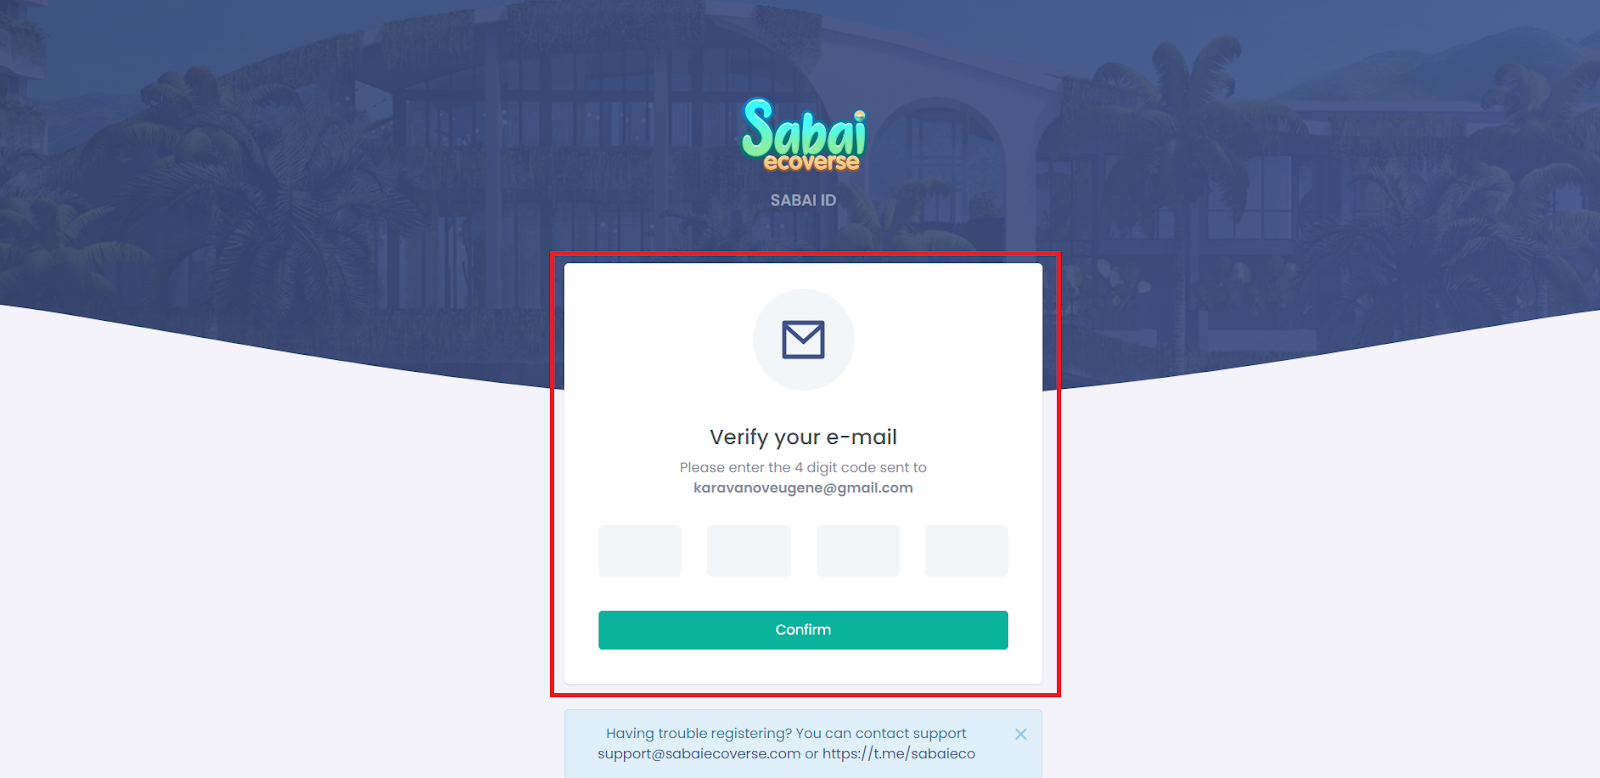
6. Congratulations! You are now registered!
Step 2: Create a MetaMask Crypto Wallet
If you don't have a MetaMask crypto wallet yet, follow these instructions to create one:
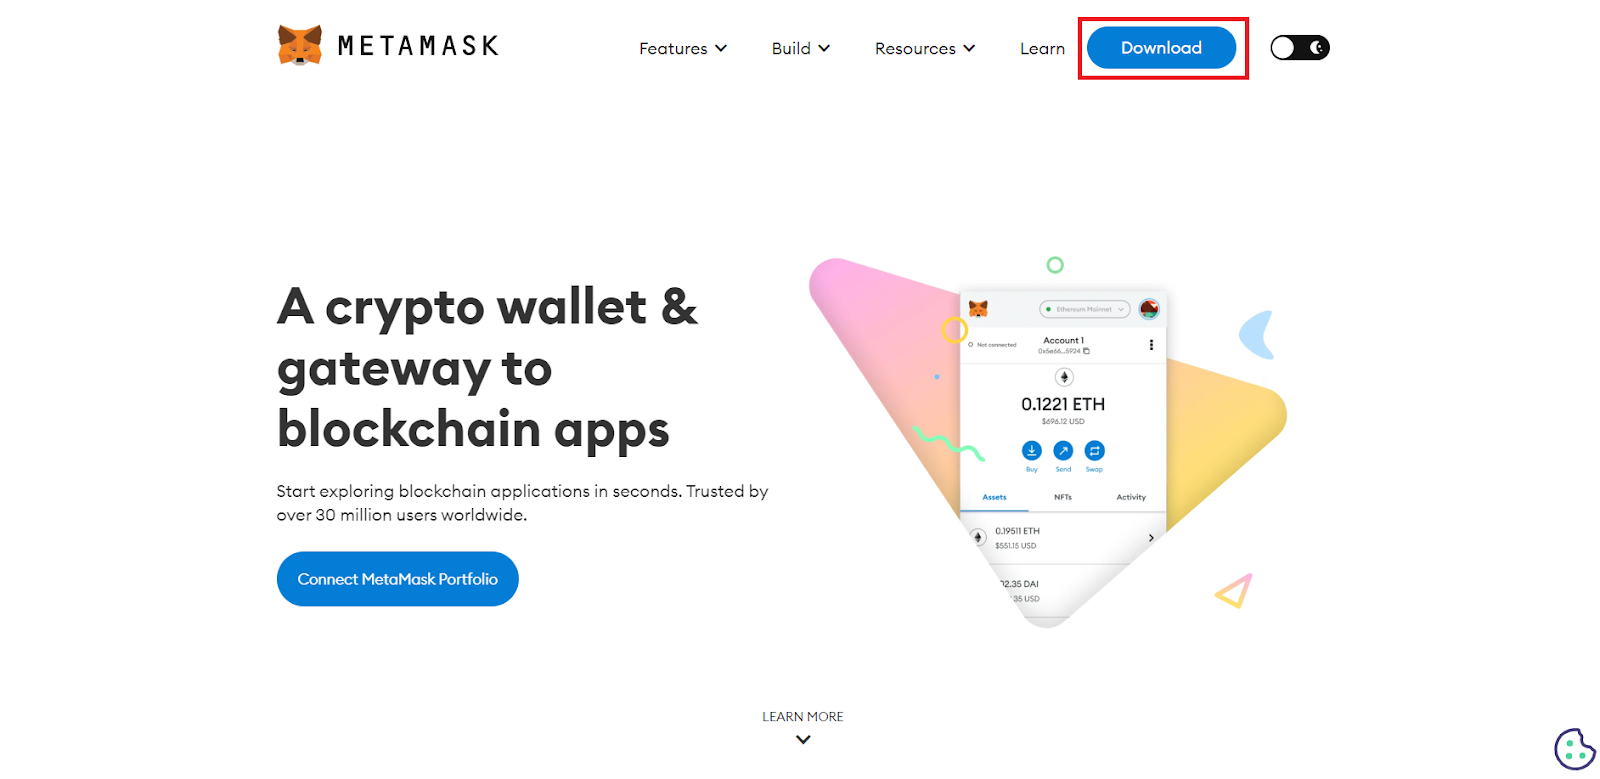
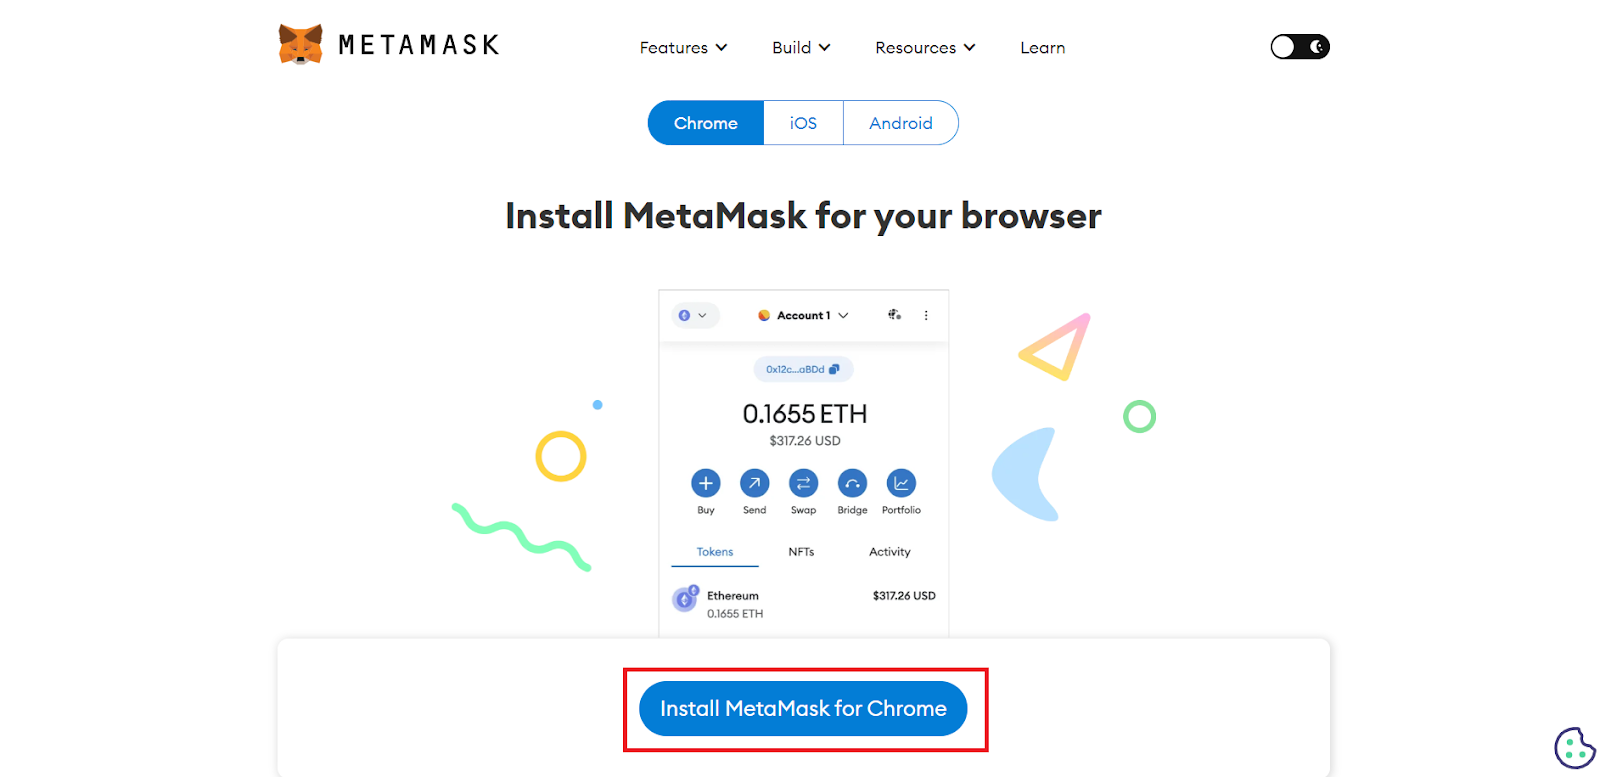
1. Visit the MetaMask website and click on “Download”.
2. Install the extension for your browser.
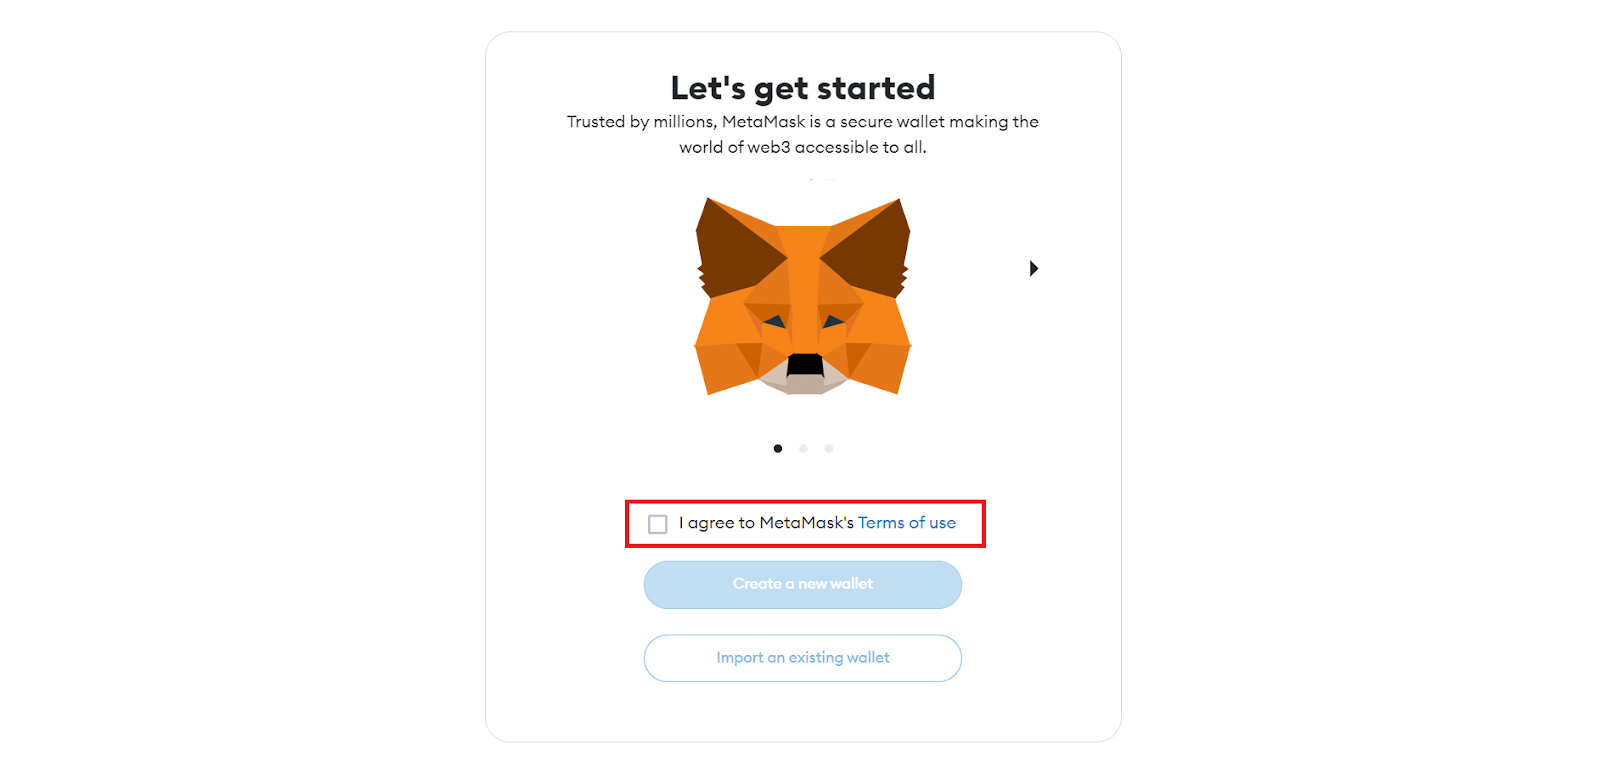
3. Review and agree to MetaMask's terms of use by checking the appropriate box.
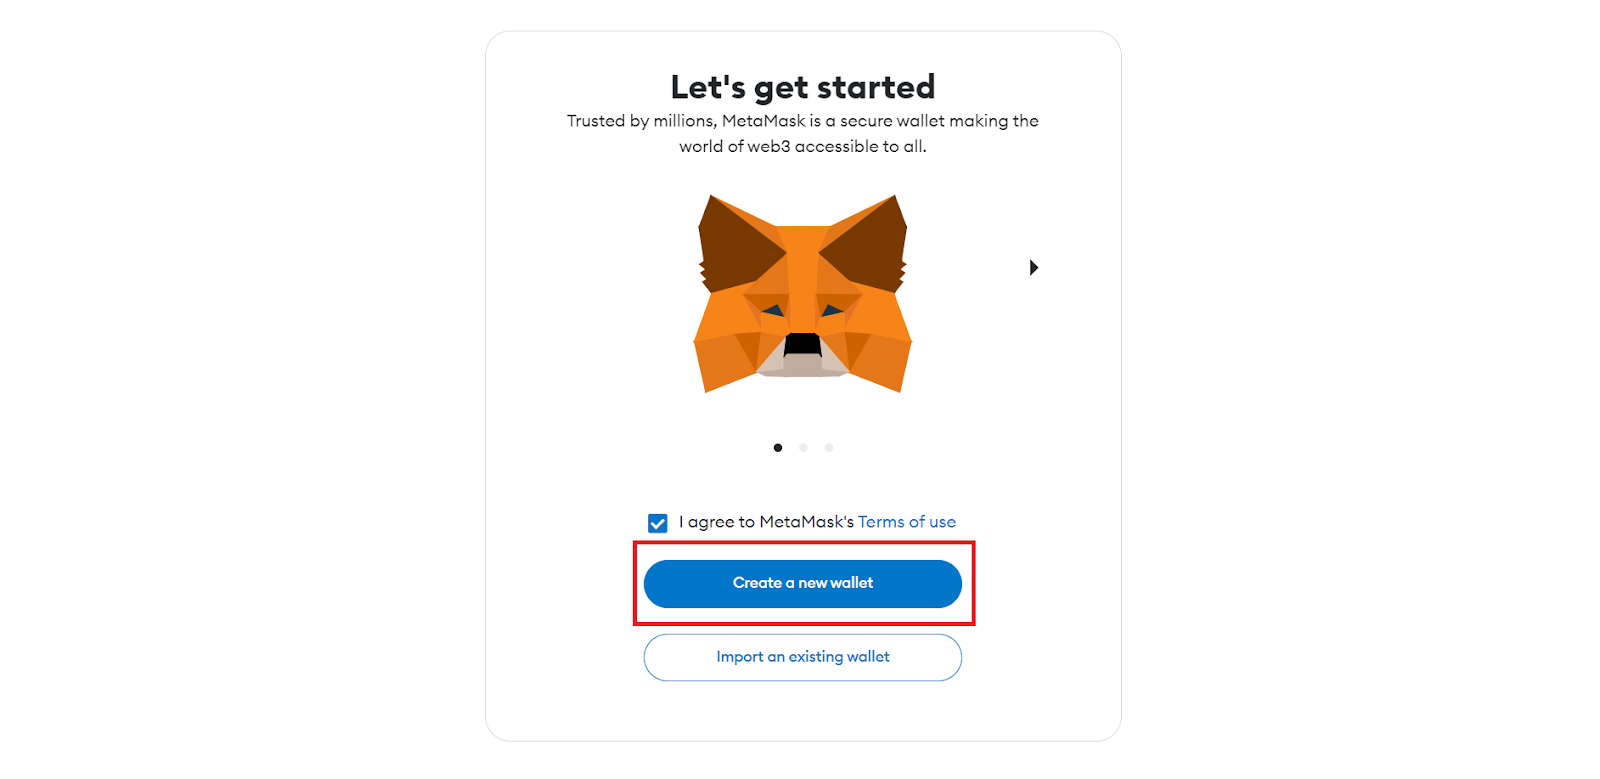
4. Click “Create a new wallet”, then read and agree to the information provided in the pop-up window.
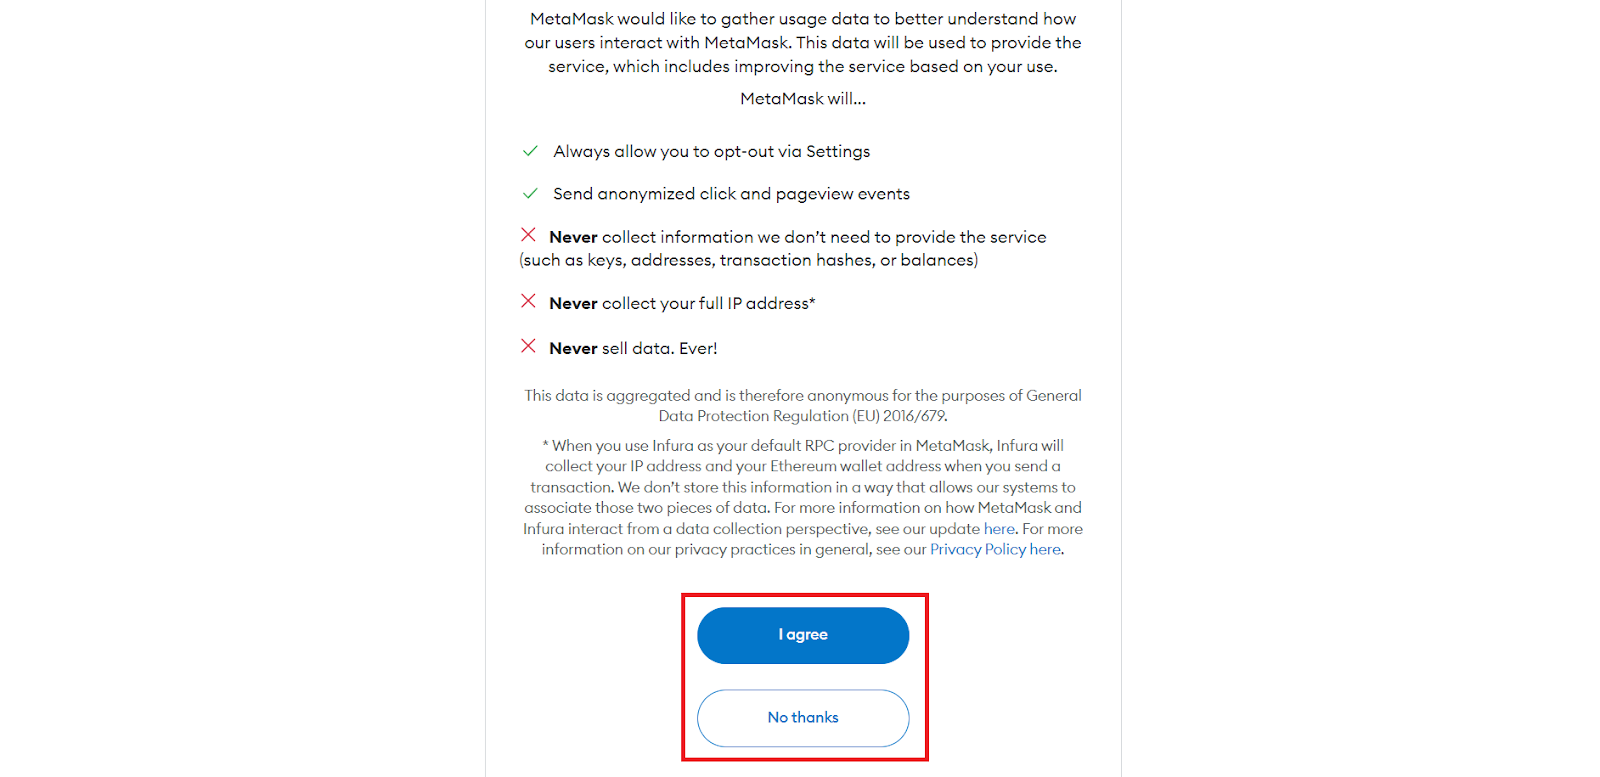
5. Agree (or decline) to data collection by MetaMask.
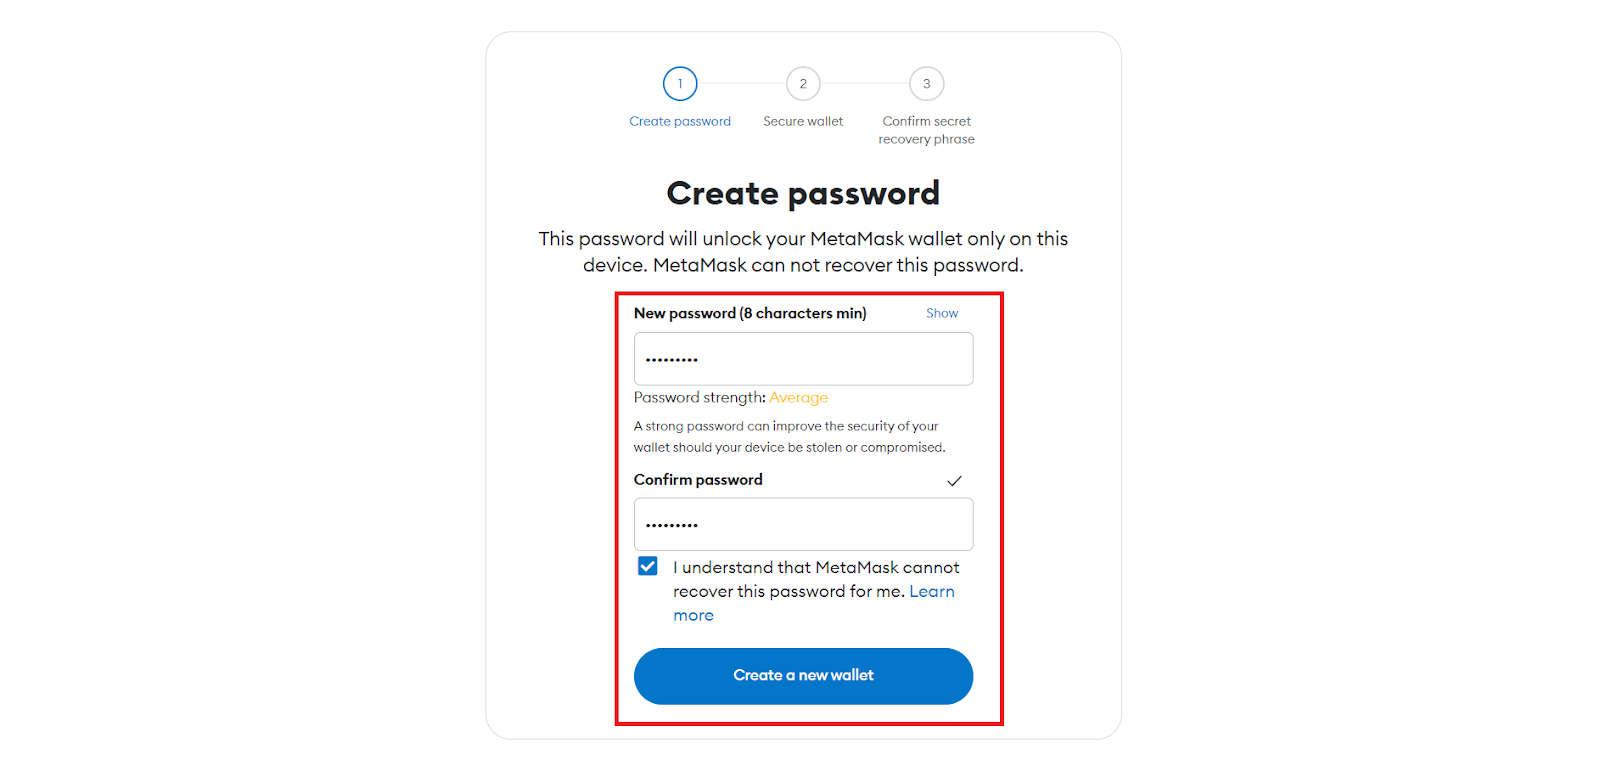
6. Create a wallet password, confirm that MetaMask cannot recover it, and click "Create a new wallet".
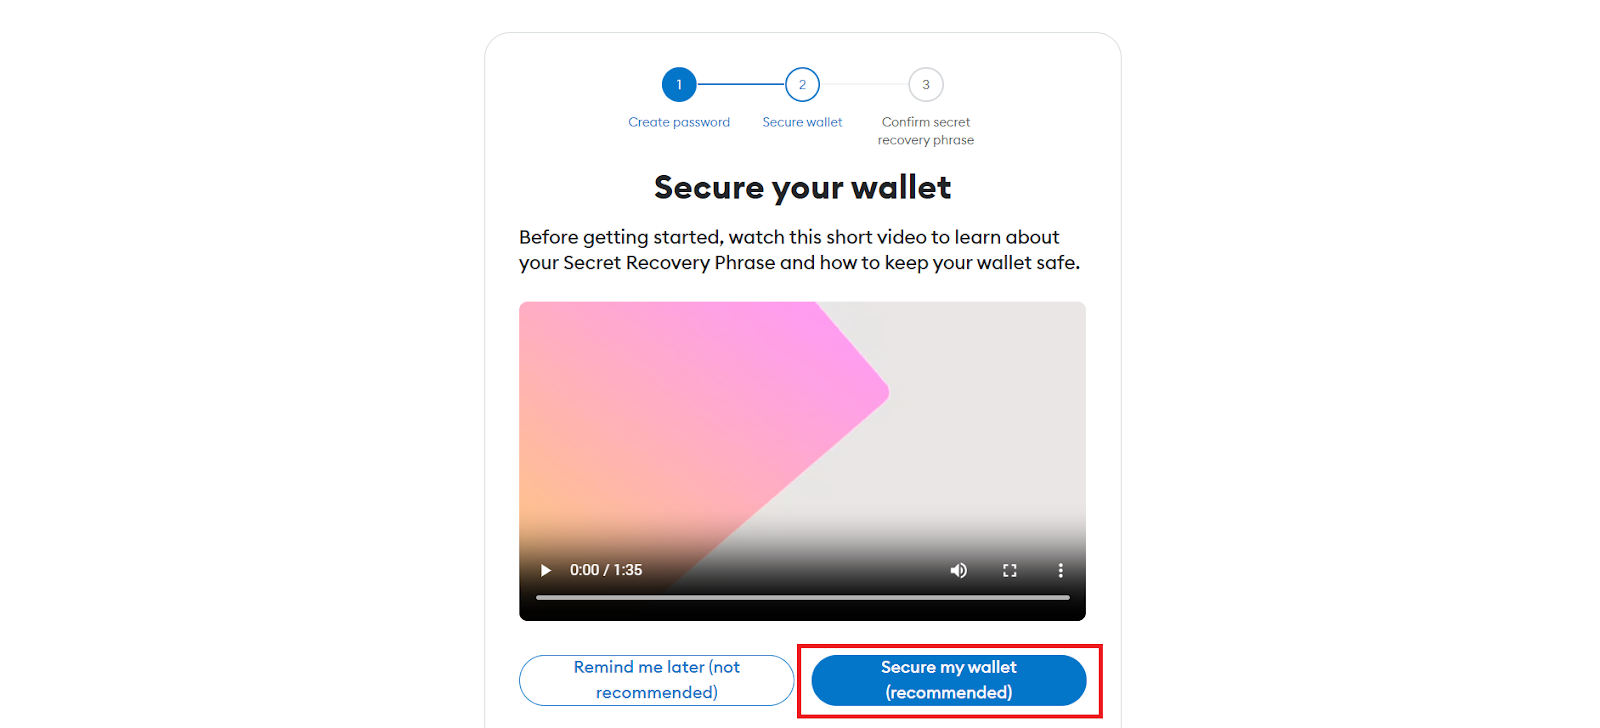
7. Click "Secure My Wallet".
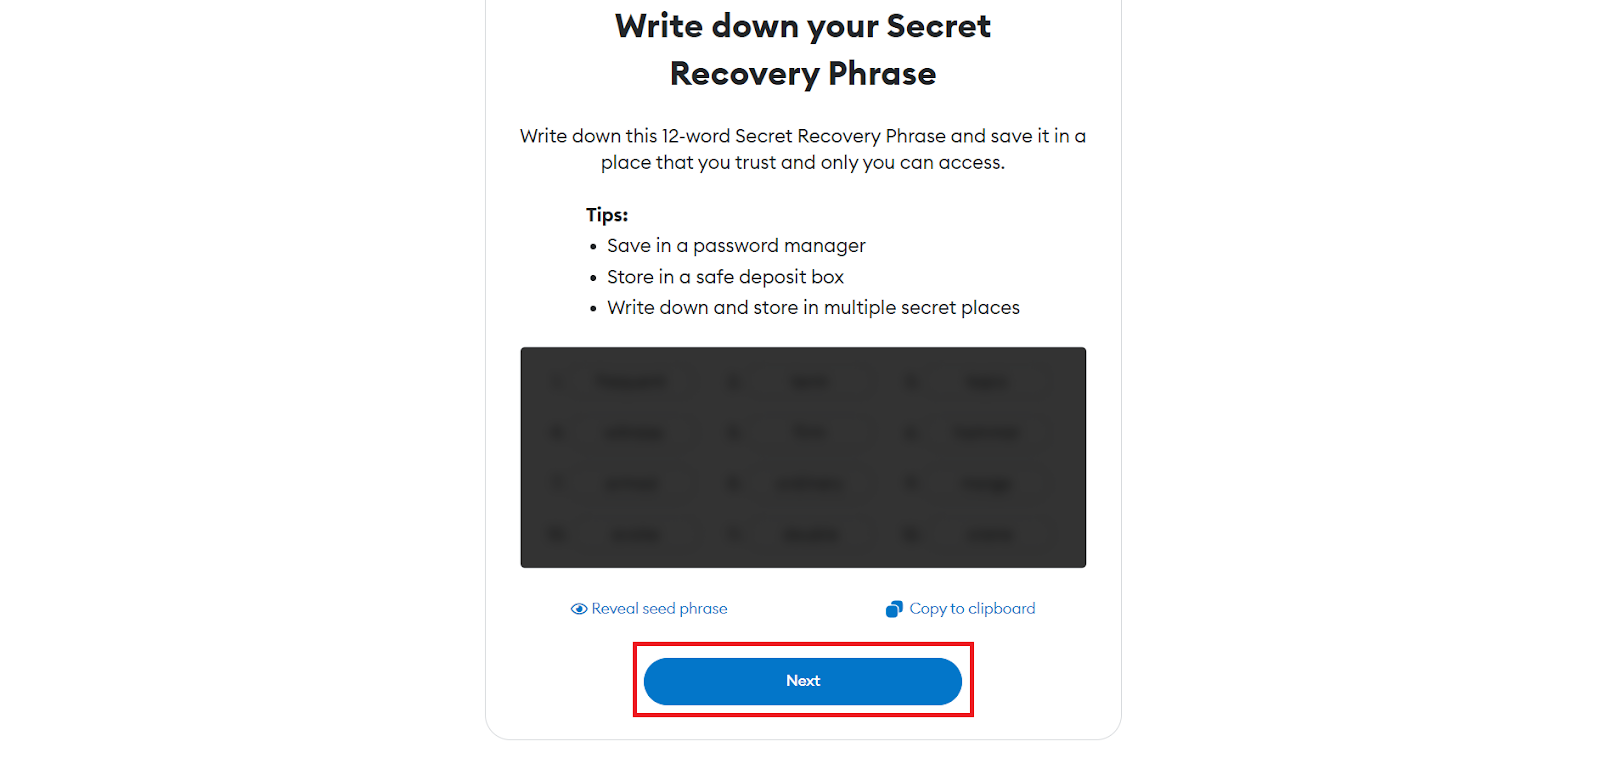
8. Click "Reveal Secret Recovery Phrase".

9. Safely store your recovery phrase. Remember that you won't be able to access your wallet without it. Afterward, click "Next".
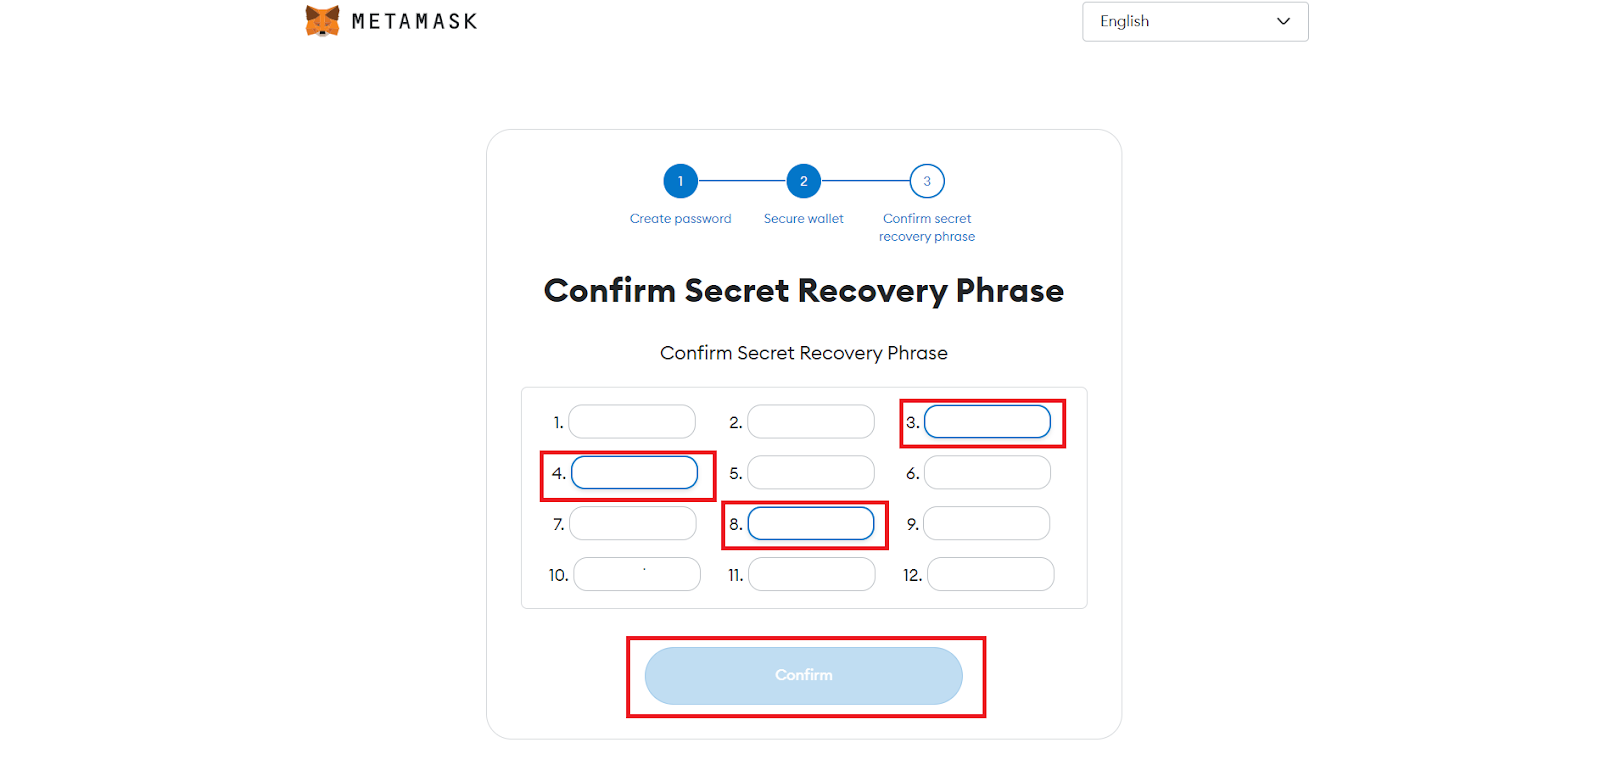
10. Confirm the recovery phrase by entering its corresponding parts in the empty fields and click "Confirm".
11. Congratulations! You've successfully created your MetaMask wallet!
Step 3: Connect MetaMask to Sabai ID
1. In Sabai ID, navigate to the "Wallet" section and then the "External Wallet" subsection.
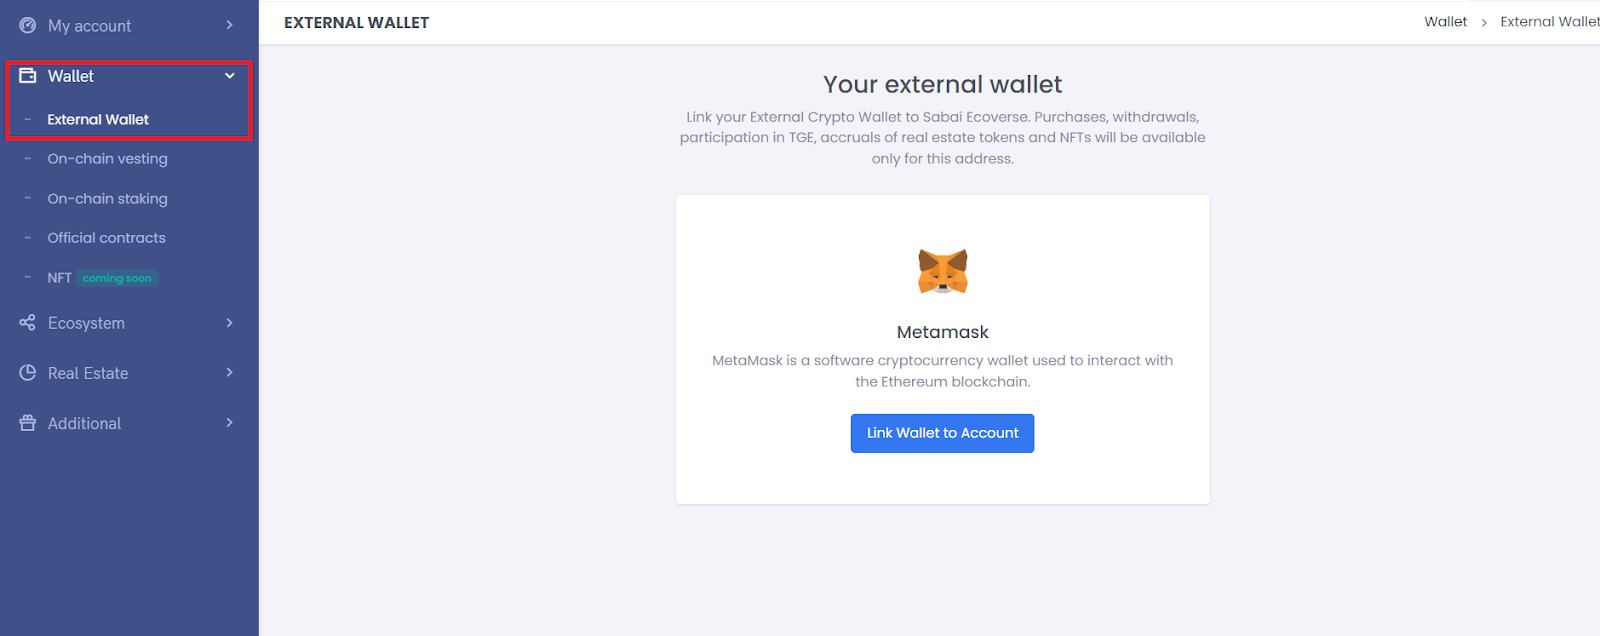
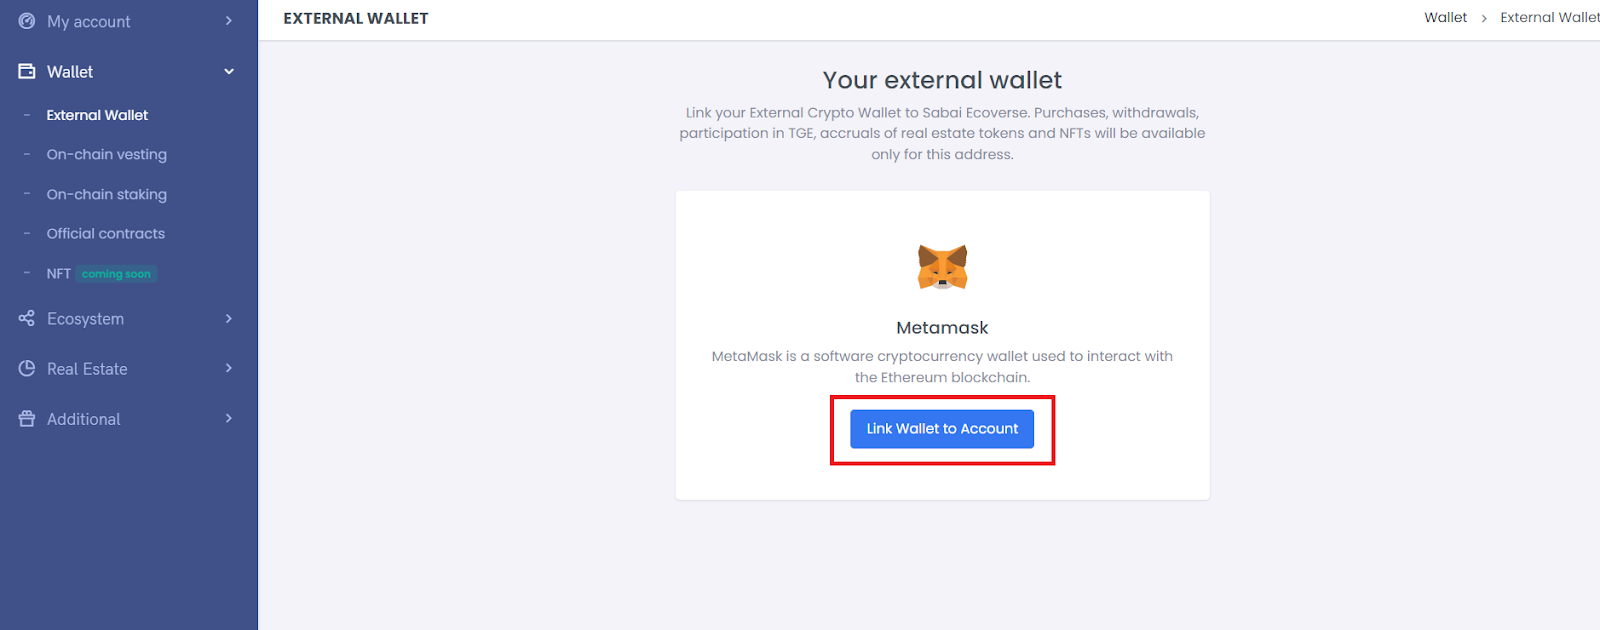
2. Click on "Link Wallet to Account".
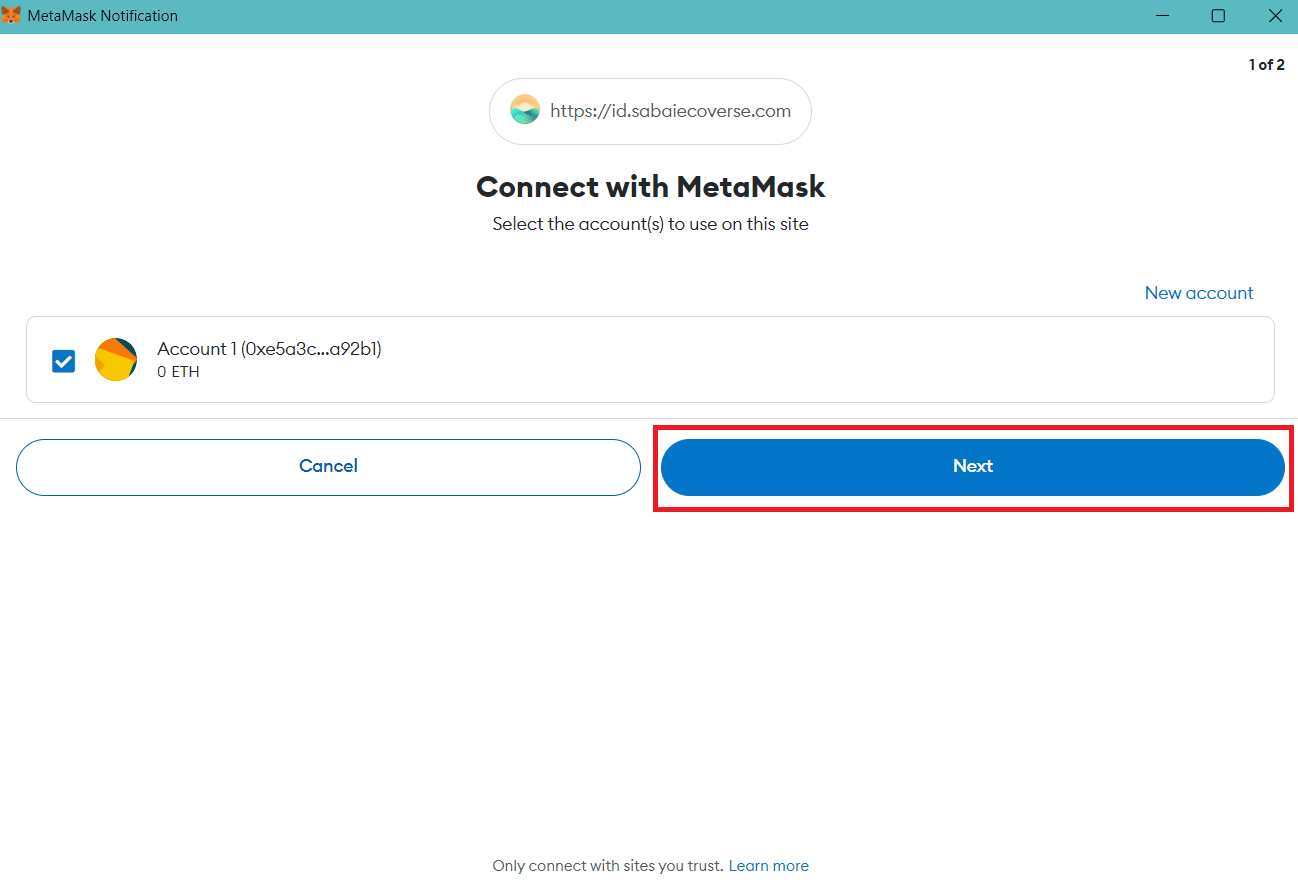
3. In the popup window that appears, click "Next".
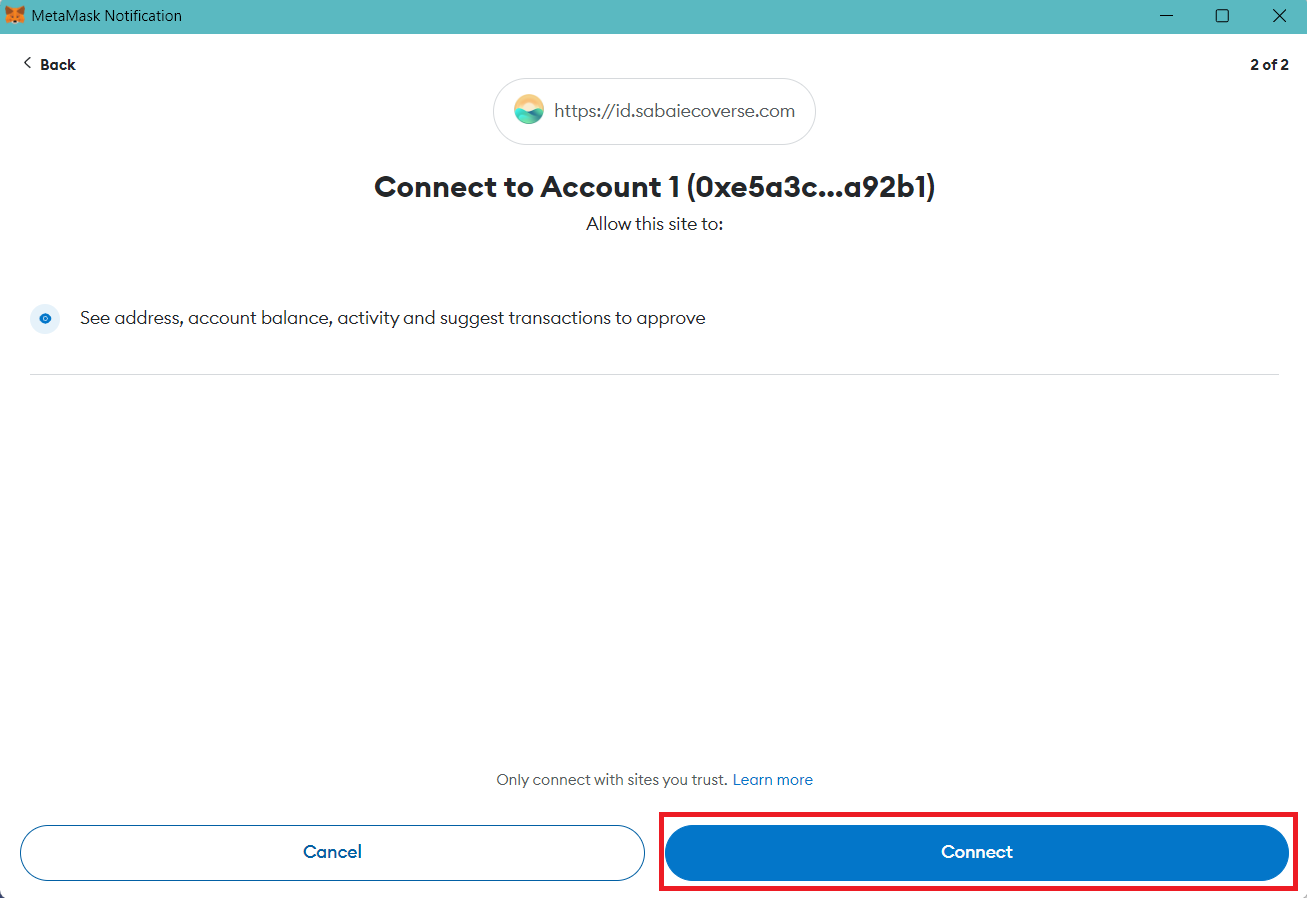
4. Next, click "Connect".
5. Then, once again, click "Link Wallet to Account".
6. Congratulations! Your MetaMask cryptocurrency wallet is now successfully linked to Sabai ID.
❗️ATTENTION! At the moment, MetaMask can only be reliably connected in the desktop version.
Step 4: Purchase $SABAI Tokens
To start staking $SABAI tokens and utilize the income boost later, you will need two cryptocurrencies: $SABAI tokens and MATIC. The first one is the token of the Sabai Ecoverse project, which you will stake. The second is the native token of the Polygon blockchain, used for transaction fees when working with $SABAI tokens.
Currently, $SABAI tokens can be purchased on CEX BitMart and DEX UniSwap for USDT. USDT and MATIC are available on most centralized and decentralized exchanges, but we recommend using BitMart and UniSwap for the exchange process, following the steps provided below.
❗️Important!
- If you already have MATIC and $SABAI tokens in your wallet, you can skip steps 4.1 to 4.7.
- If you already have MATIC and USDT on the Polygon network in your wallet, you can skip steps 4.1 to 4.6.
Step 4.1: Sign Up on BitMart
If you don't have an account on the BitMart exchange yet, start by registering one:
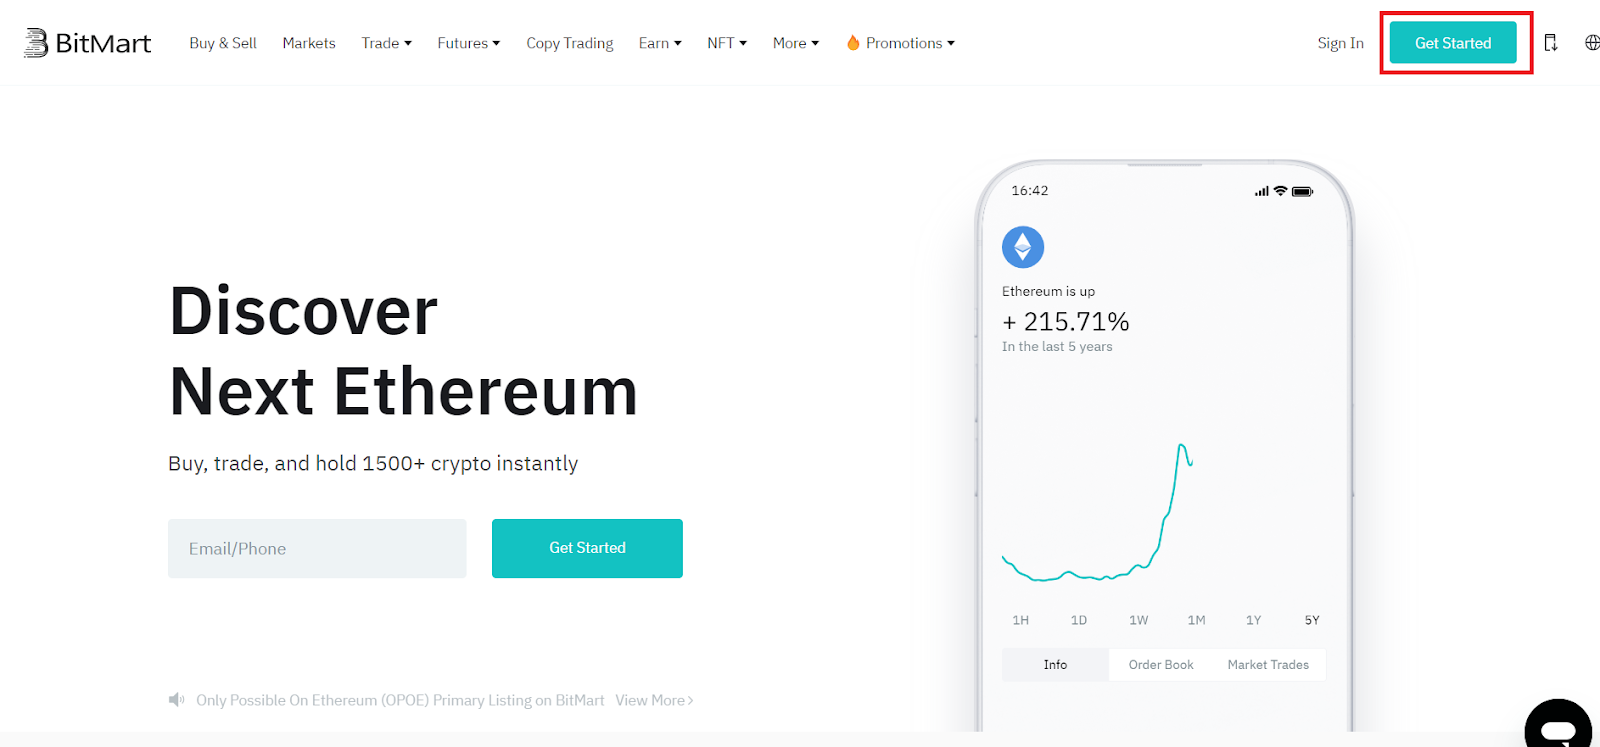
1. Go to the BitMart website and click "Get Started".
2. Enter your email (or phone number) and password.
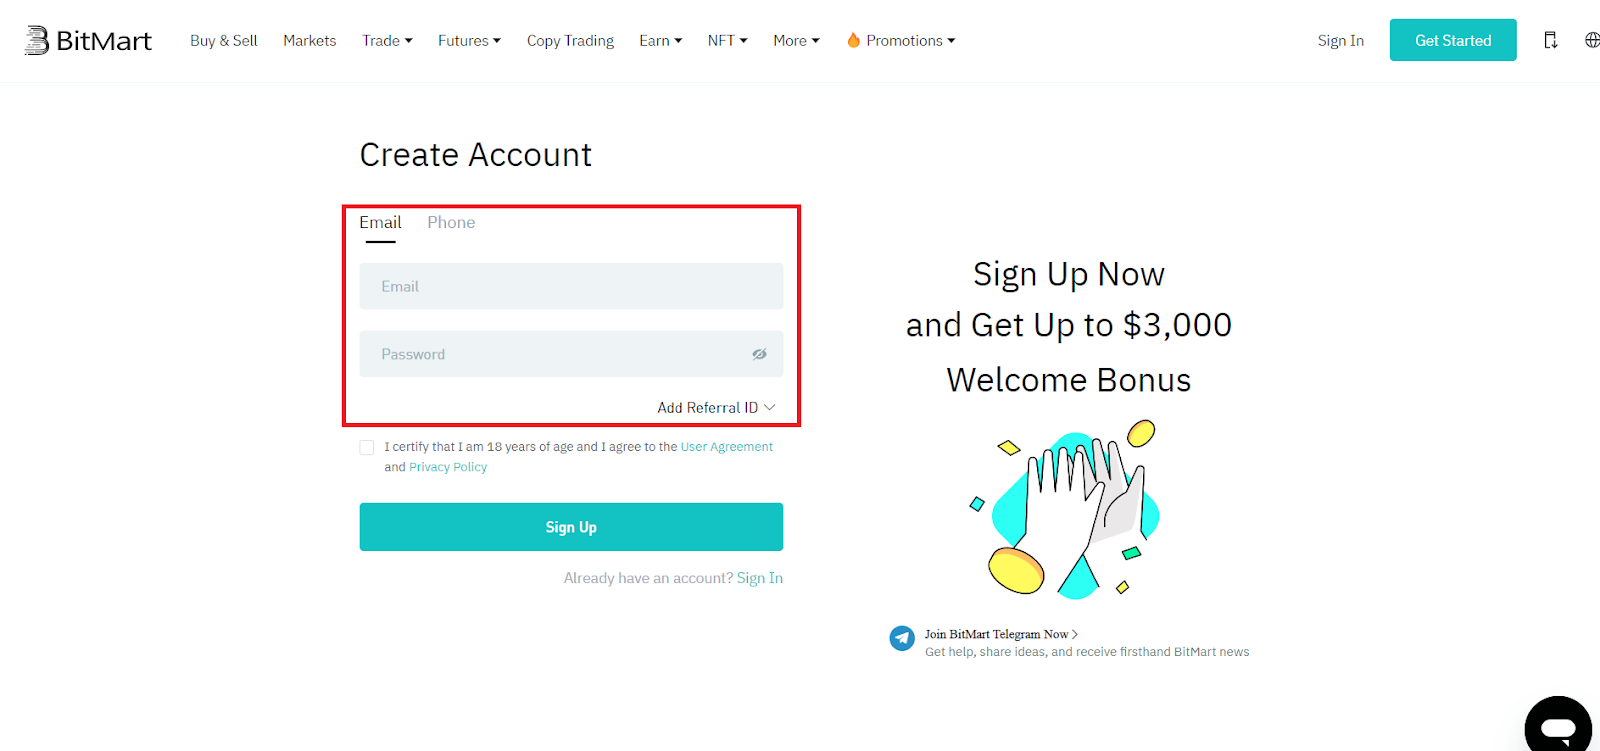
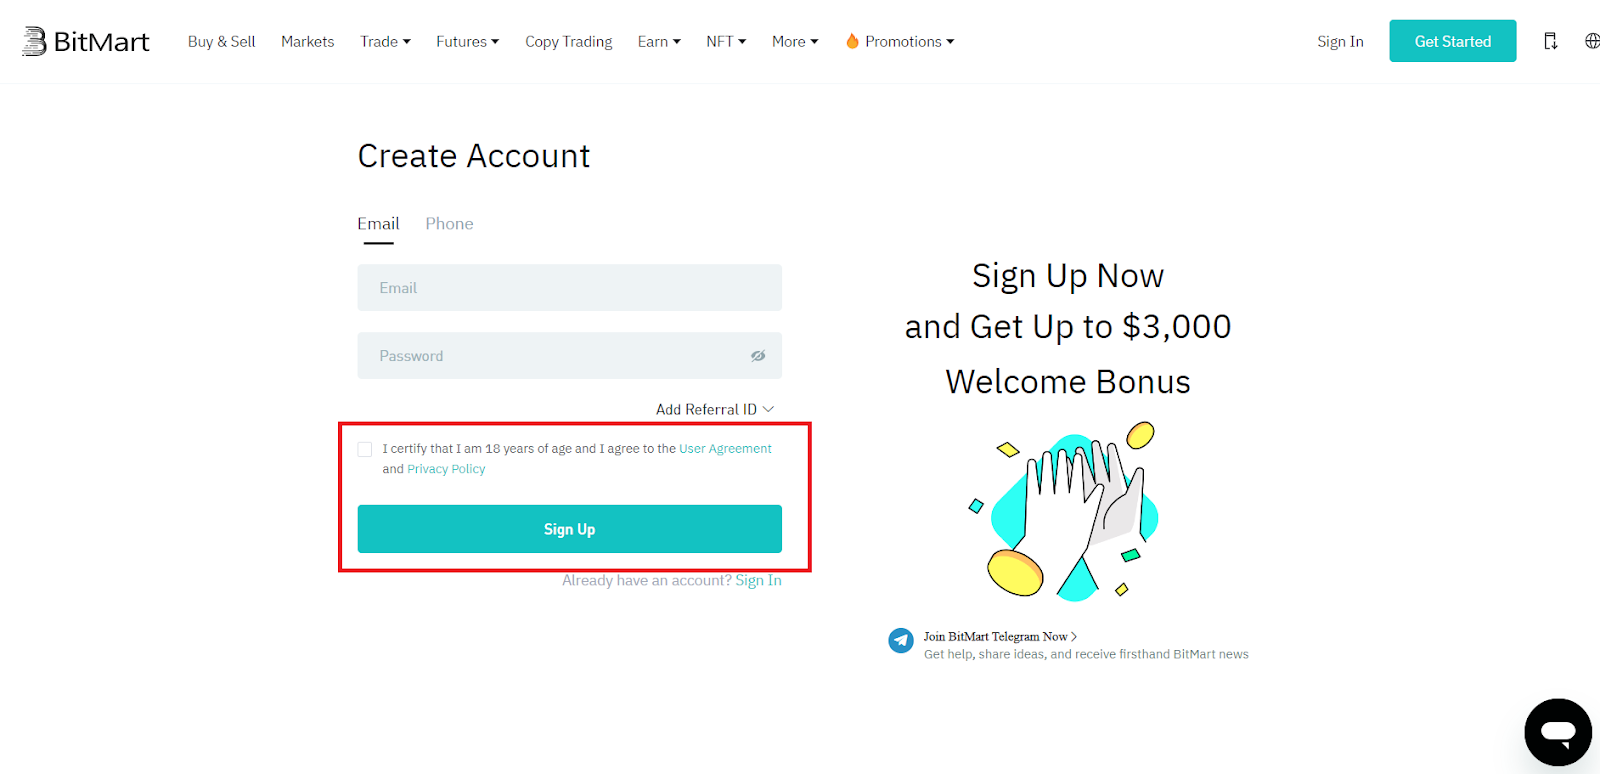
3. Confirm that you are at least 18 years old and agree to the User Agreement and Privacy Policy after reviewing them by checking the respective box, and then click "Register".
4. After that, enter the code sent to your email/phone and click "Submit".
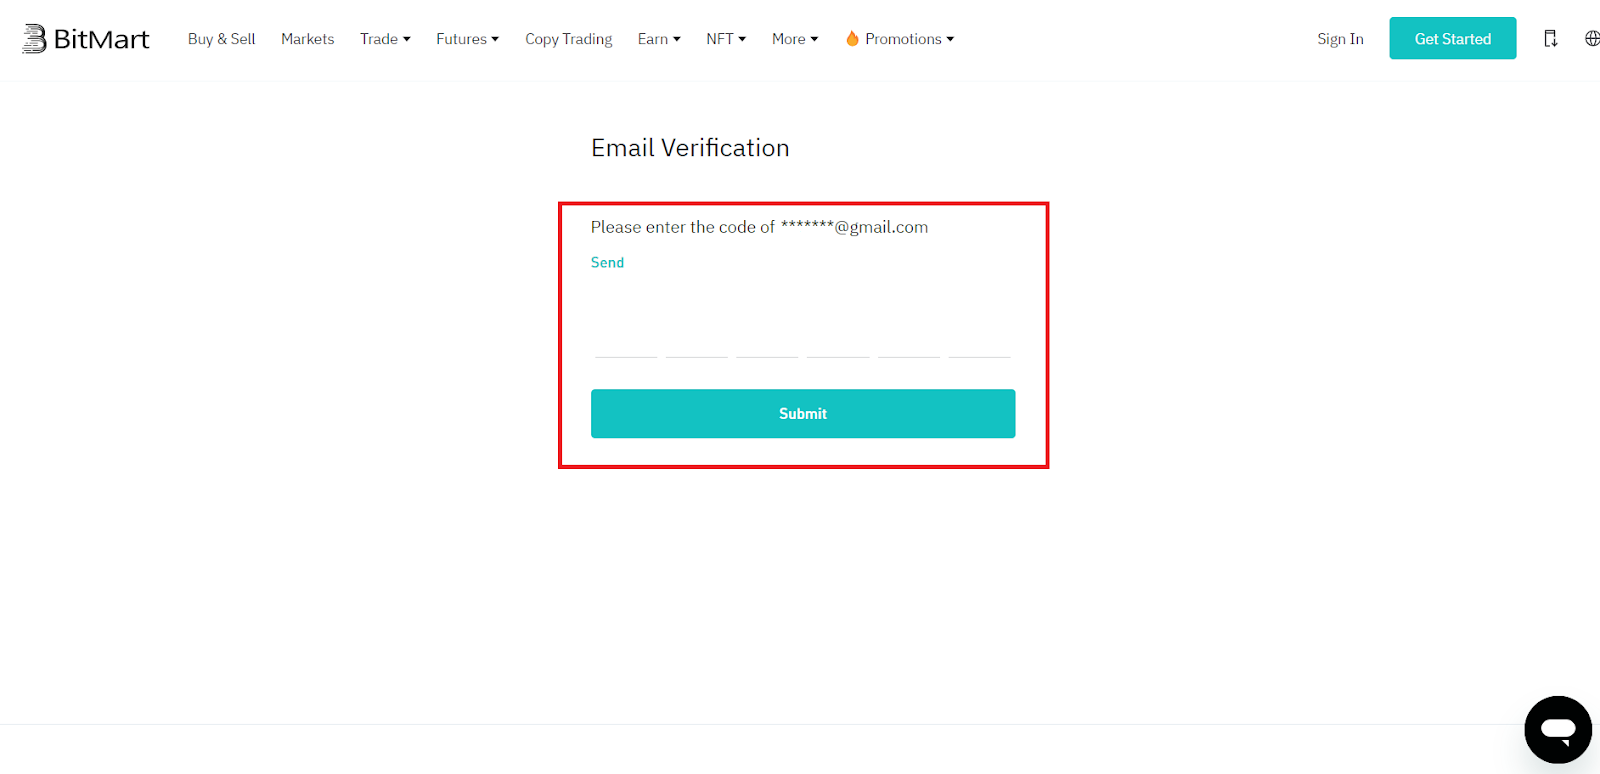
5. Congratulations! You have successfully registered on BitMart exchange!
Step 4.2: Complete the Verification
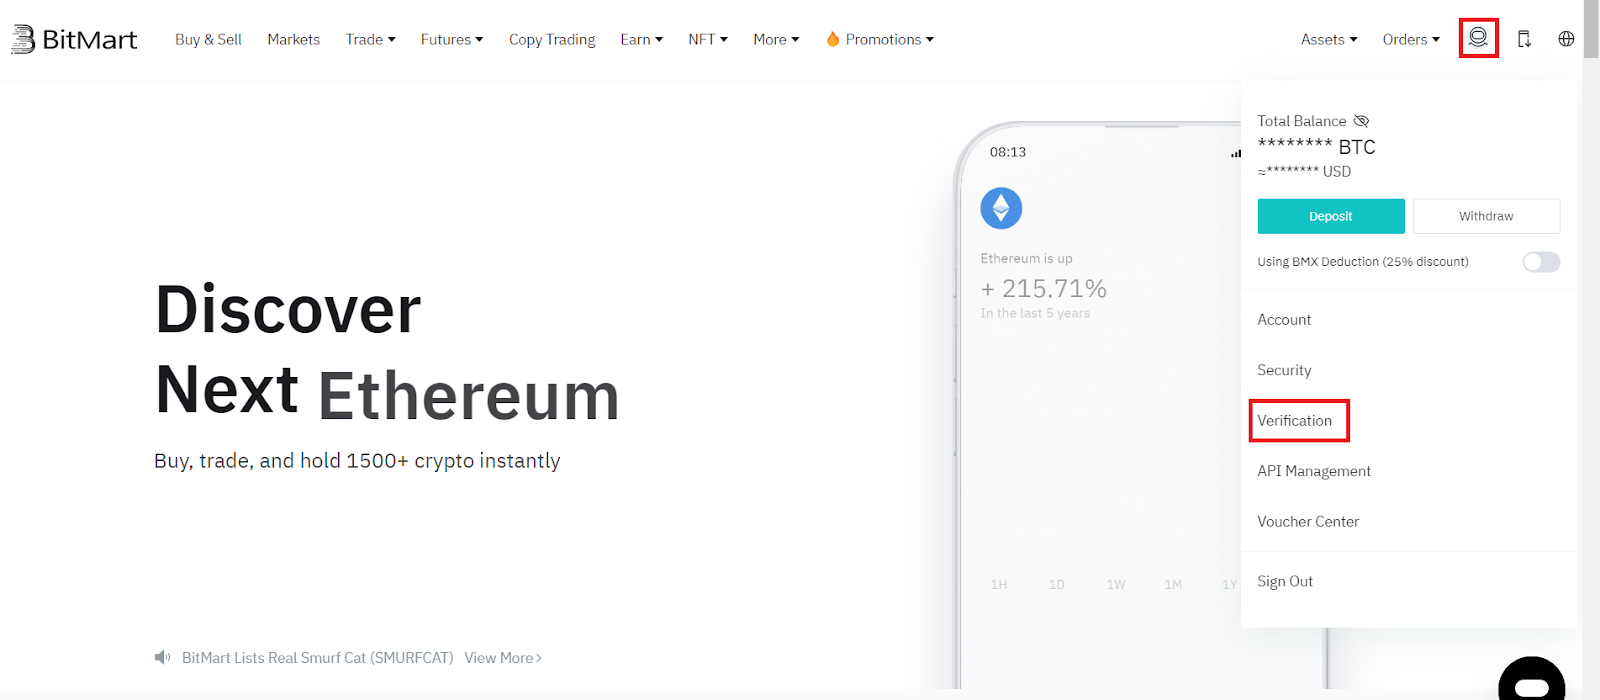
1. Before accessing your BitMart account, hover over your profile picture and click on "Verification".
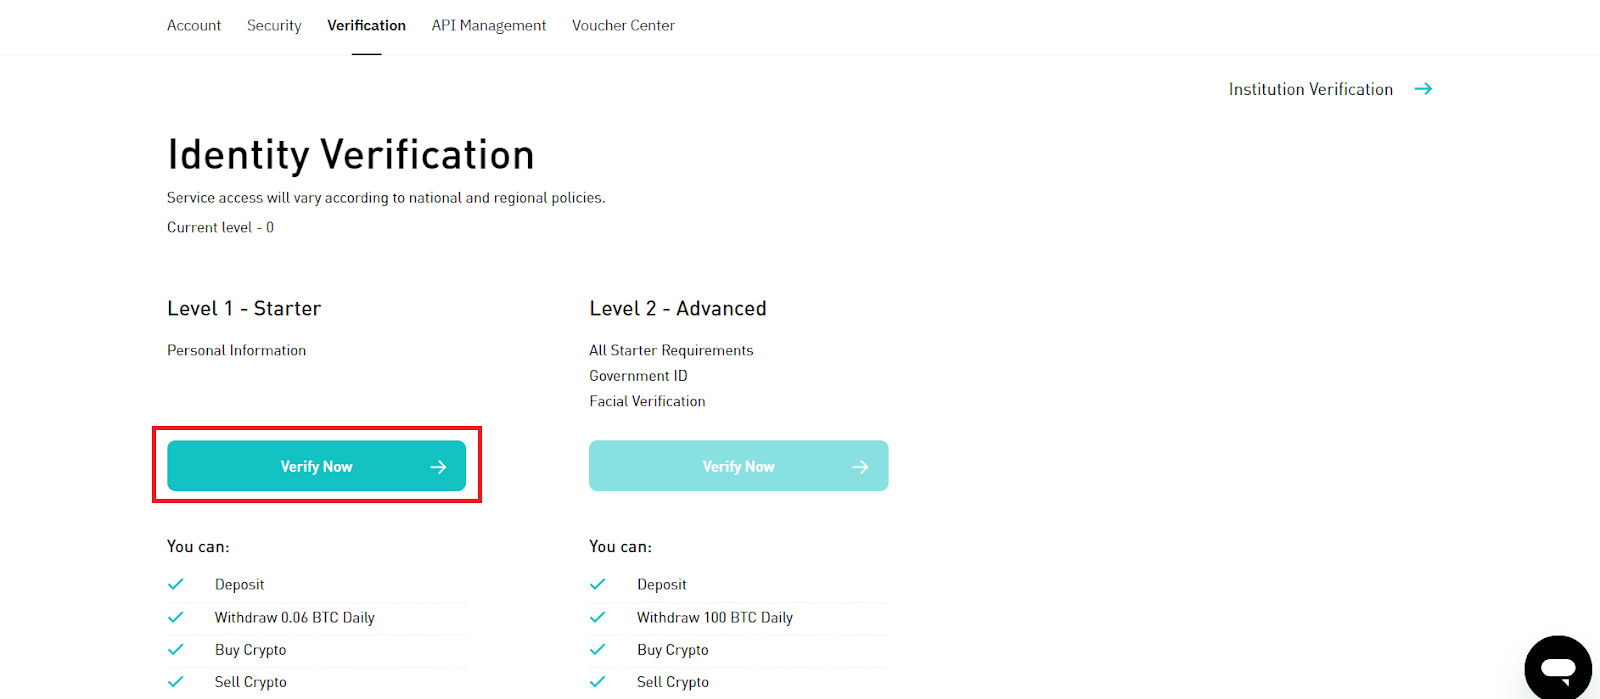
2. Next, click "Verify Now" to complete Level 1 verification – Starter.
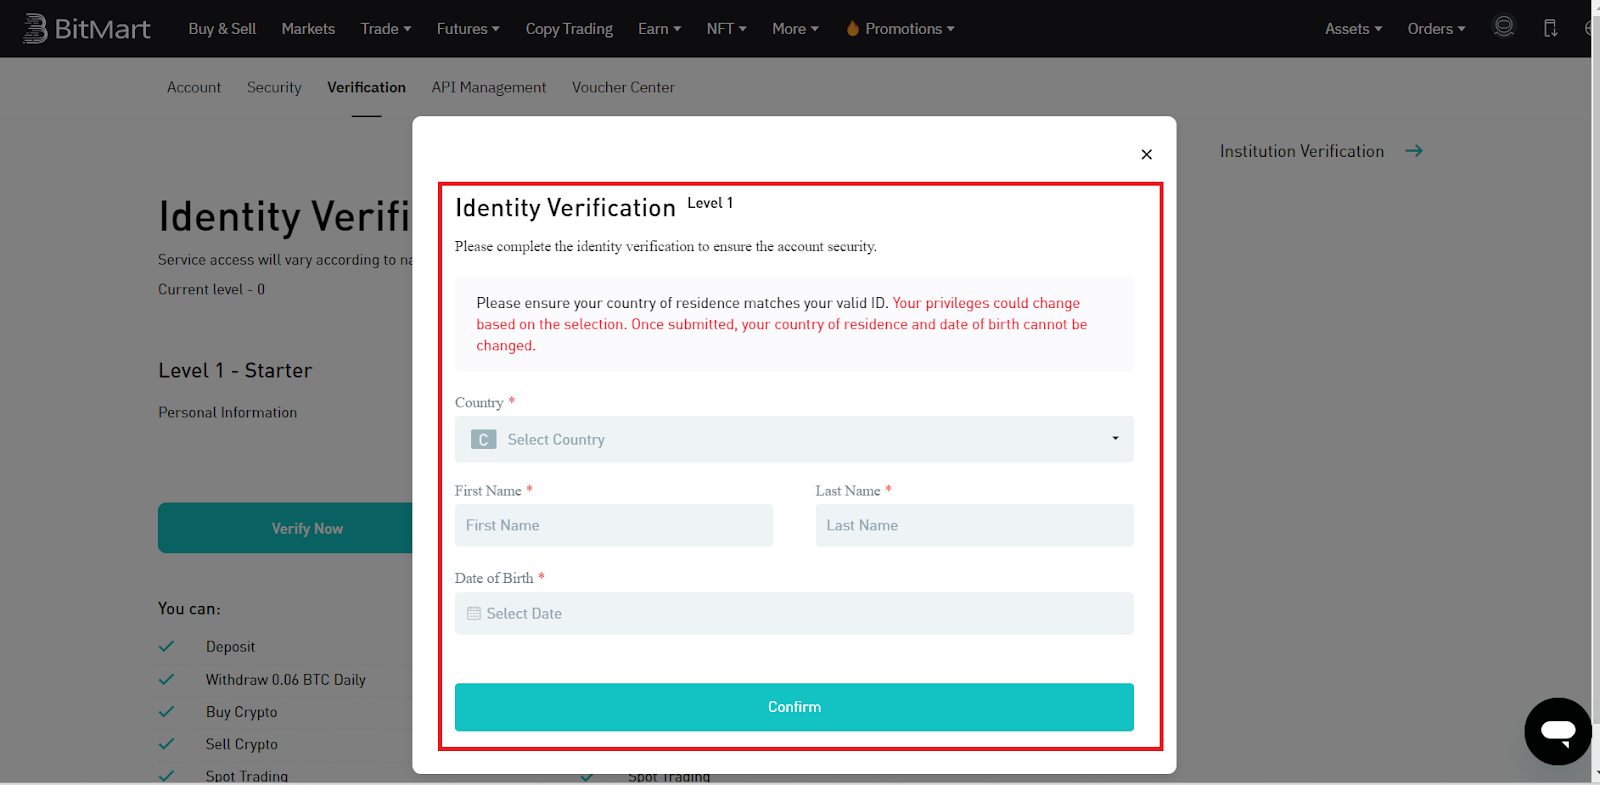
3. In the pop-up window, fill in the fields with accurate information and click "Confirm".
4. Congratulations! You have successfully completed the verification process on BitMart exchange.
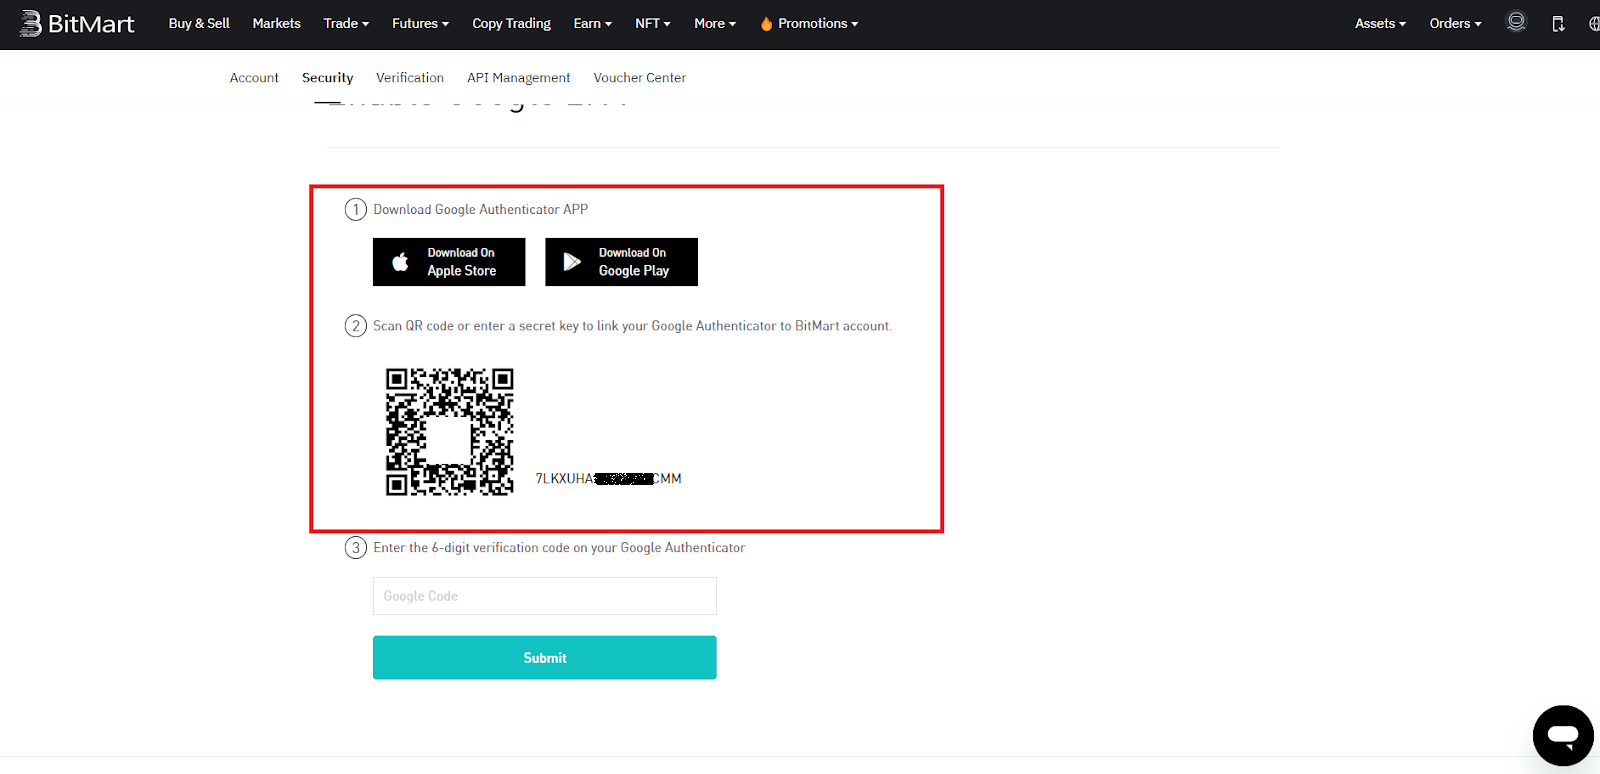
Step 4.3: Set up 2FA Protection
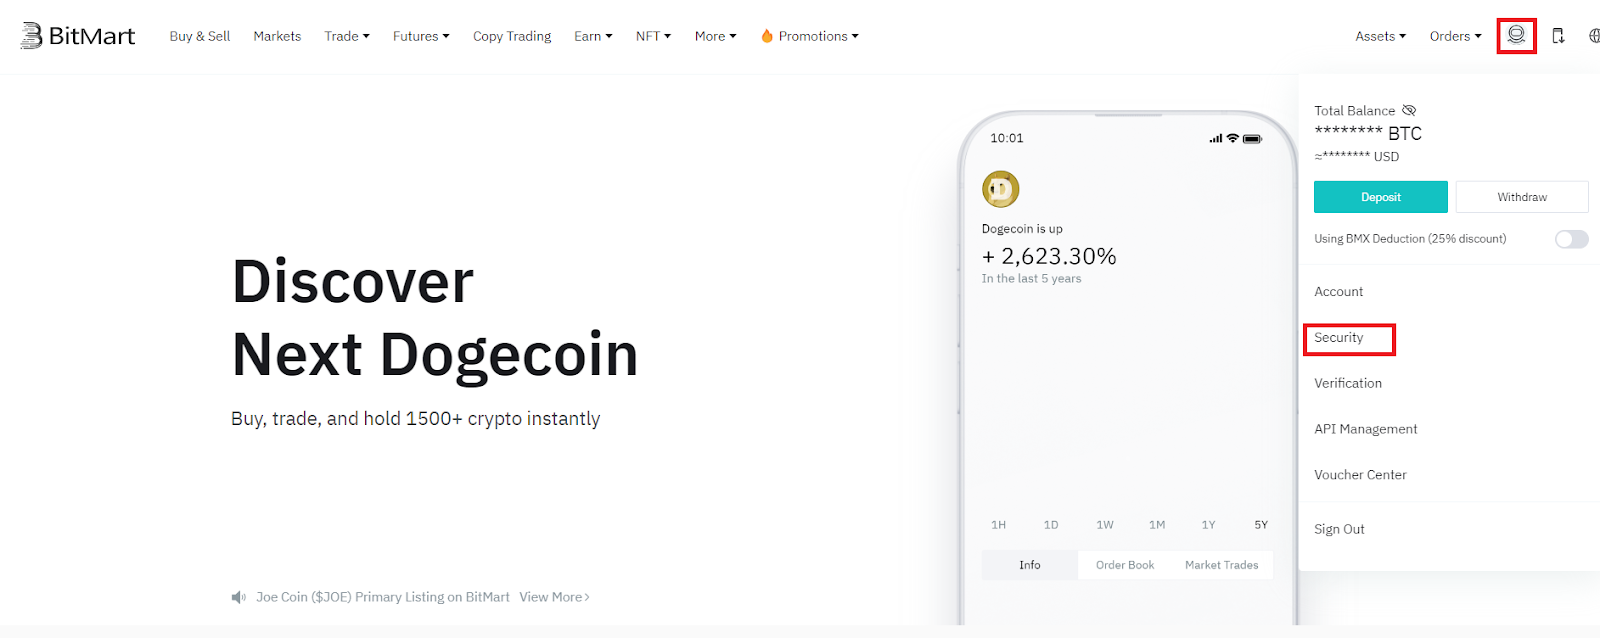
1. Once you're logged into your BitMart account, hover over your profile picture and click "Security".
2. Click "Enable" next to Google Authenticator (the preferred 2FA option, but you can choose another).

3. Download the Google Authenticator app (Android / iOS) on your smartphone, open it, and click the '+' icon in the bottom right corner of the screen. Then, select "Scan QR Code" or "Enter Setup Key". Depending on your choice, either scan the QR code or enter the key located to the right of it.
4. Enter the code from the app and click "Submit".
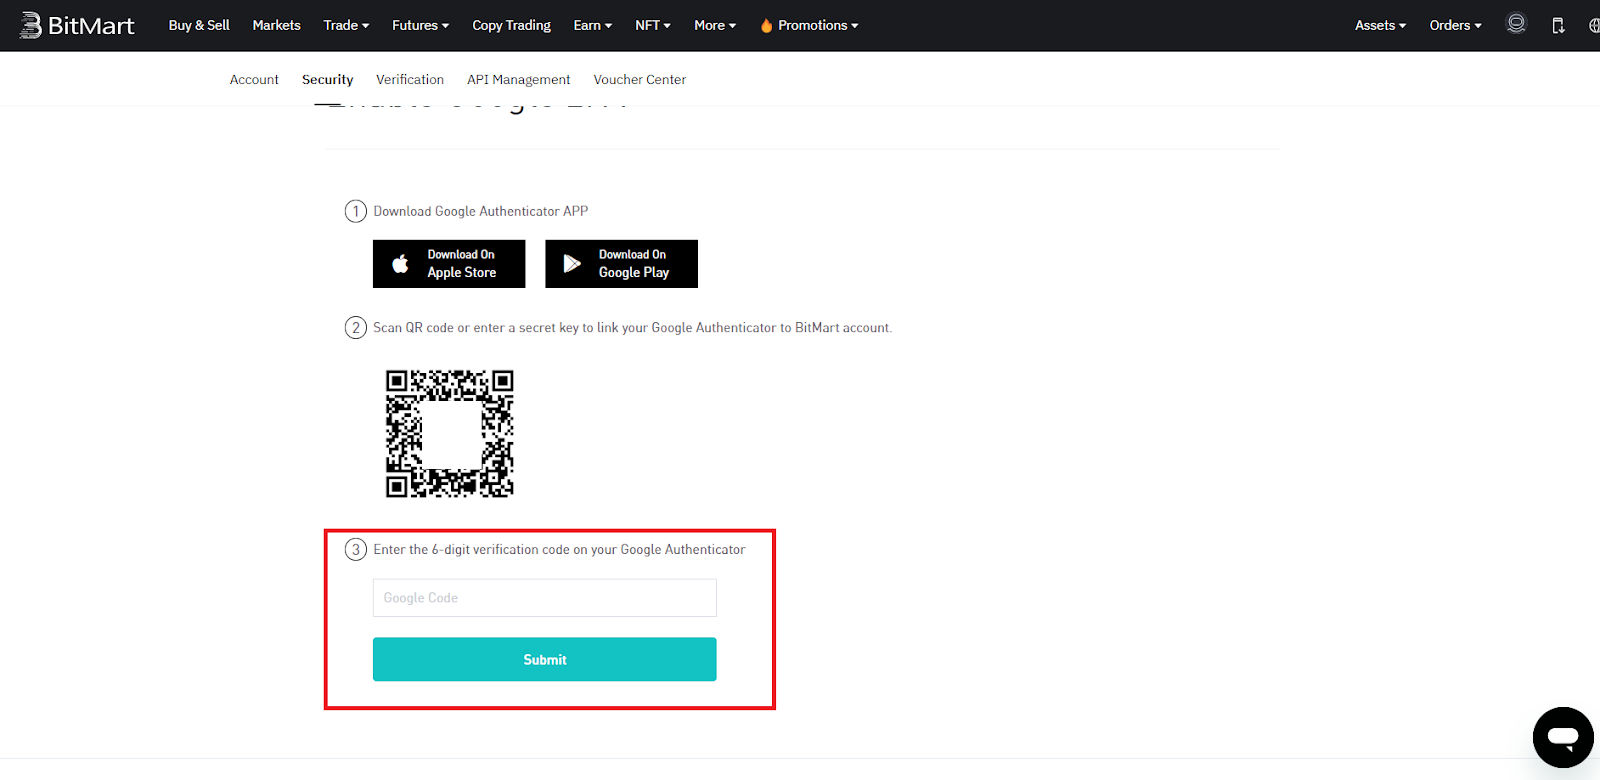
5. In the pop-up window, click "Send", enter the code from the email you received, and click "Submit". For added security, the exchange requests email confirmation to ensure it's you setting up 2FA.

6. Congratulations! You've enabled two-factor authentication.
Step 4.4: Deposit to BitMart
There are two main ways to deposit funds into BitMart exchange.
First, you can deposit the cryptocurrency you already have and later exchange it for the required coins: USDT and MATIC.
Second, you can purchase cryptocurrency (e.g., USDT) through one of the payment services offered by BitMart exchange (using fiat currency).
Below, you'll find these two deposit options. Choose the one that best suits your needs.
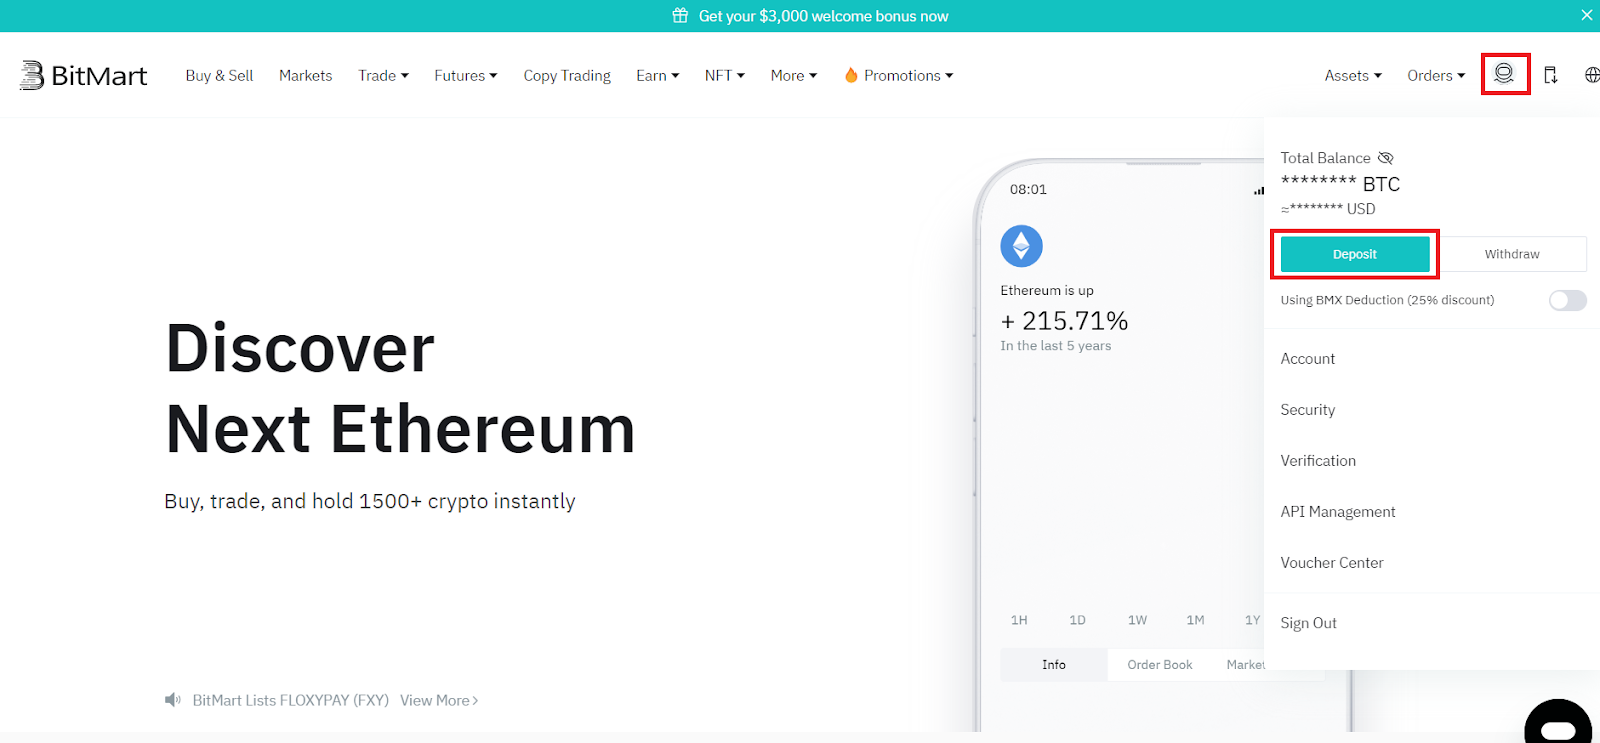
Step 4.4.1: Deposit with Cryptocurrency
1. Before accessing your BitMart account, hover over your profile picture and click "Deposit".
2. Choose the cryptocurrency you want to deposit into BitMart.
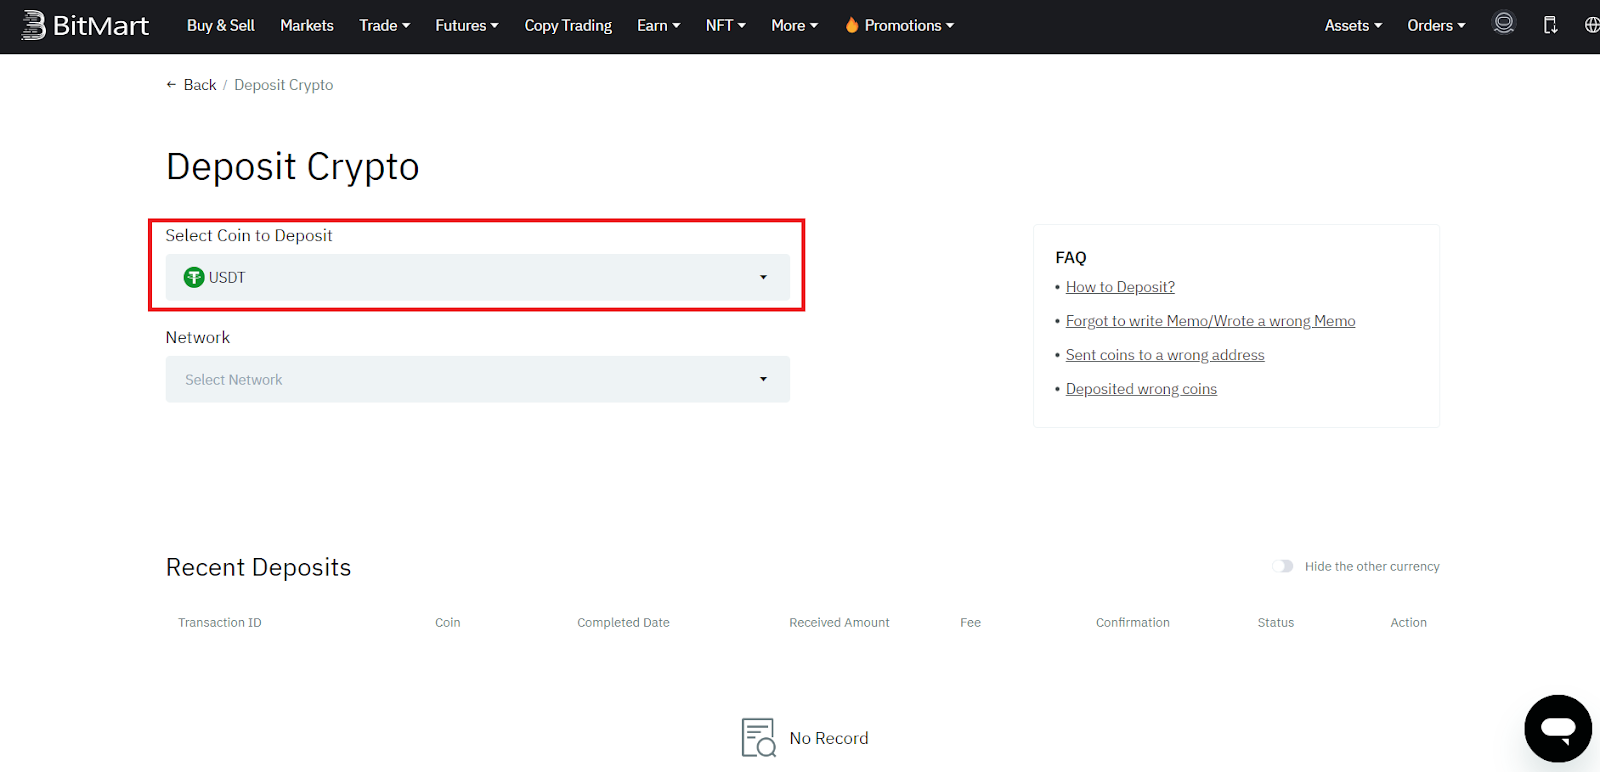
3. Select the network through which you will deposit into BitMart. Please note that the selected network should match the network in which the tokens you are sending are located. Or, if you are sending them from another centralized exchange, you should specify the same network when completing the transaction for the deposit.
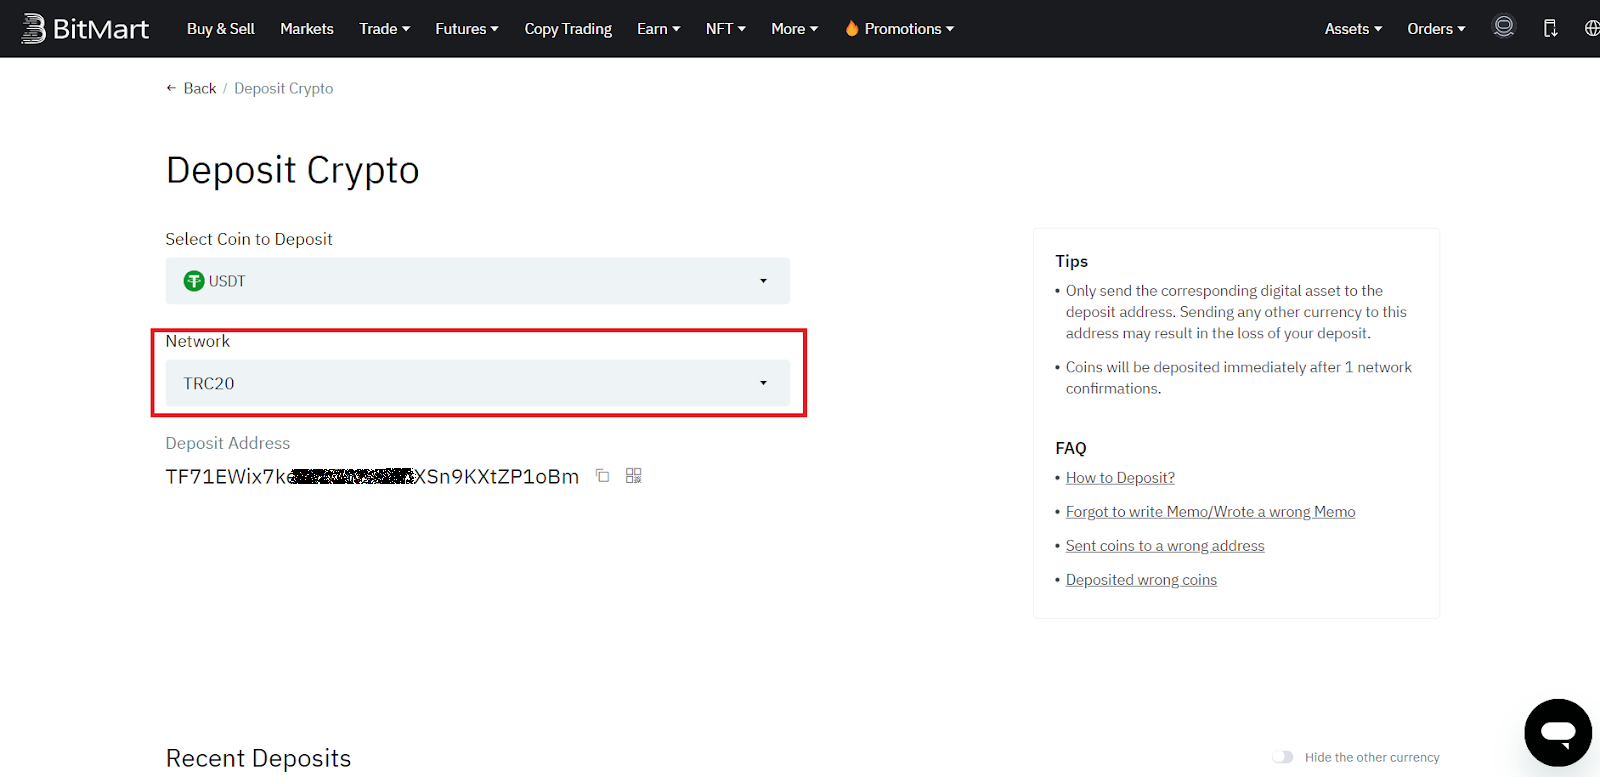
4. Copy the wallet address provided to you (the address provided by the BitMart exchange) and send your selected cryptocurrency to it (send it from the exchange or wallet where you plan to send it from). It's important to emphasize again that the cryptocurrency you have chosen at earlier stages must arrive at the specified wallet address in the indicated network. Other tokens either won't arrive due to blockchain-specific features or won't be credited. Blockchain transactions cannot be reversed!
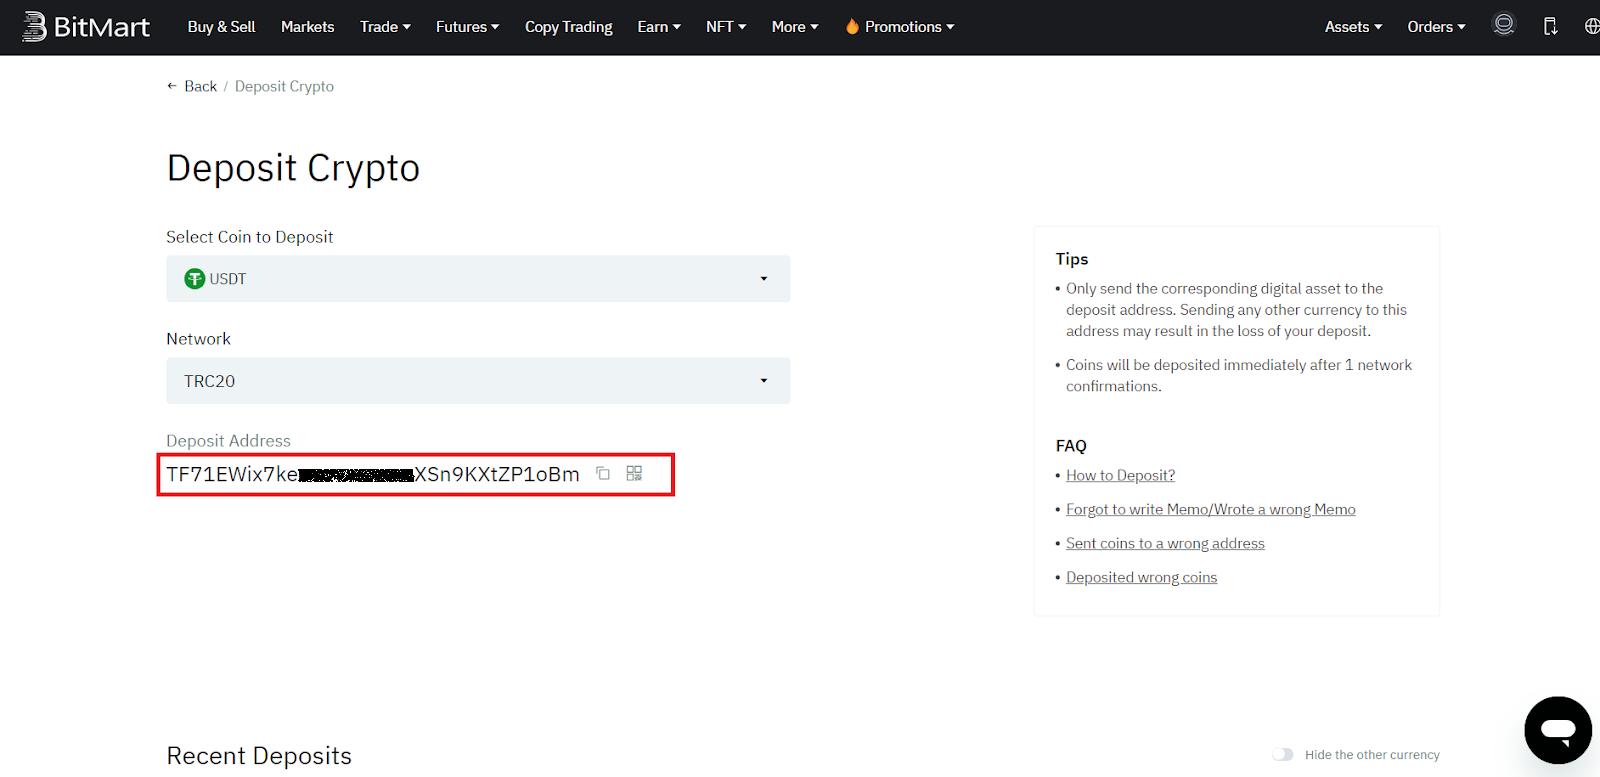
5. Congratulations! You have successfully deposited funds into your BitMart account. Please be aware that the transaction confirmation speed depends on the chosen blockchain, but it usually takes only a few minutes.
Step 4.4.2: Buying Cryptocurrency with Fiat Money
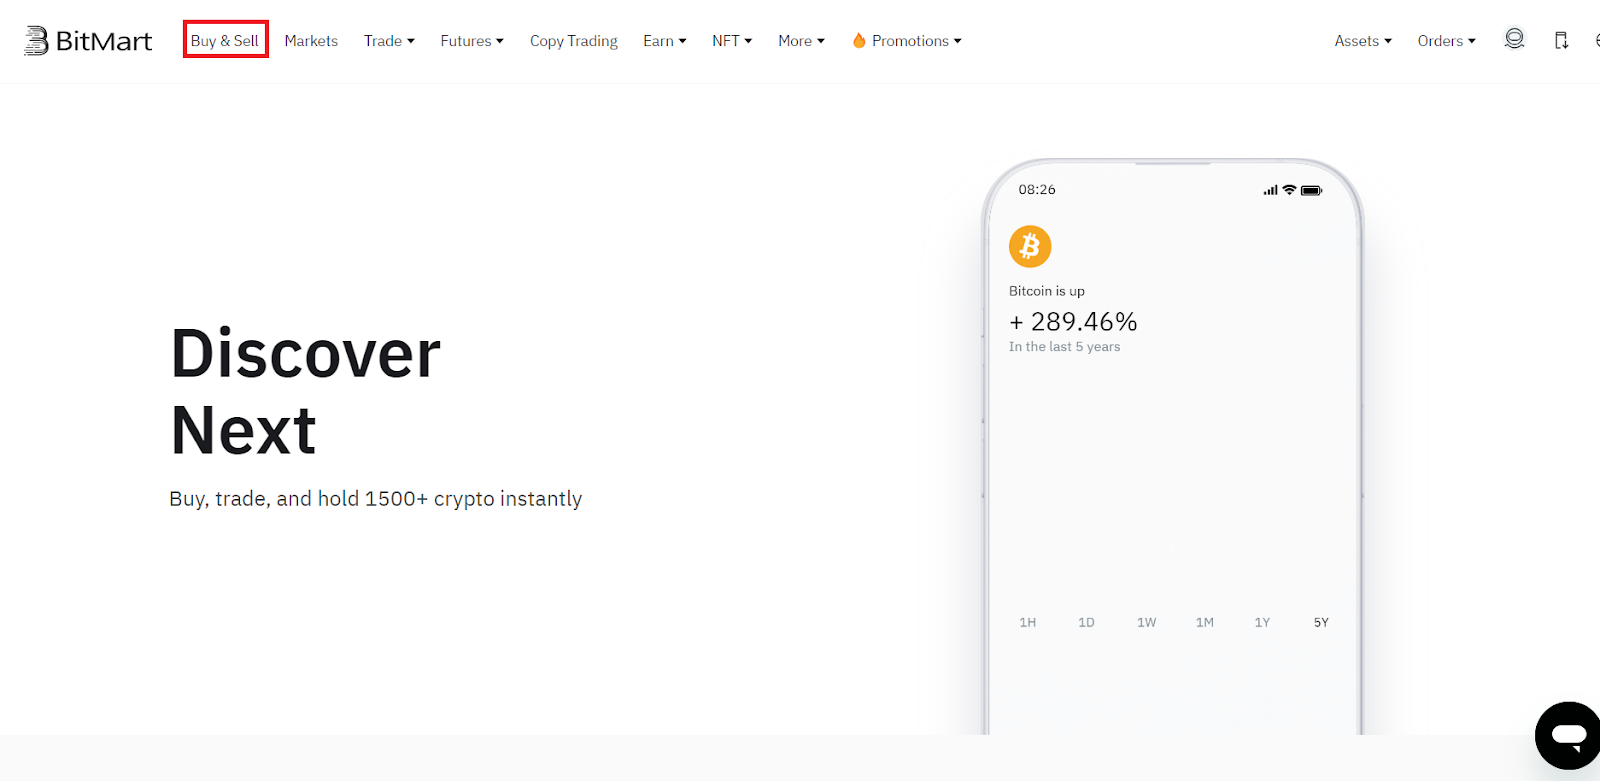
1. After logging into your BitMart account, click on "Buy & Sell".
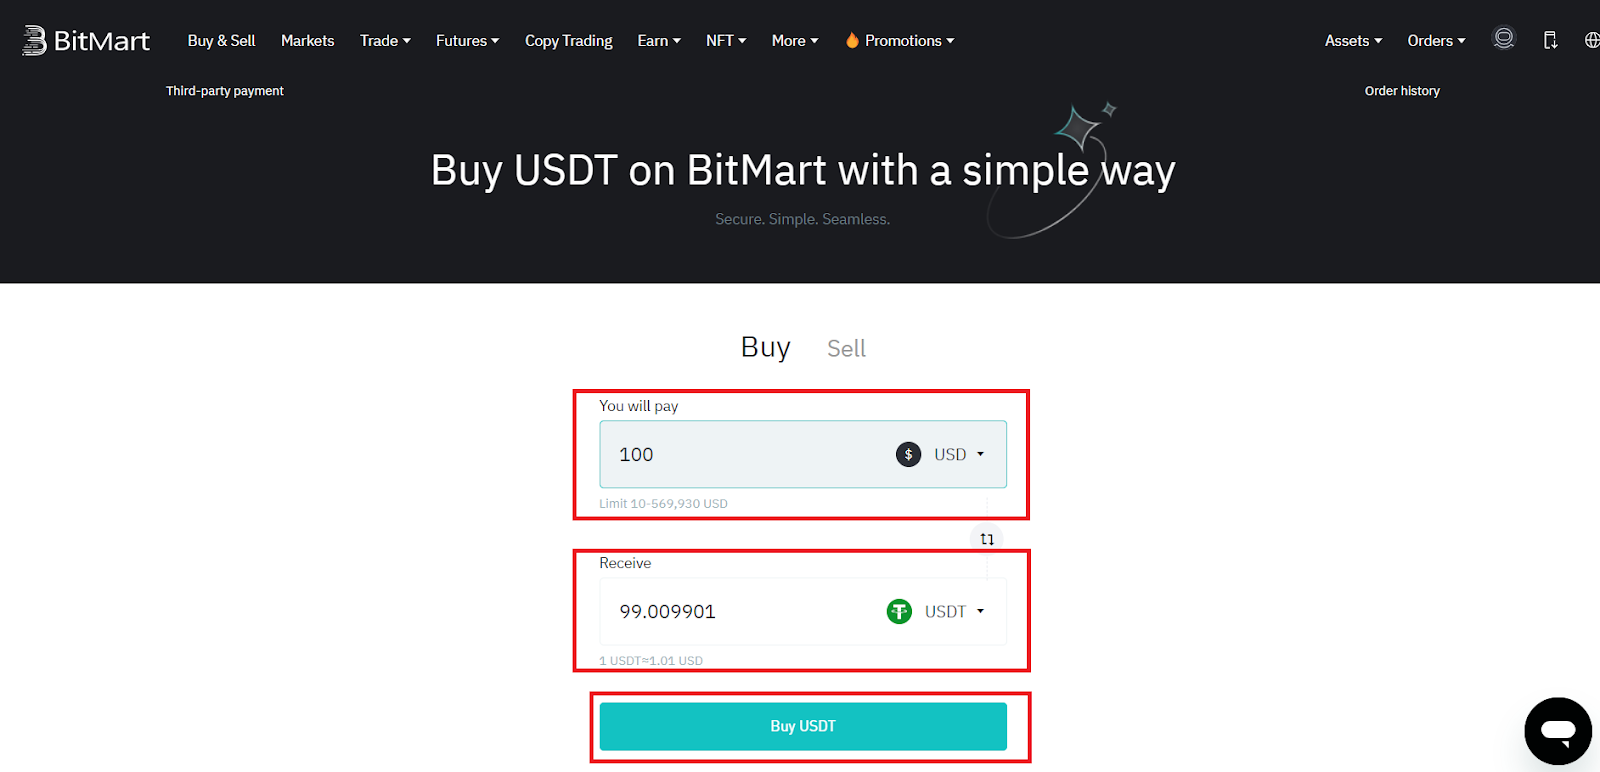
2. Select the fiat currency you want to use for the purchase and the cryptocurrency you wish to acquire. Then, click "Buy...".
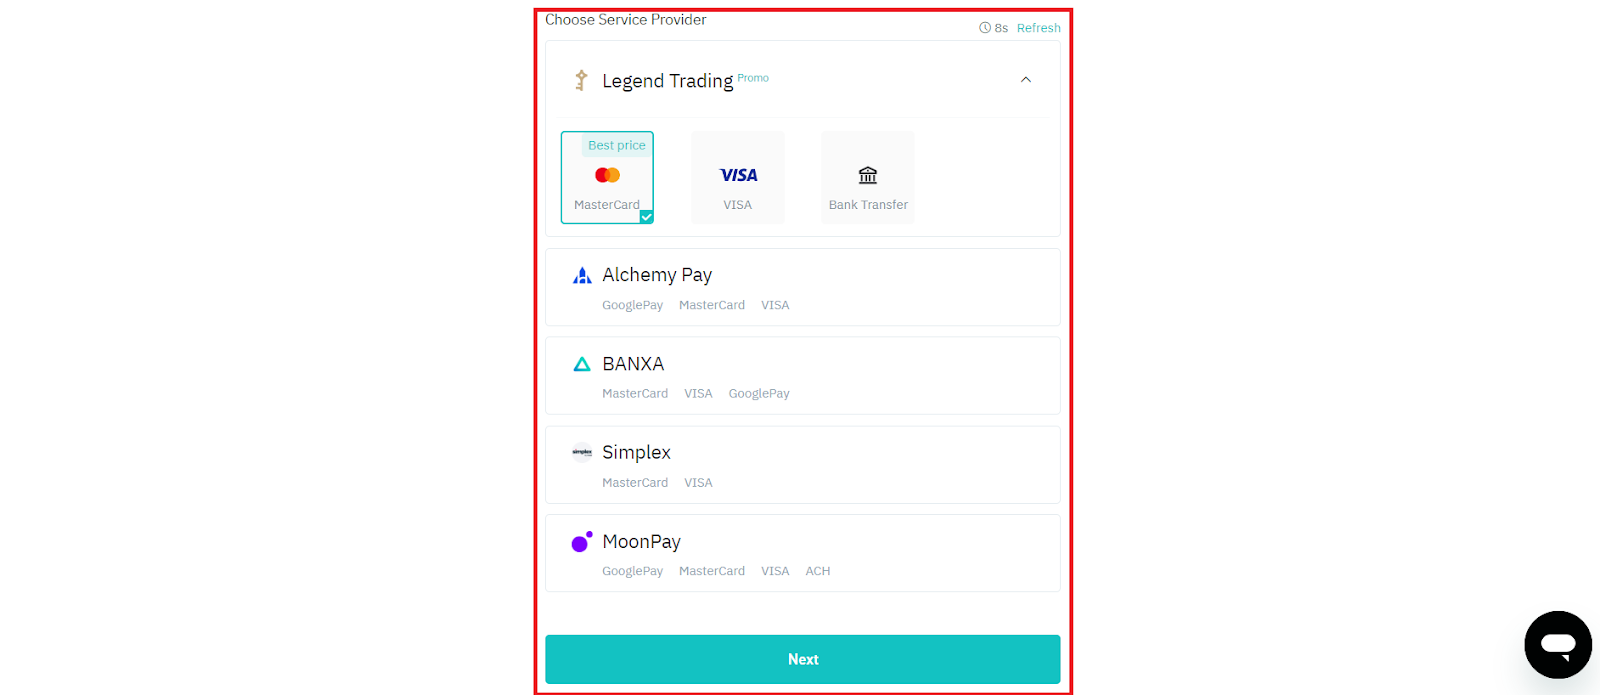
3. Choose a Service Provider for the payment and click "Next". Please note that different providers may have varying payment methods.
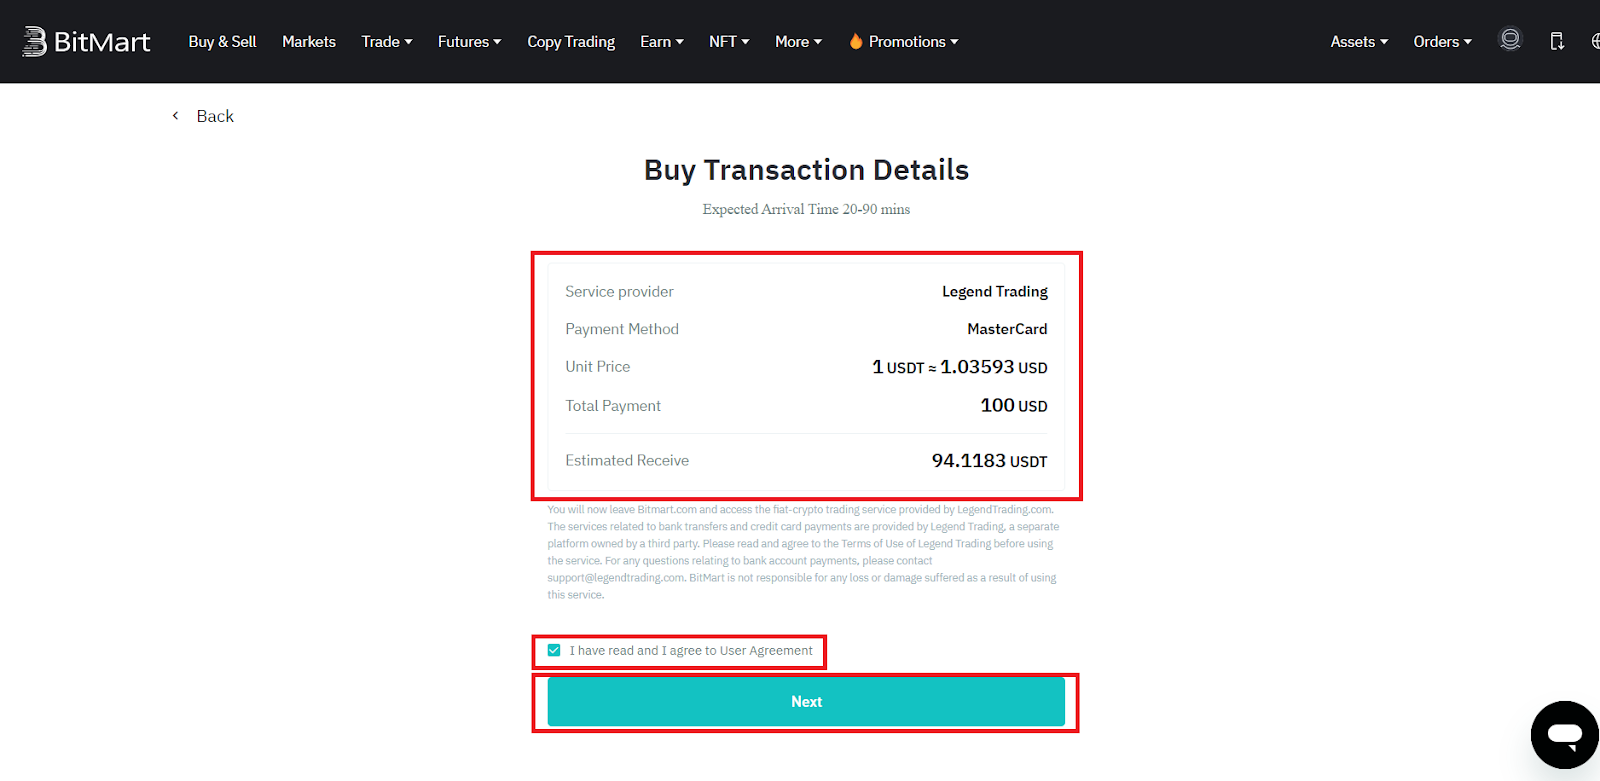
4. Ensure that the transaction details are correct, check the box next to "I have read and I agree to User Agreement", and then click "Next".
5. Follow the instructions provided by your chosen Service Provider.
Step 4.5: Buy USDT and MATIC Tokens on BitMart
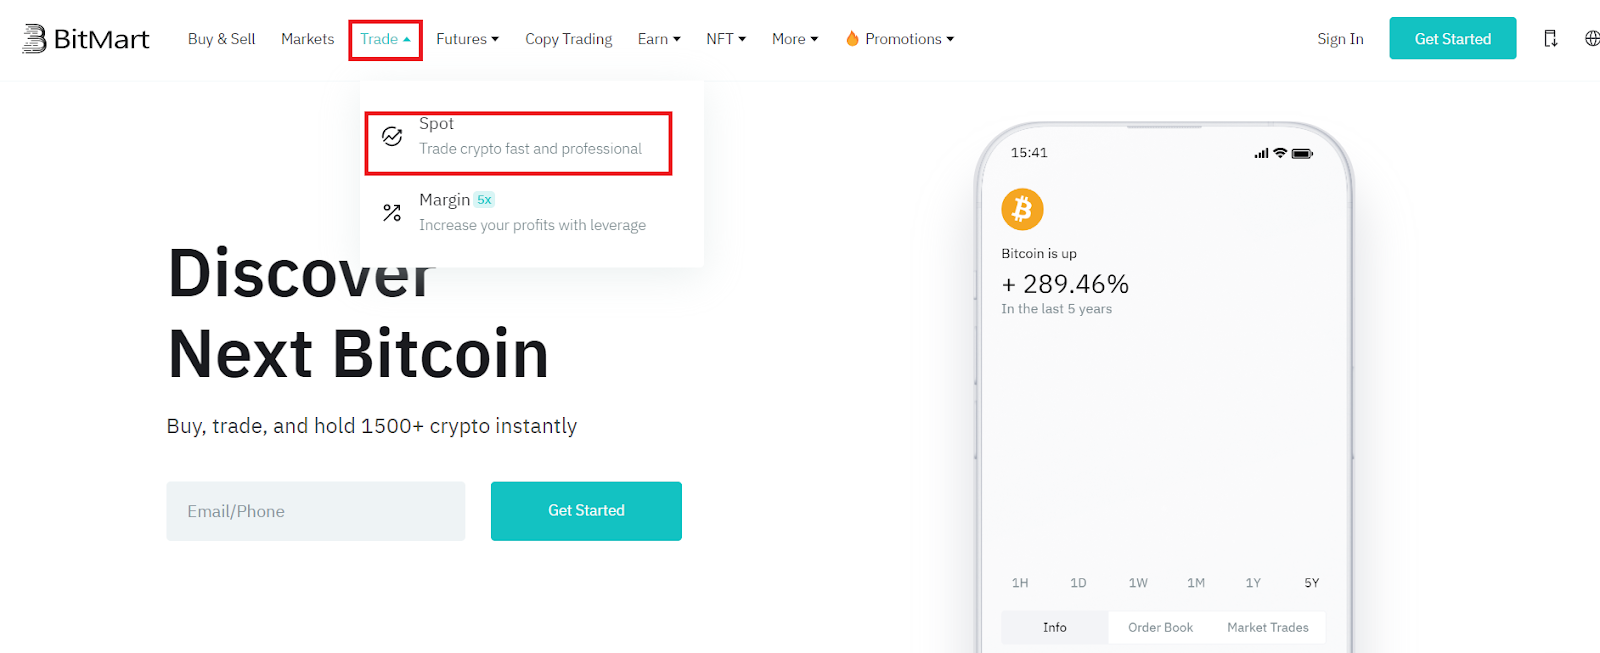
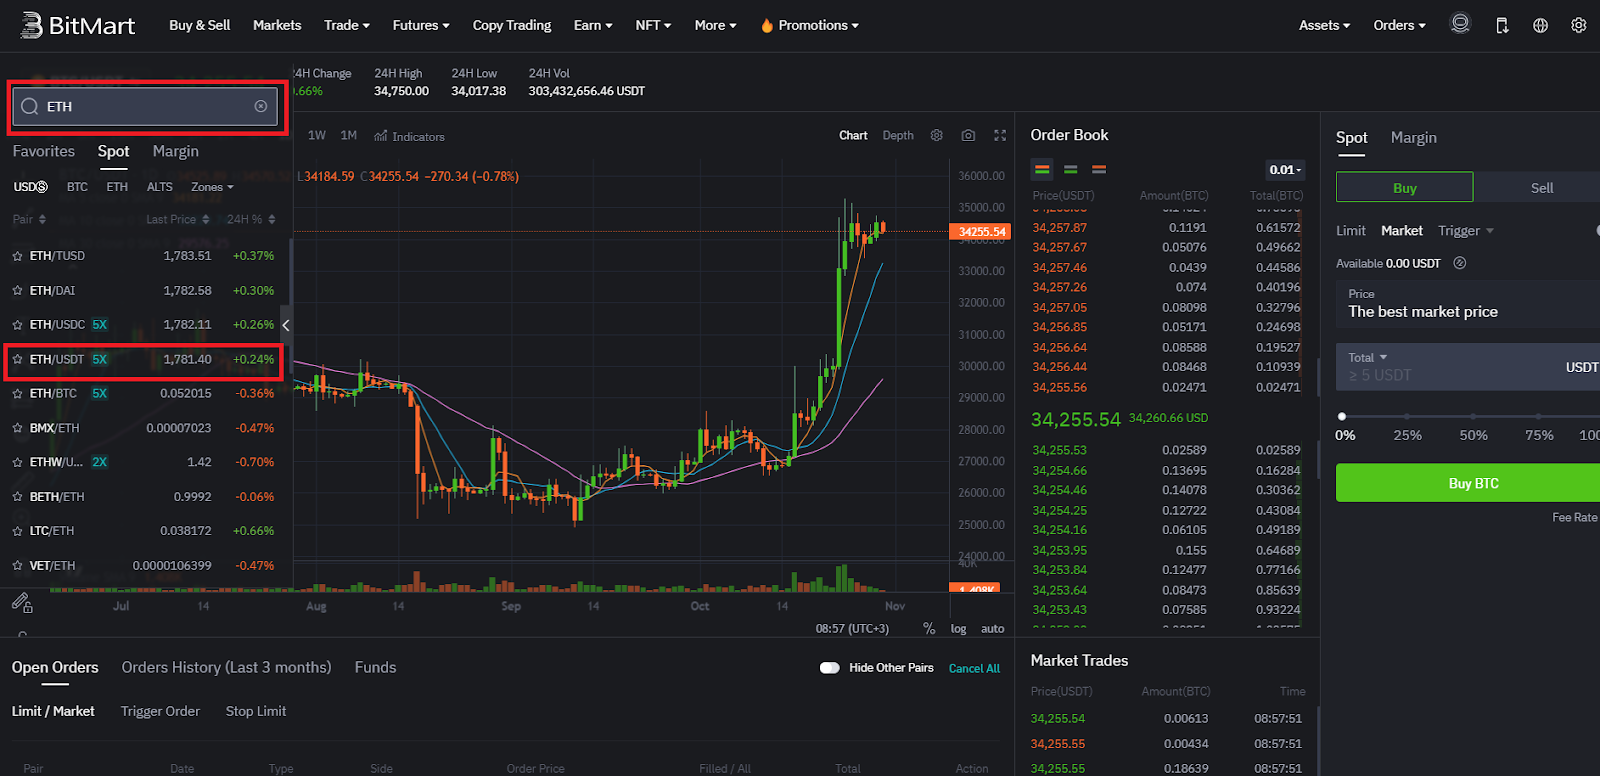
1. After logging into your BitMart account, hover your cursor over the "Trade" section and then click on the "Spot" sub-section.
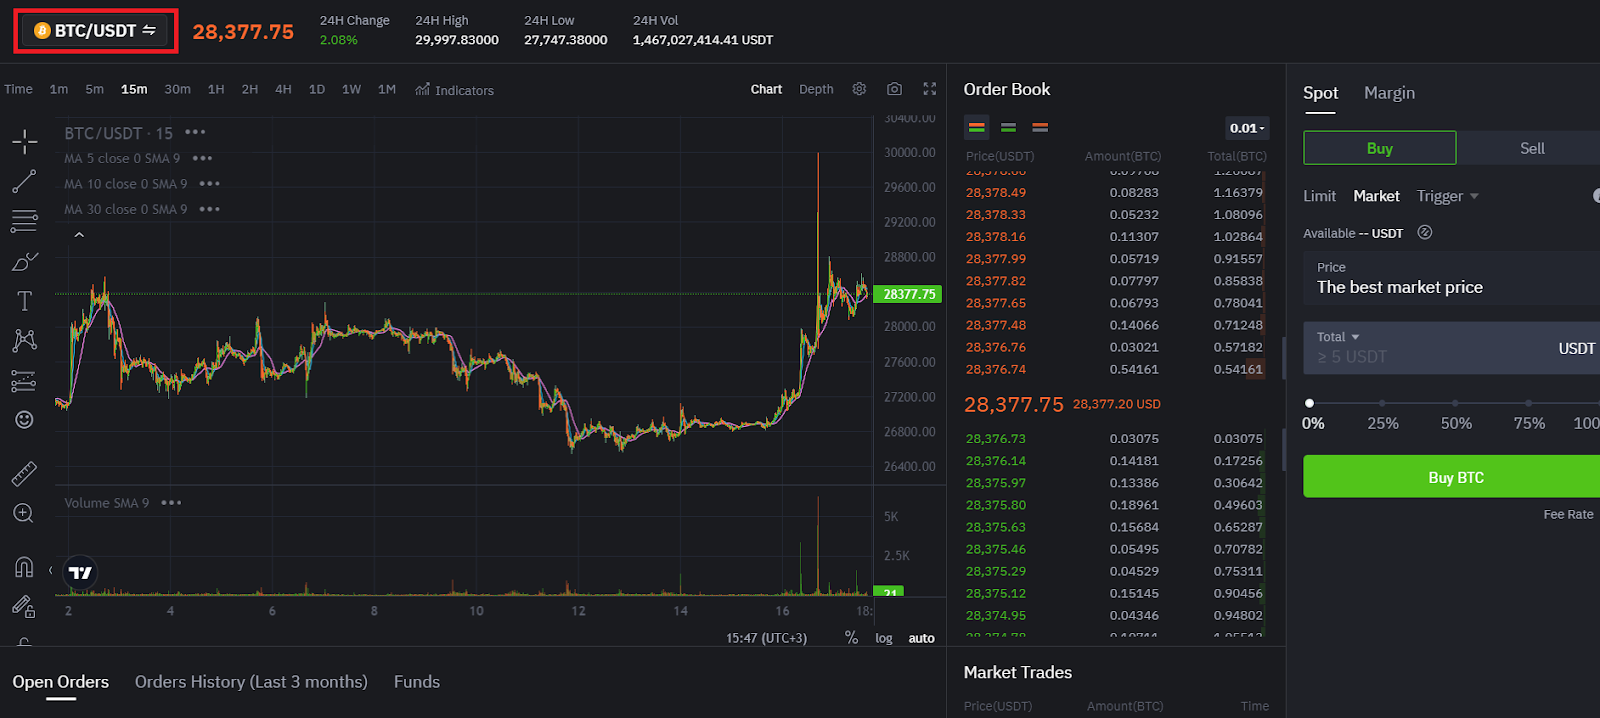
3. If you don't have USDT yet, choose the trading pair with your existing cryptocurrency, for example, ETH/USDT. To do this, type the abbreviated name of the coin in the search field.
4. Switch to "Sell", choose "Market" mode, specify the amount of USDT you want to receive in exchange, and click "Sell...".
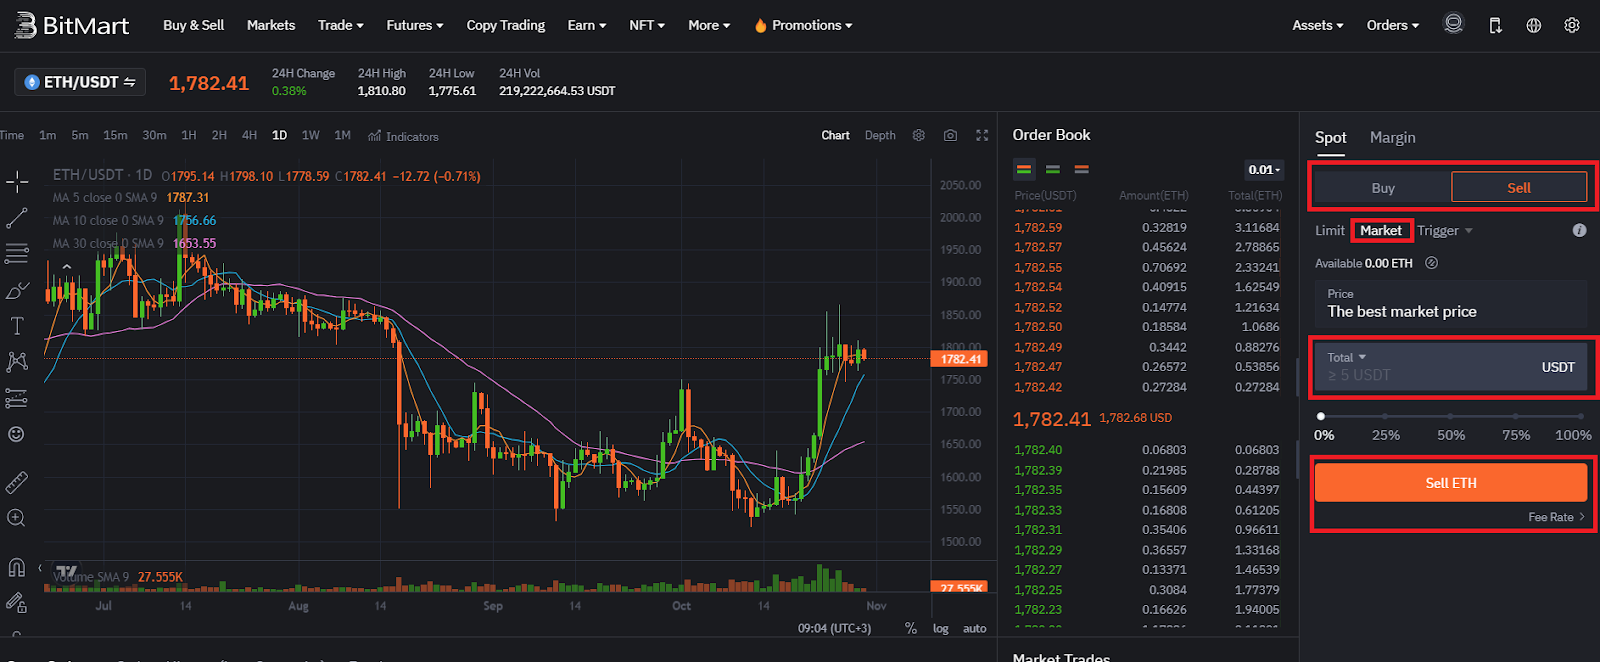
Congratulations! You've acquired USDT, but now you need to exchange a small portion of it for MATIC coins, which will be used to pay transaction fees later.
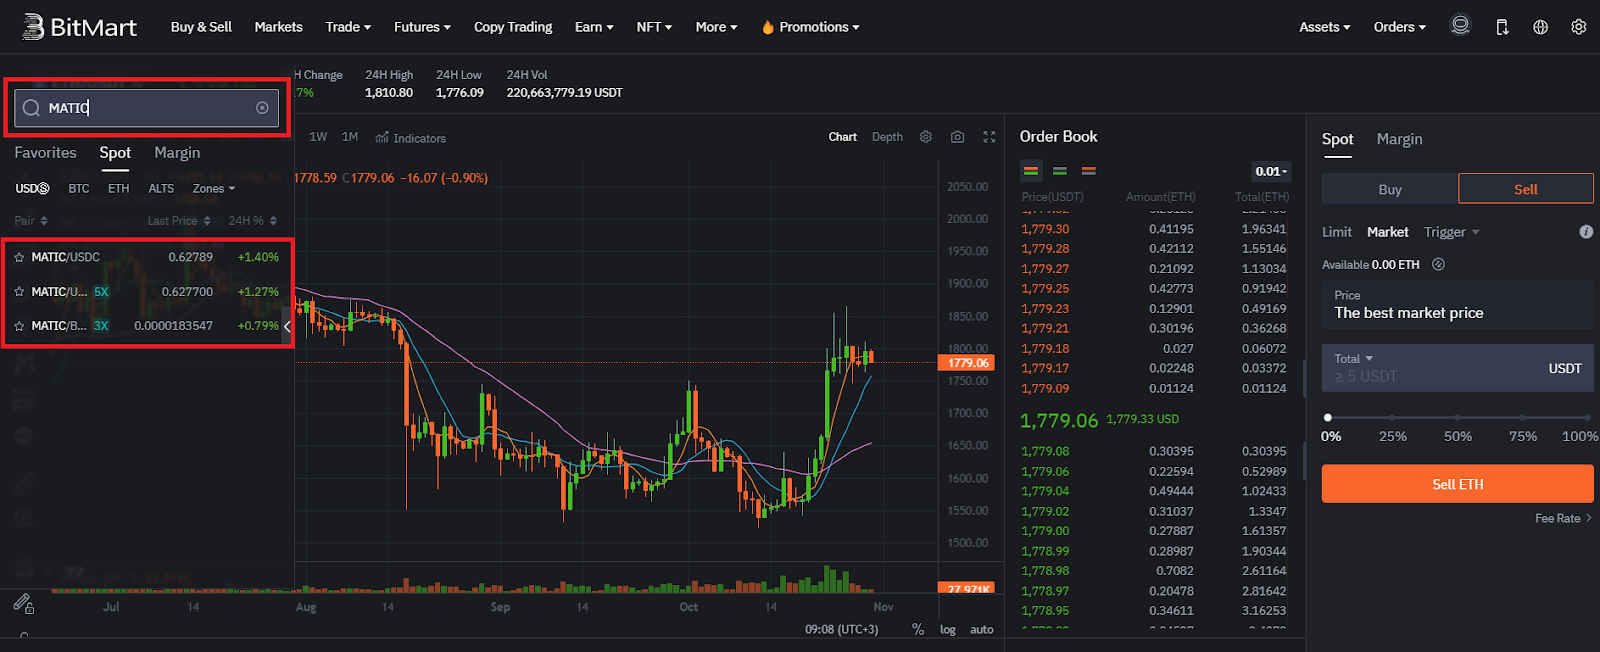
5. Enter "MATIC" in the trading pair search field. Choose the MATIC trading pair with USDT or another cryptocurrency you have available for a direct exchange into MATIC.
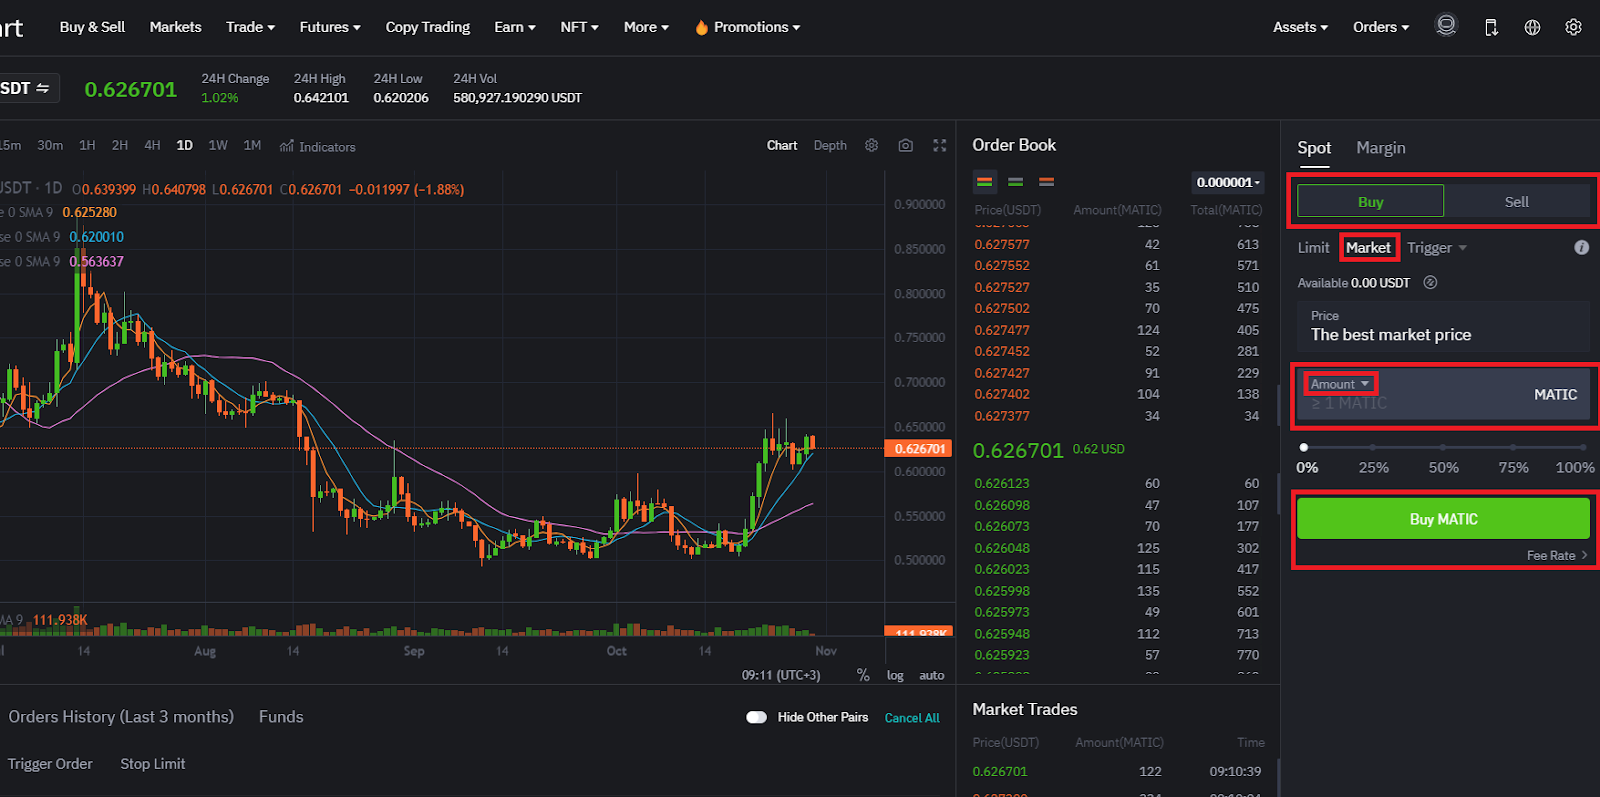
6. Switch to "Buy", select "Market" mode, and choose the "Amount" option. Specify the quantity of MATIC you want to purchase and click "Buy...". Please note that you will only need MATIC for paying fees, which are quite low on the Polygon blockchain. If you don't plan to make frequent transactions in this network, it will be enough to buy MATIC in an amount equal to BitMart's minimum withdrawal limit and purchasing fees, which is 21 MATIC.
Step 4.6: Withdraw USDT and MATIC to Your MetaMask Wallet
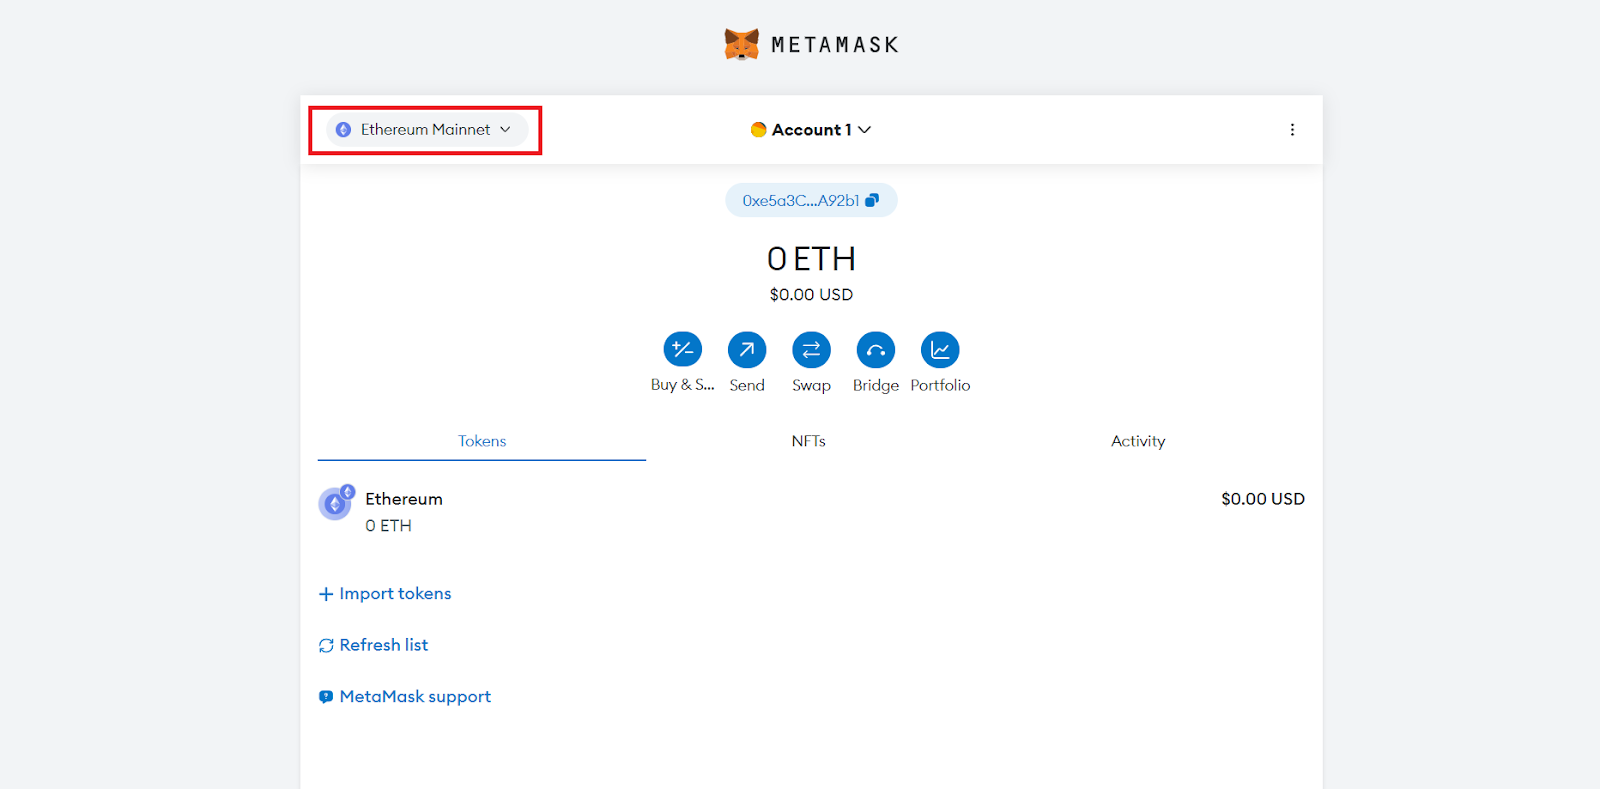
1. Before withdrawing USDT and MATIC to your MetaMask wallet, you first need to activate Polygon network support in it. To do this, log into your wallet and click on the network selection.
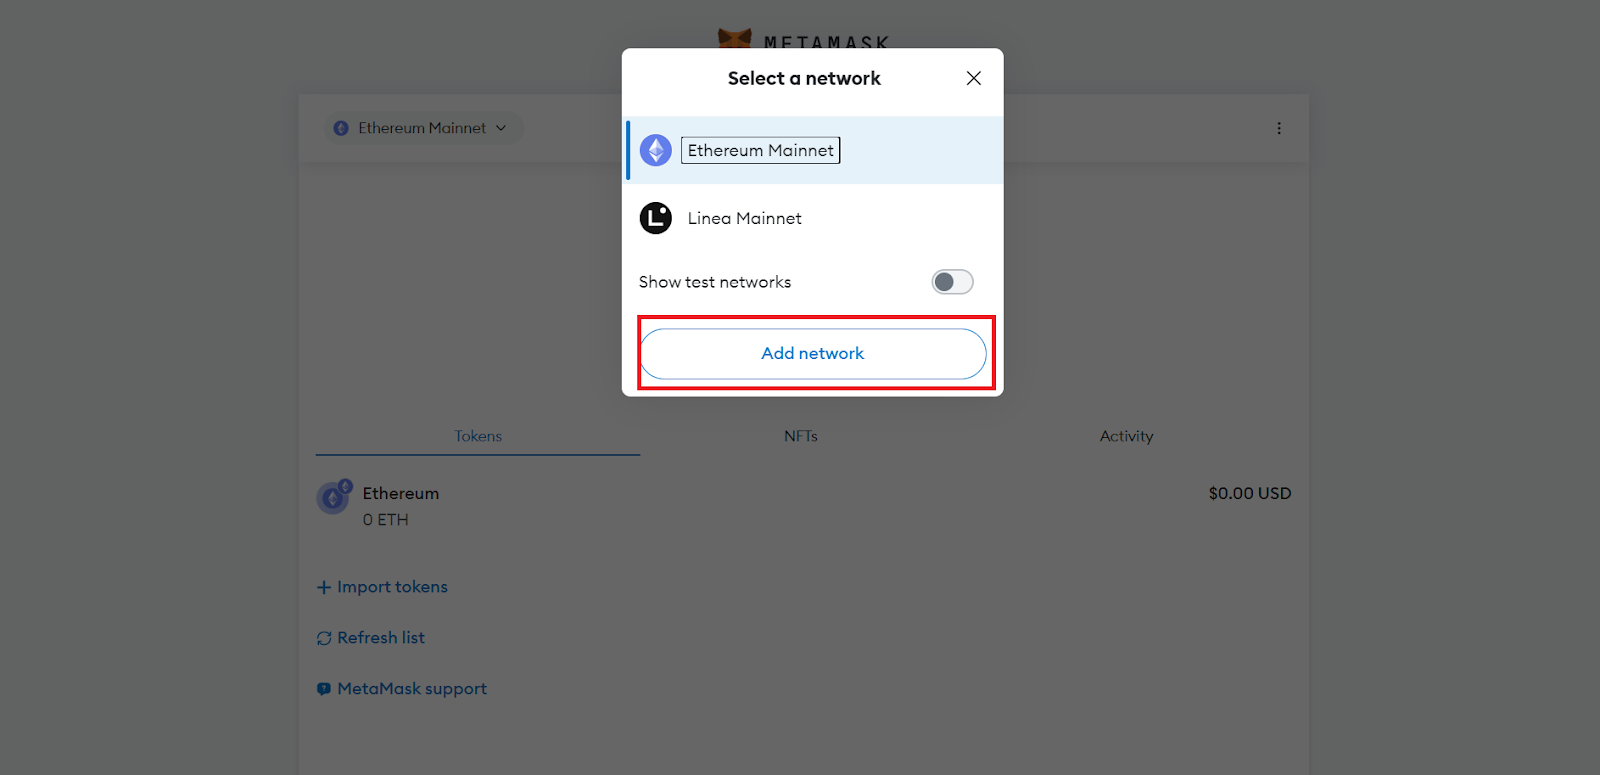
2. In the opened window, click "Add network".
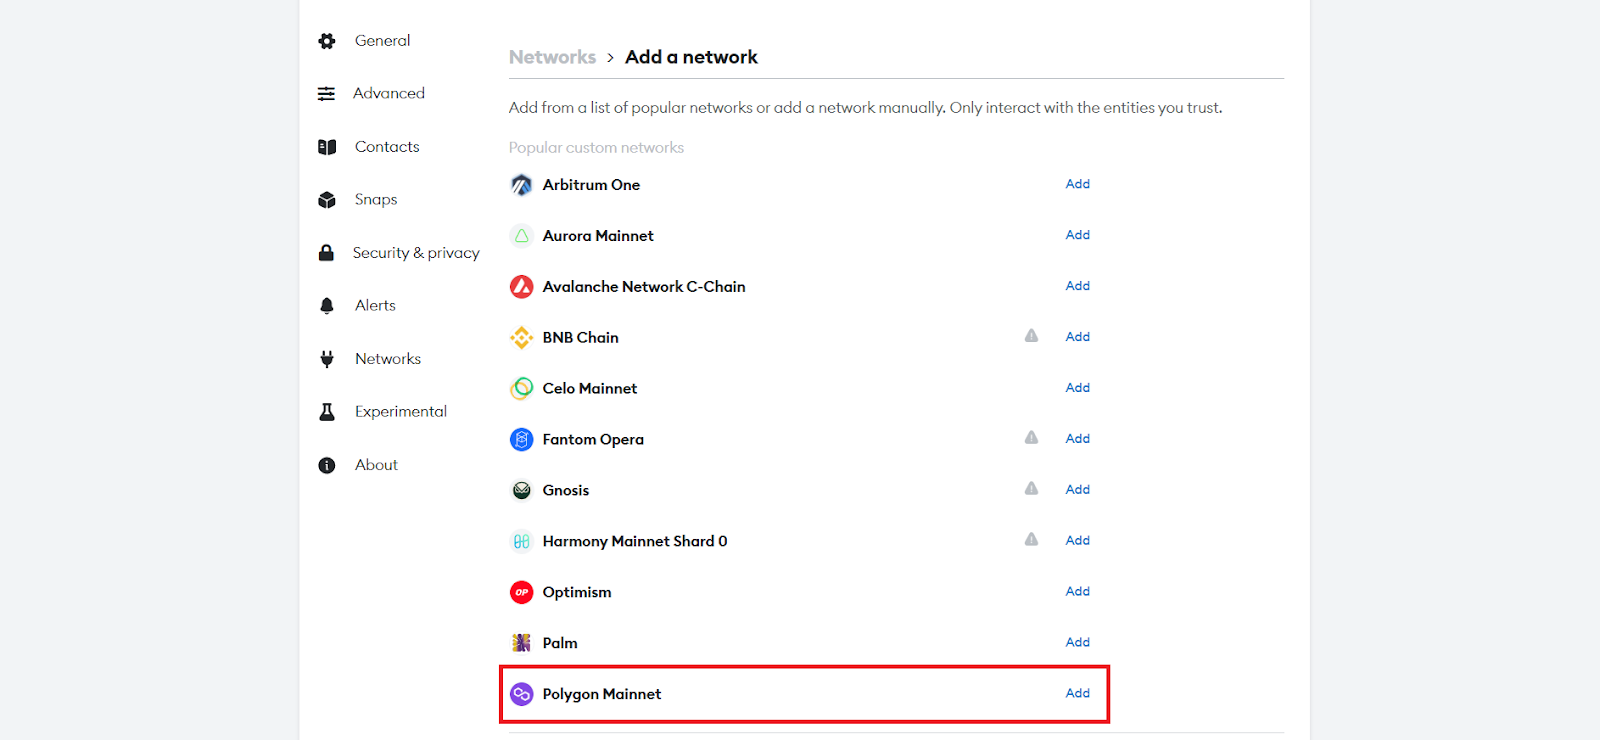
3. Select Polygon Mainnet by clicking the "Add" button next to it.
4. In the opened window, click "Approve".

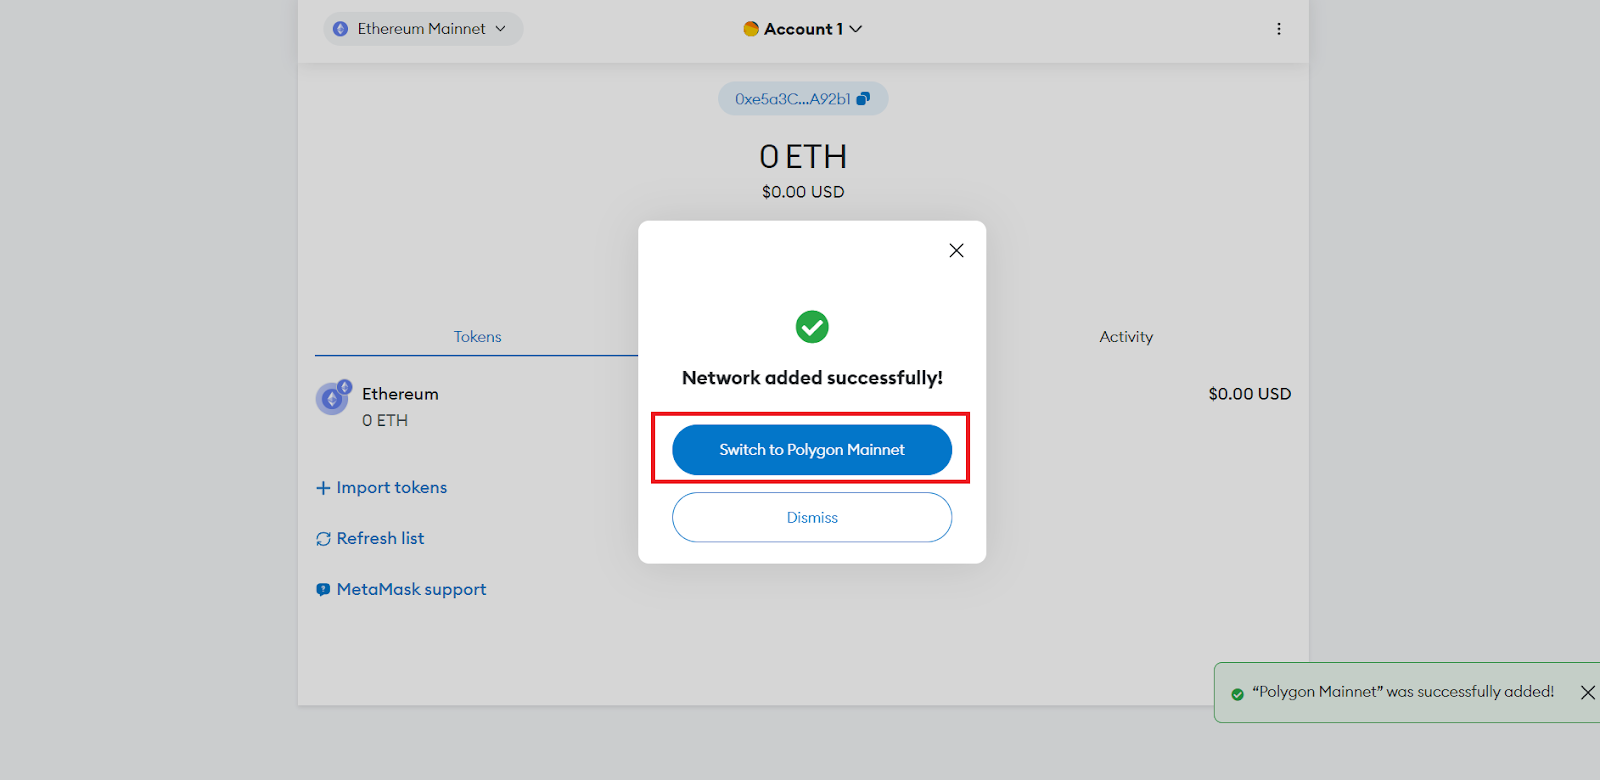
5. Next, switch to the network by clicking on "Switch to Polygon Mainnet", or manually selecting the network.
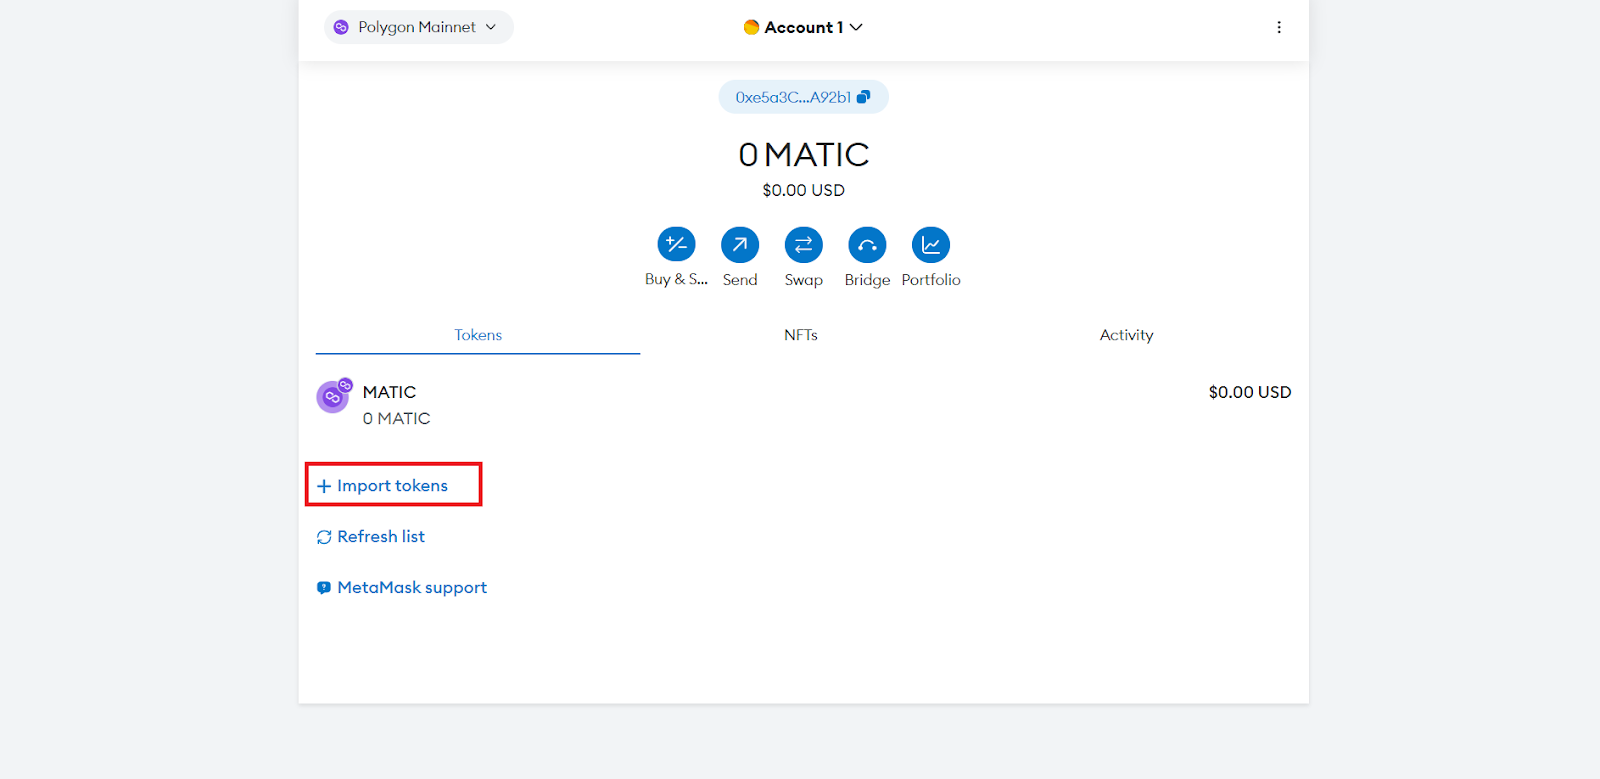
6. Add USDT to your wallet on the Polygon network. To do this, click on "+ Import tokens".
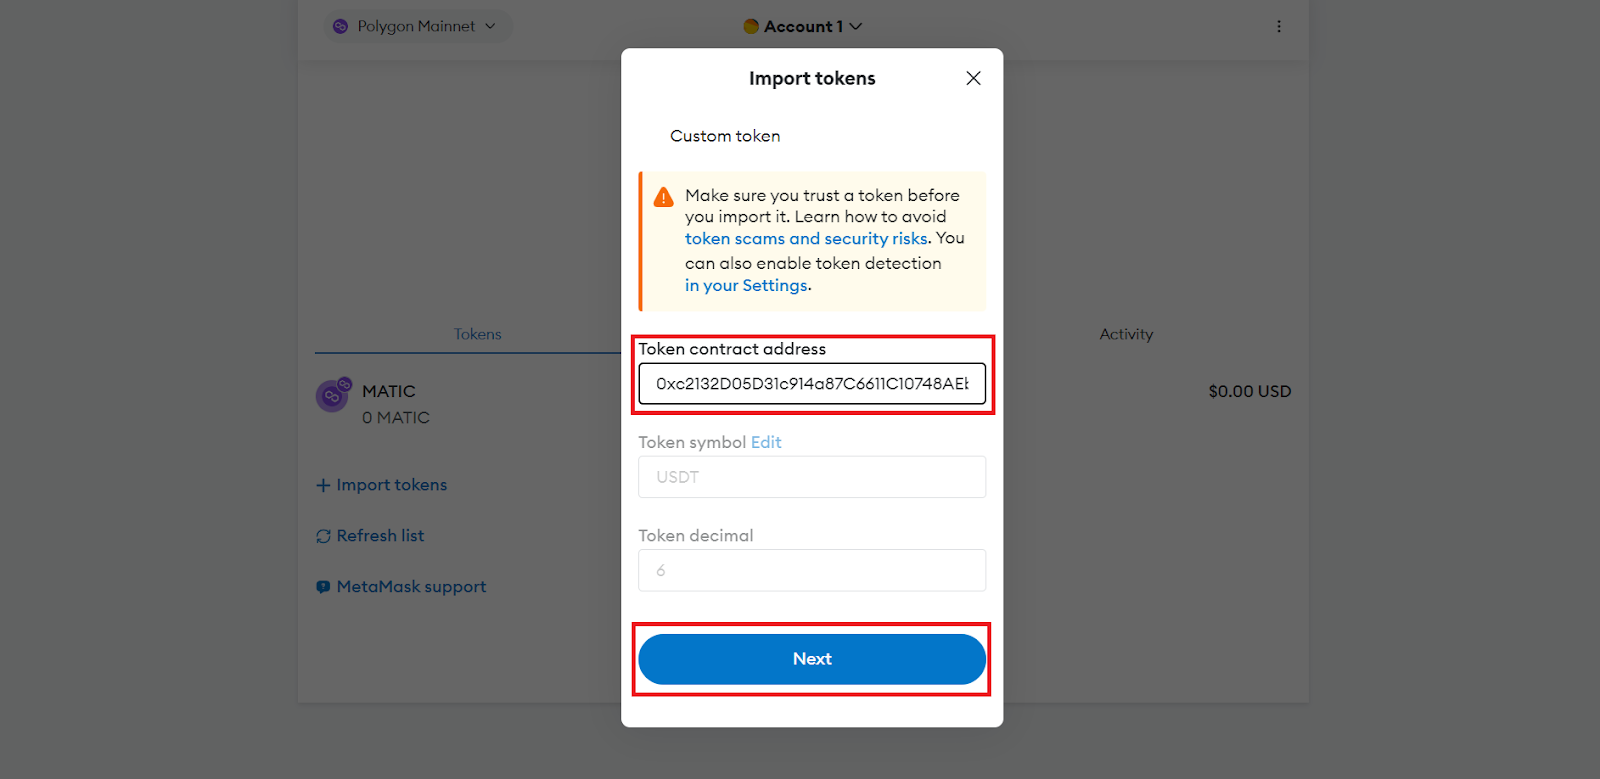
7. In the opened window, enter the USDT Token Contract (0xc2132D05D31c914a87C6611C10748AEb04B58e8F), and then click "Next".
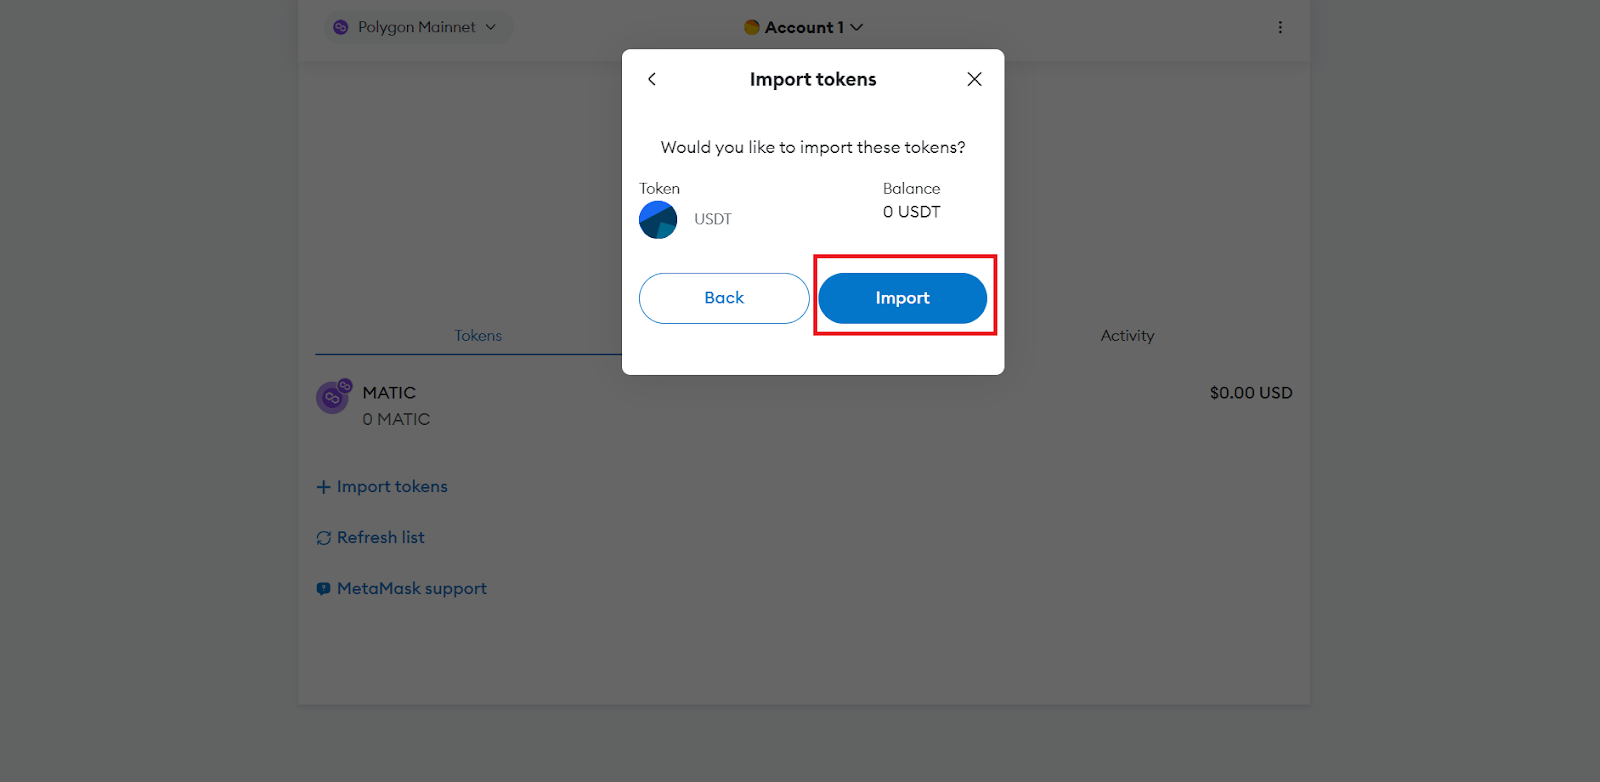
8. In the opened window, click on "Import".
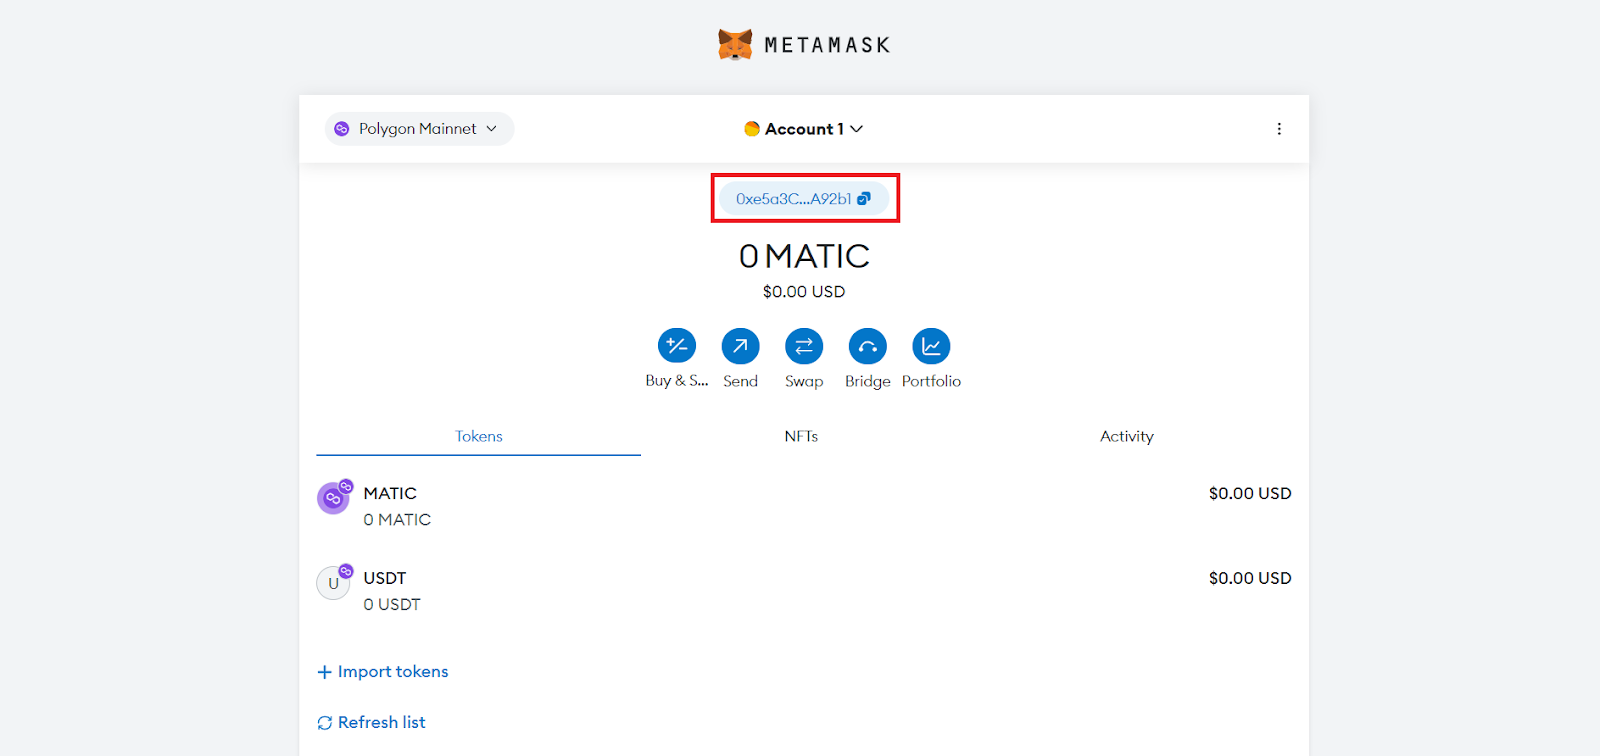
9. Copy the address of your wallet on the Polygon network by clicking on it in MetaMask.
10. Go to BitMart, hover over your profile, and click on "Withdraw".
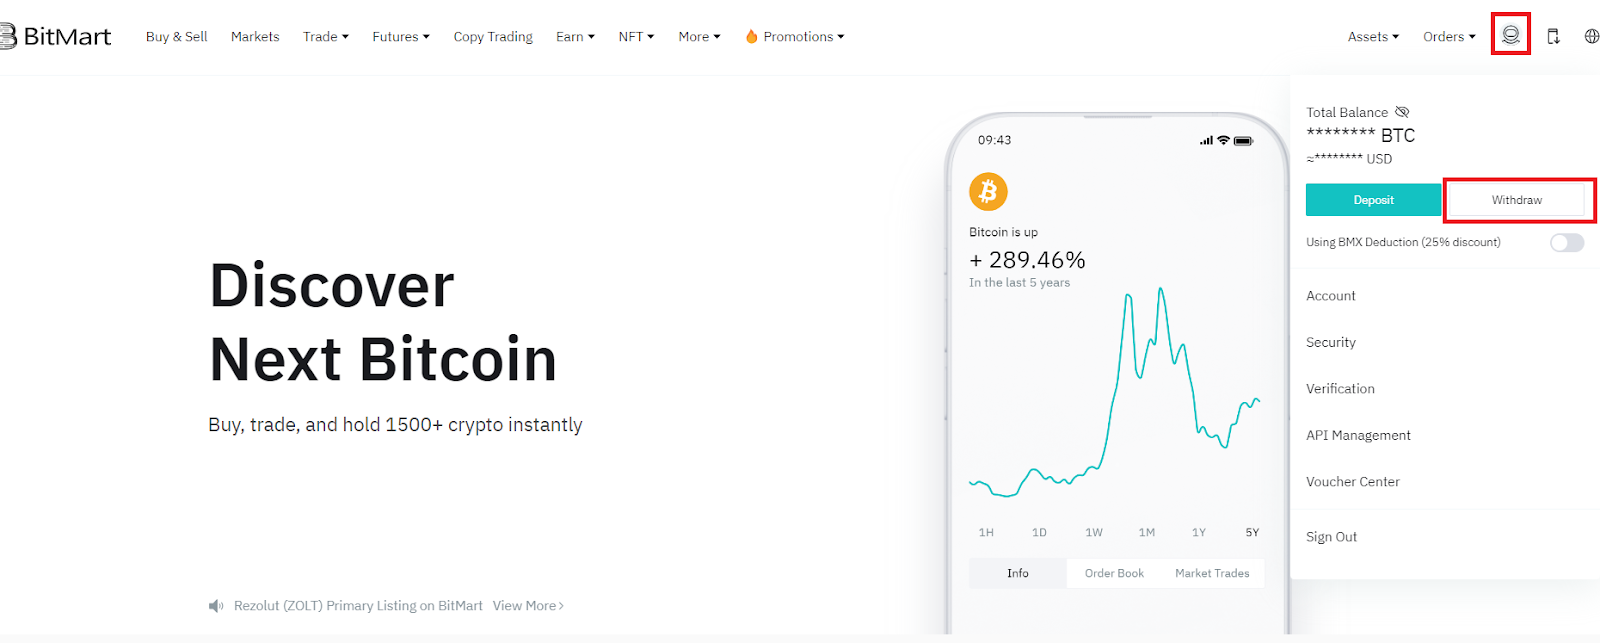
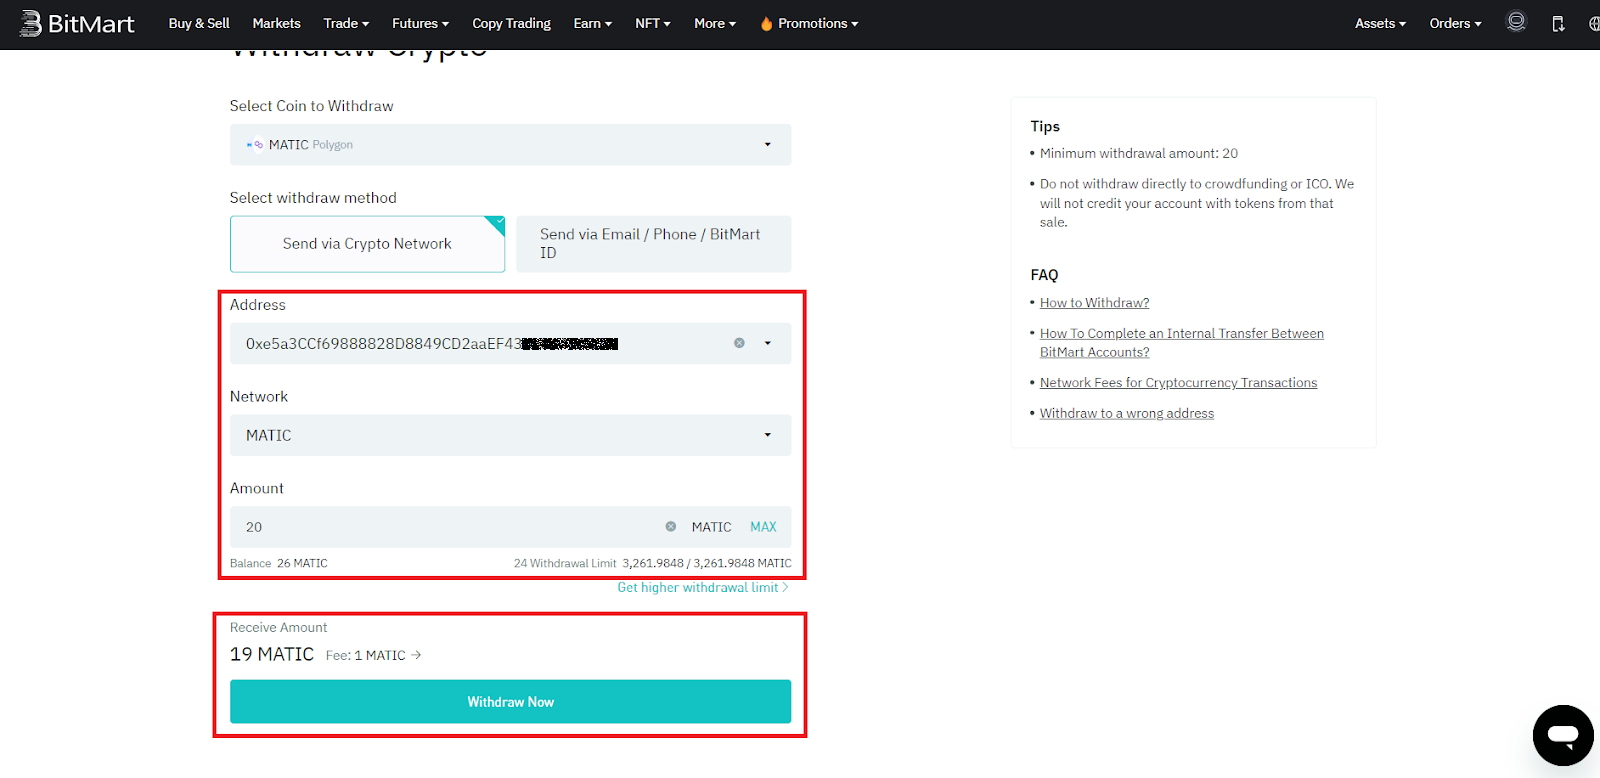
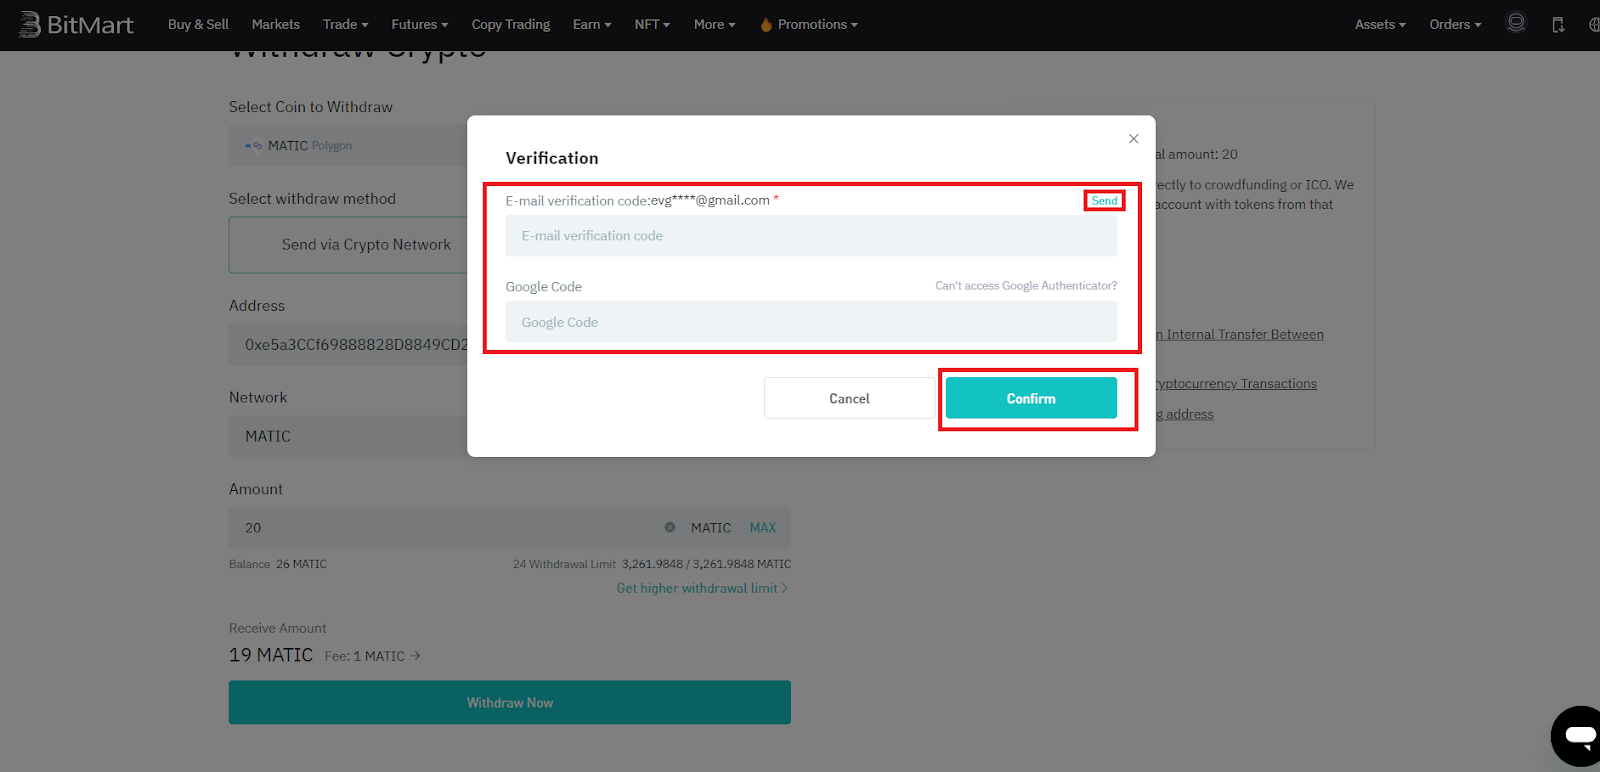
12. Enter the wallet address you previously copied from MetaMask, select the MATIC network, and enter the amount of tokens you want to withdraw. Then click "Withdraw Now".
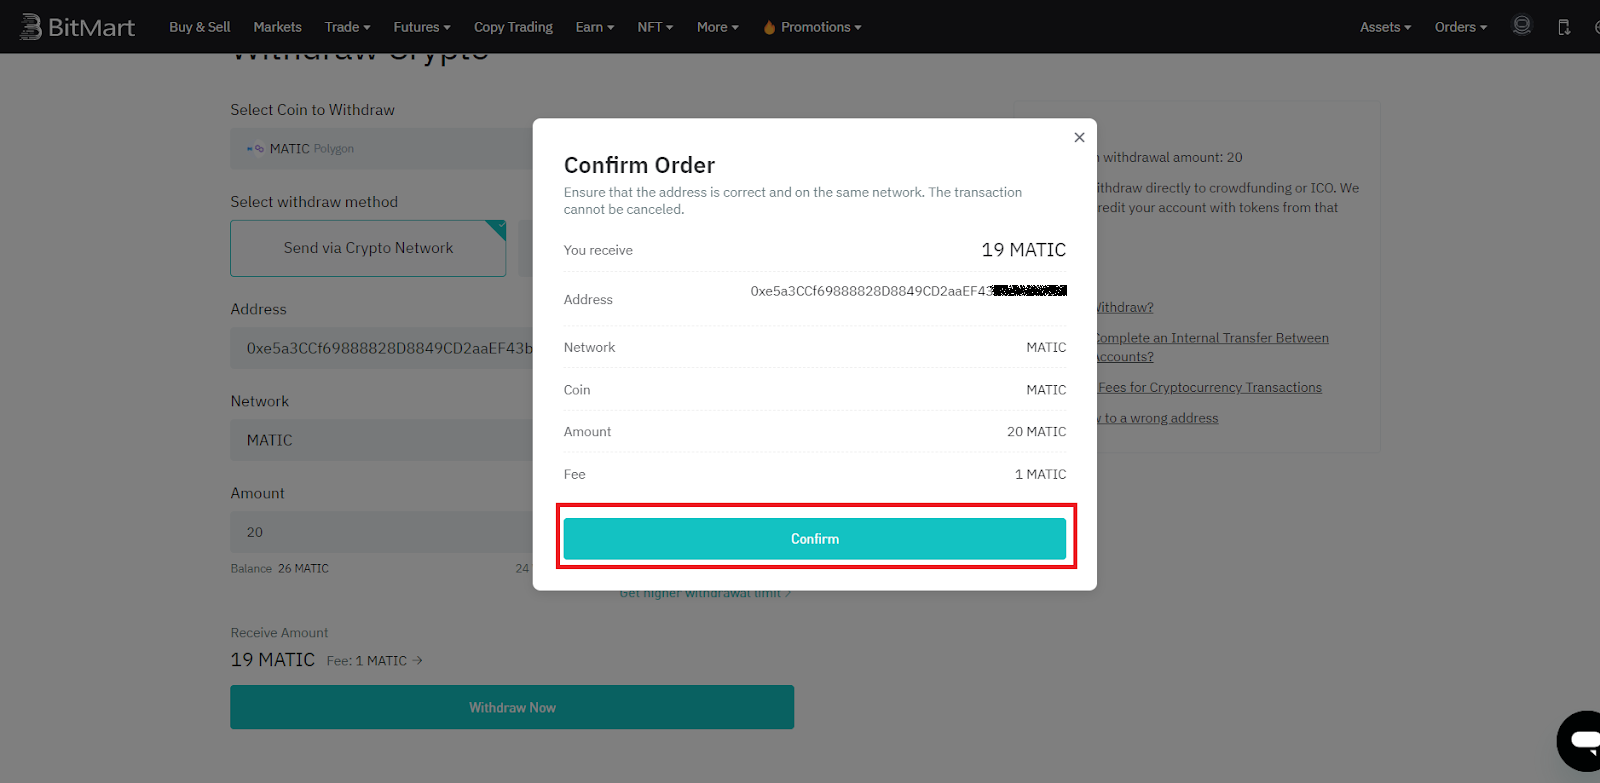
13. In the opened window, verify the accuracy of the transaction details and click on "Confirm".
14. Click on "Send" and enter the code from the email you received. Then enter the code from the Google Authenticator app and click "Confirm".
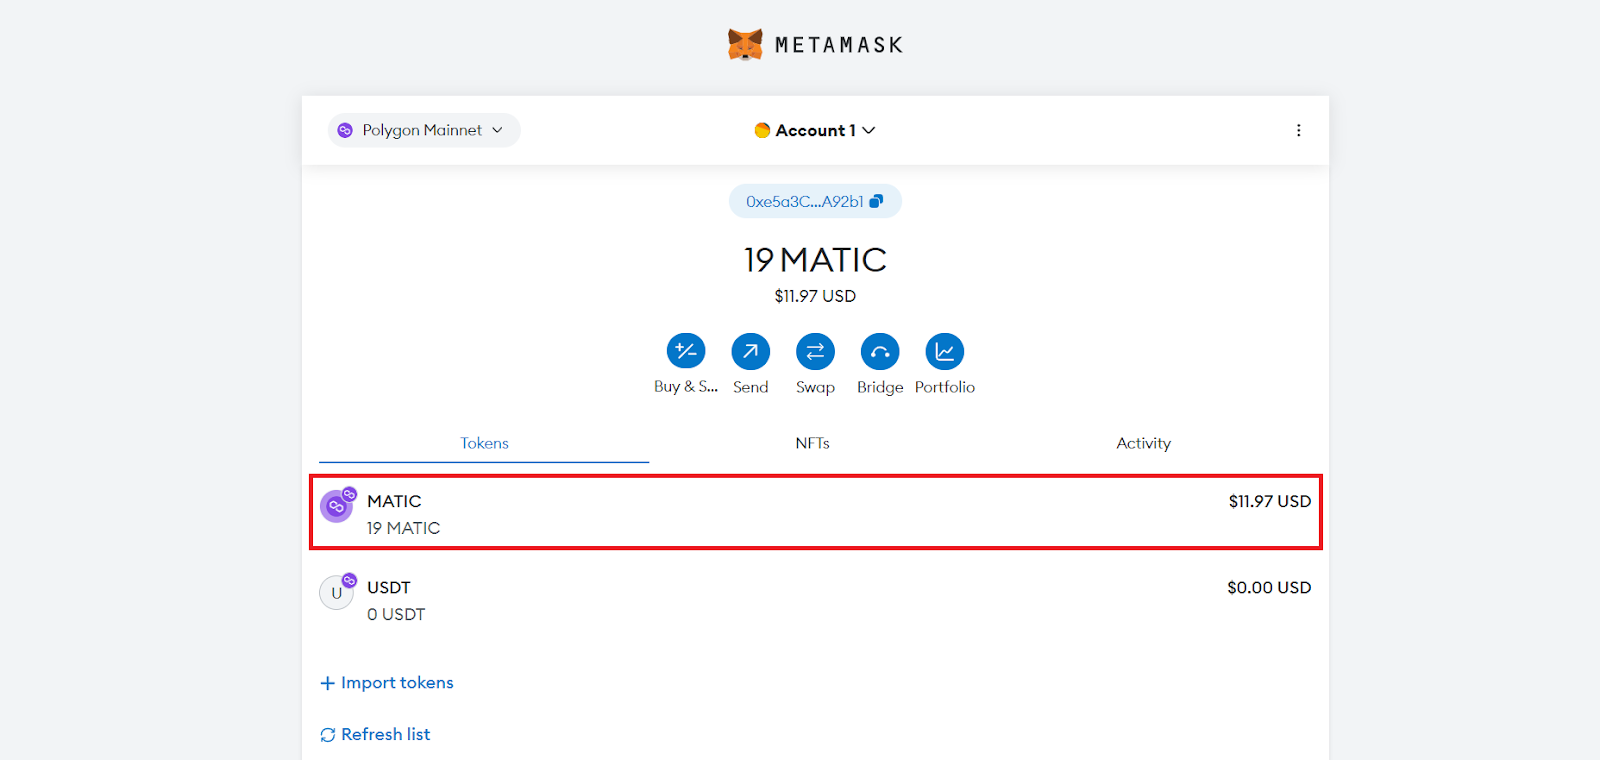
15. The MATIC tokens will soon be deposited into your wallet. You can verify this by opening MetaMask.
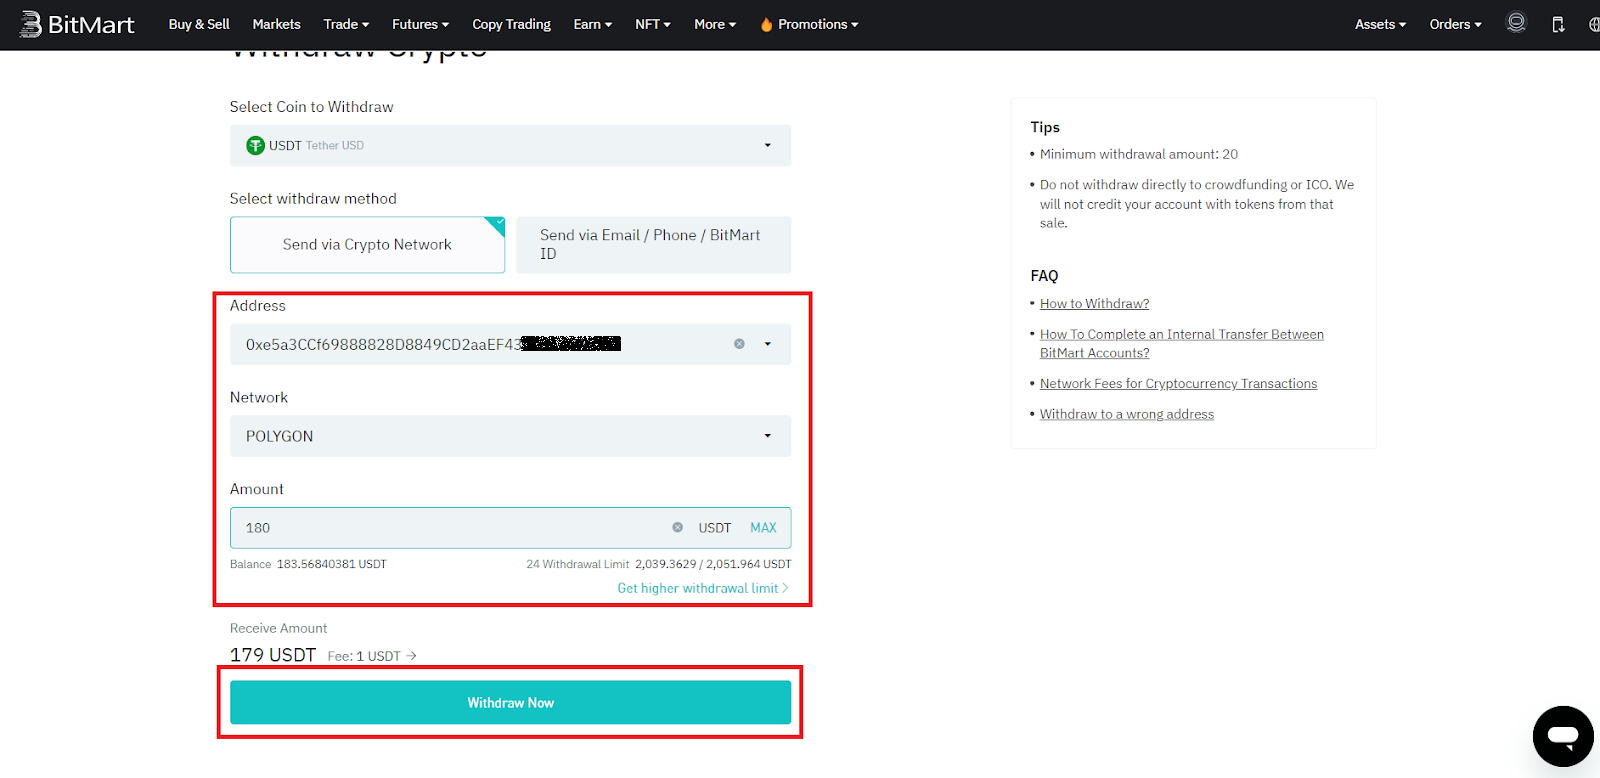
16. Now, go back to BitMart, hover over your profile, and click on "Withdraw".
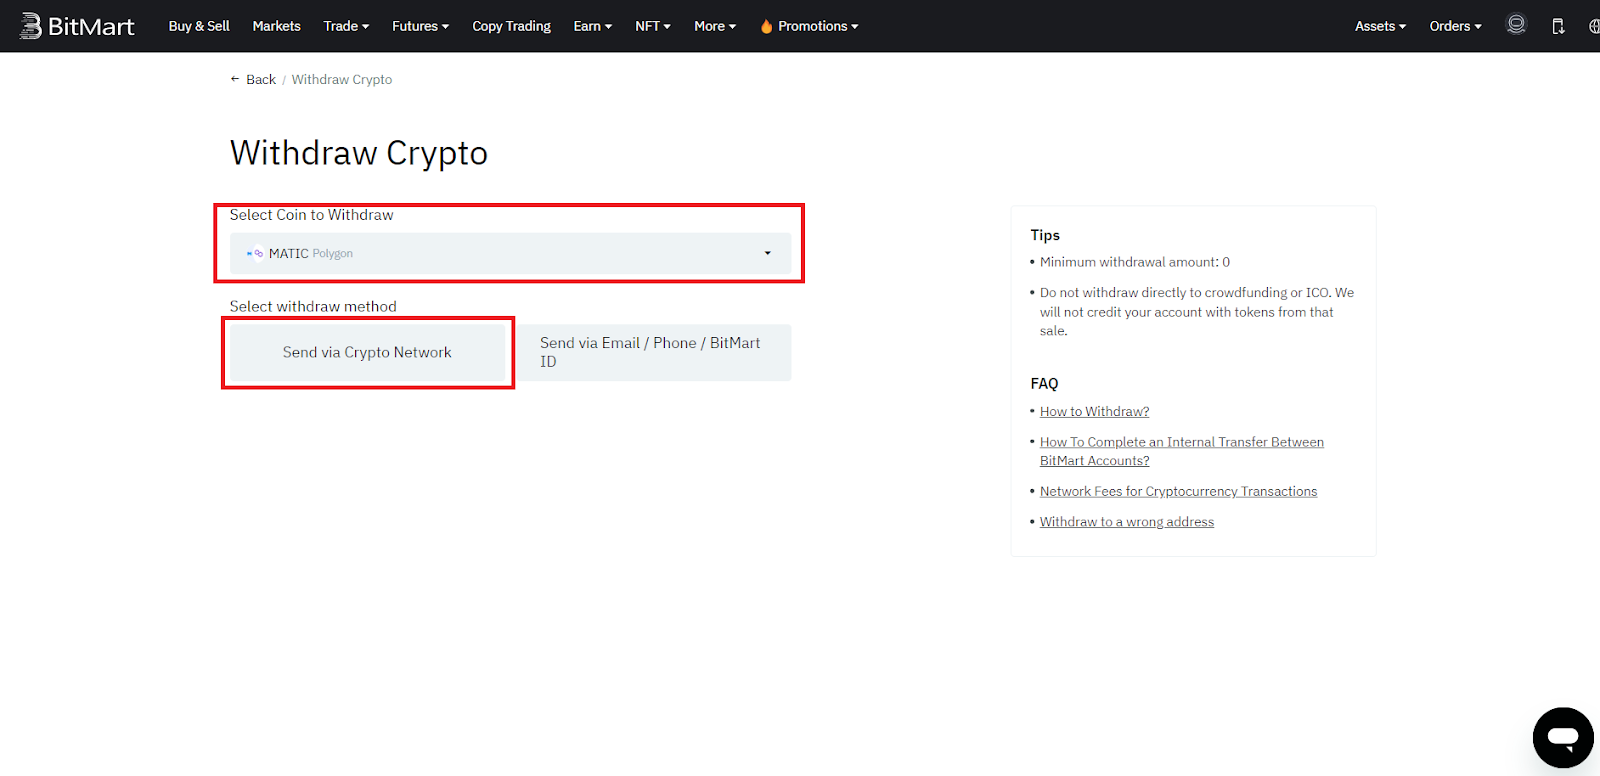
17. Select USDT and click on "Send via Crypto Network".

18. Go to MetaMask and copy the address of your wallet on the Polygon network by clicking on it.
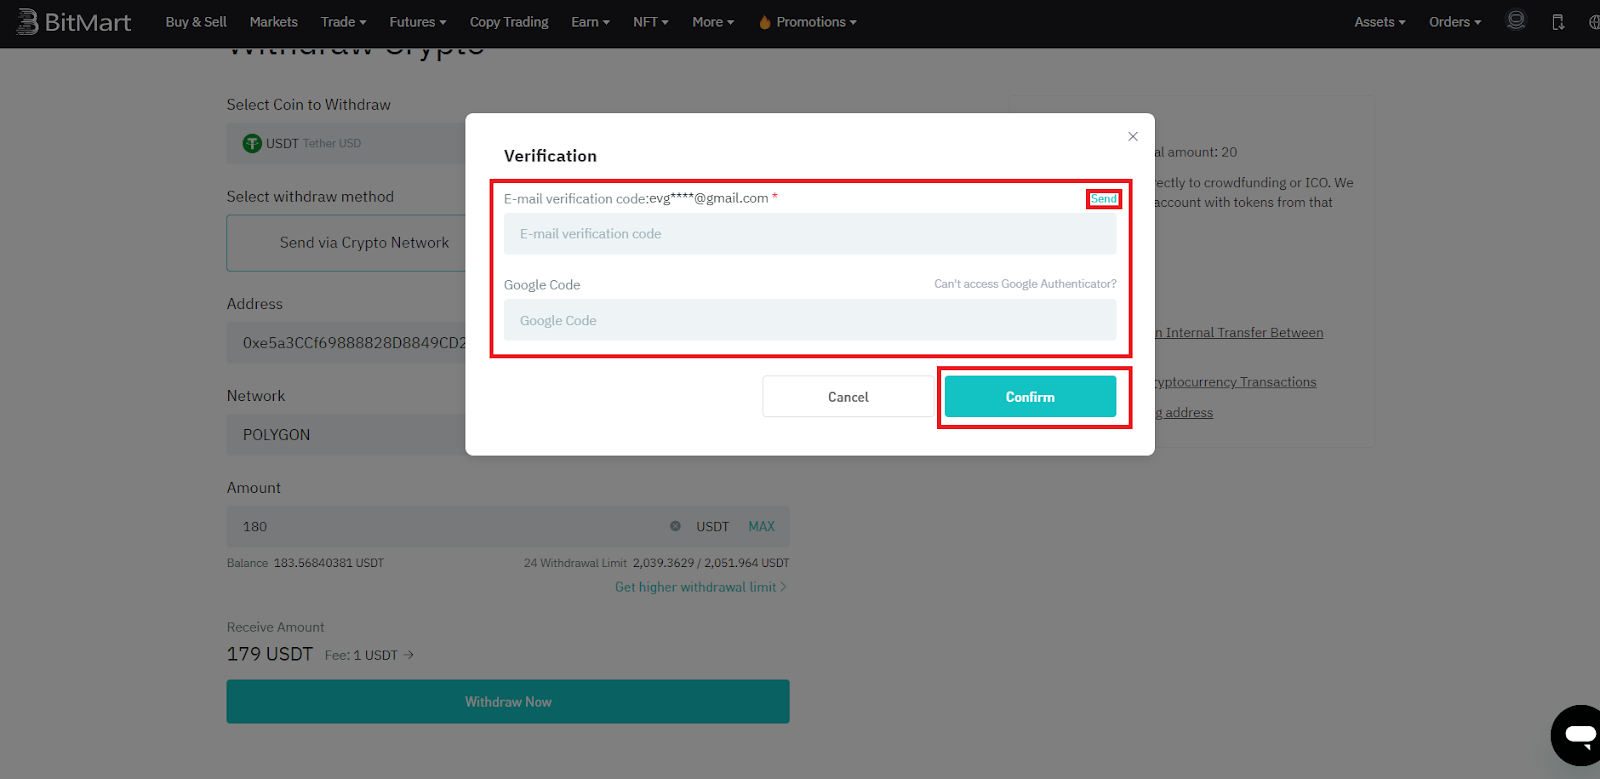
19. Return to BitMart. Enter the wallet address you copied from MetaMask, select the POLYGON network, and enter the amount of tokens you want to withdraw. Then click "Withdraw Now".
20. In the opened window, verify the accuracy of the transaction details and click on "Confirm".
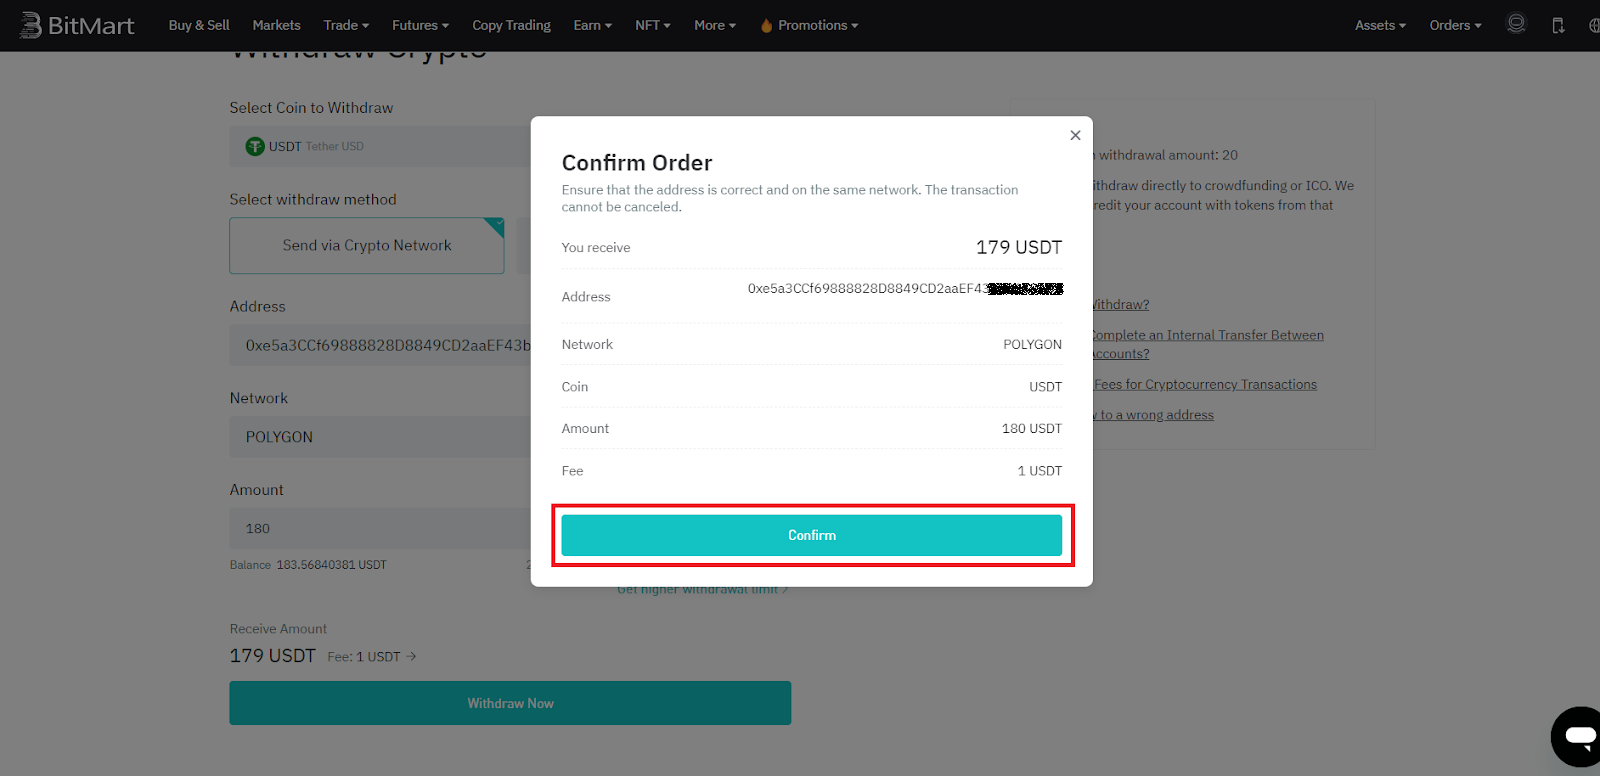
21. Click on "Send" and enter the code from the email you received. Then enter the code from the Google Authenticator app and click "Confirm".
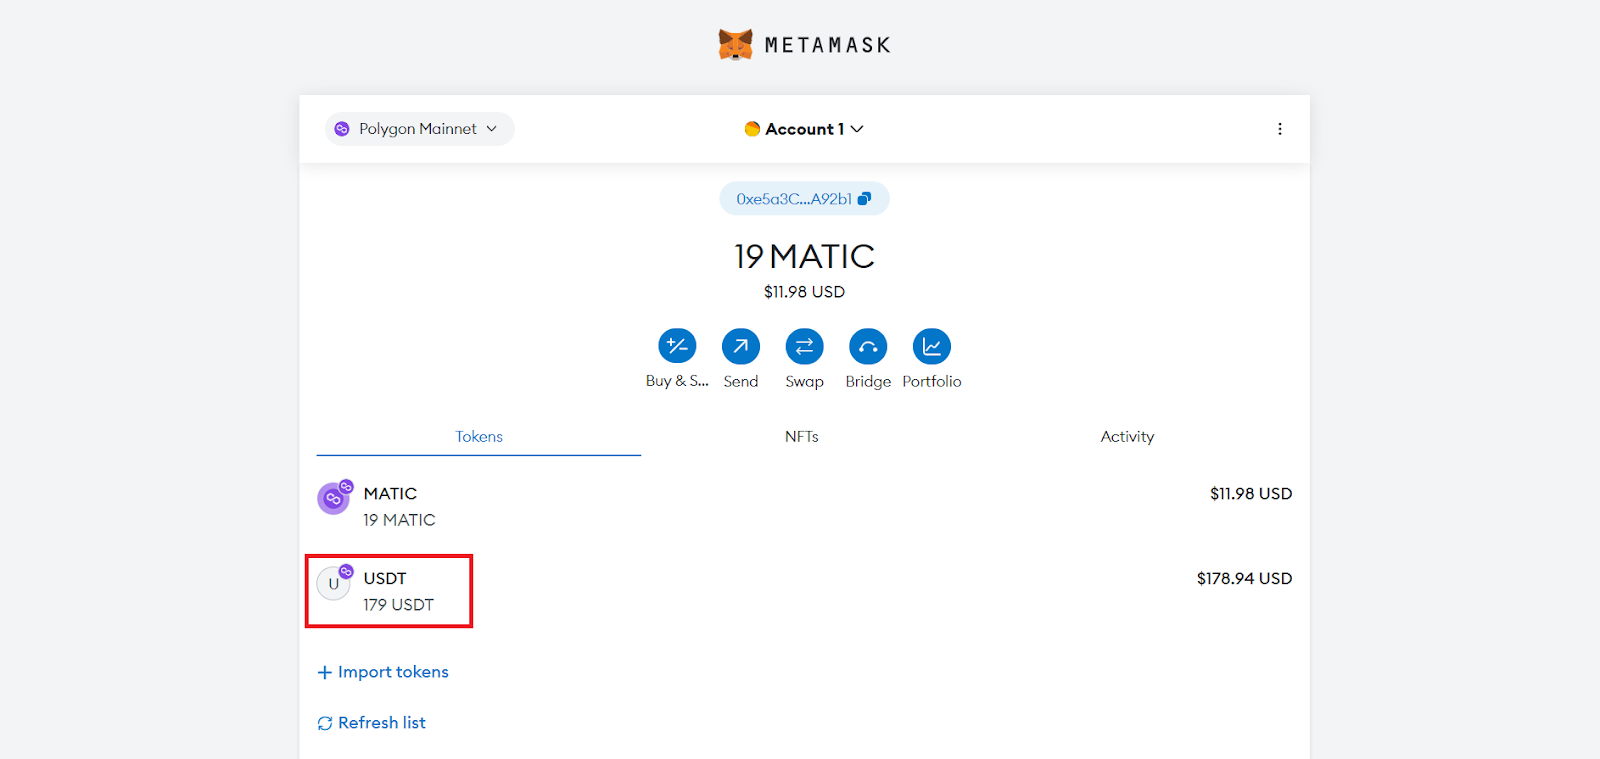
22. The USDT tokens will soon be deposited into your wallet. You can verify this by opening MetaMask.
Step 4.7: Exchange USDT for SABAI on Uniswap
After you have withdrawn USDT and MATIC to your MetaMask wallet, you need to purchase $SABAI tokens. The easiest way to do this is through the decentralized exchange Uniswap.
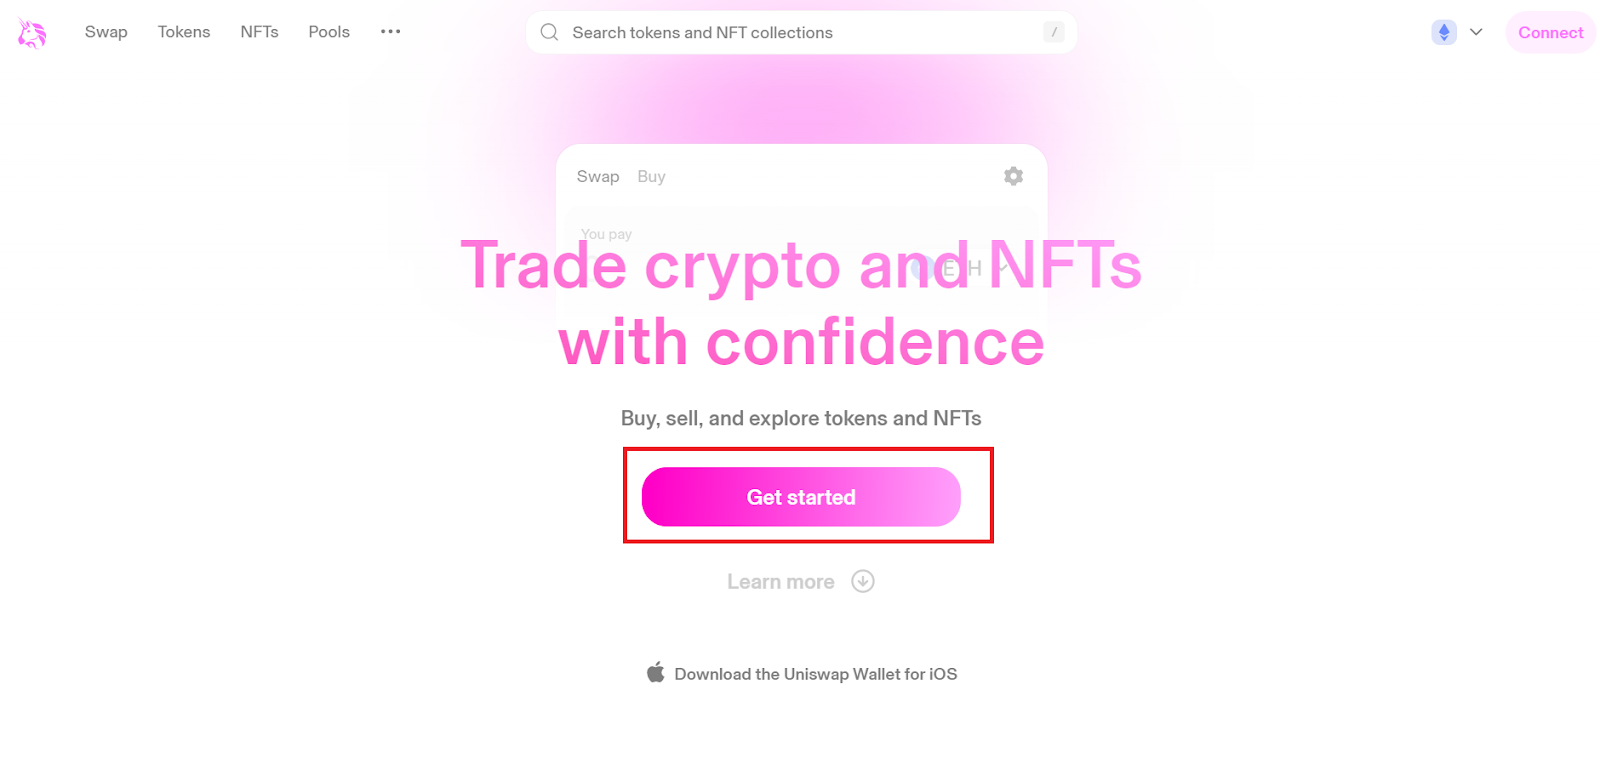
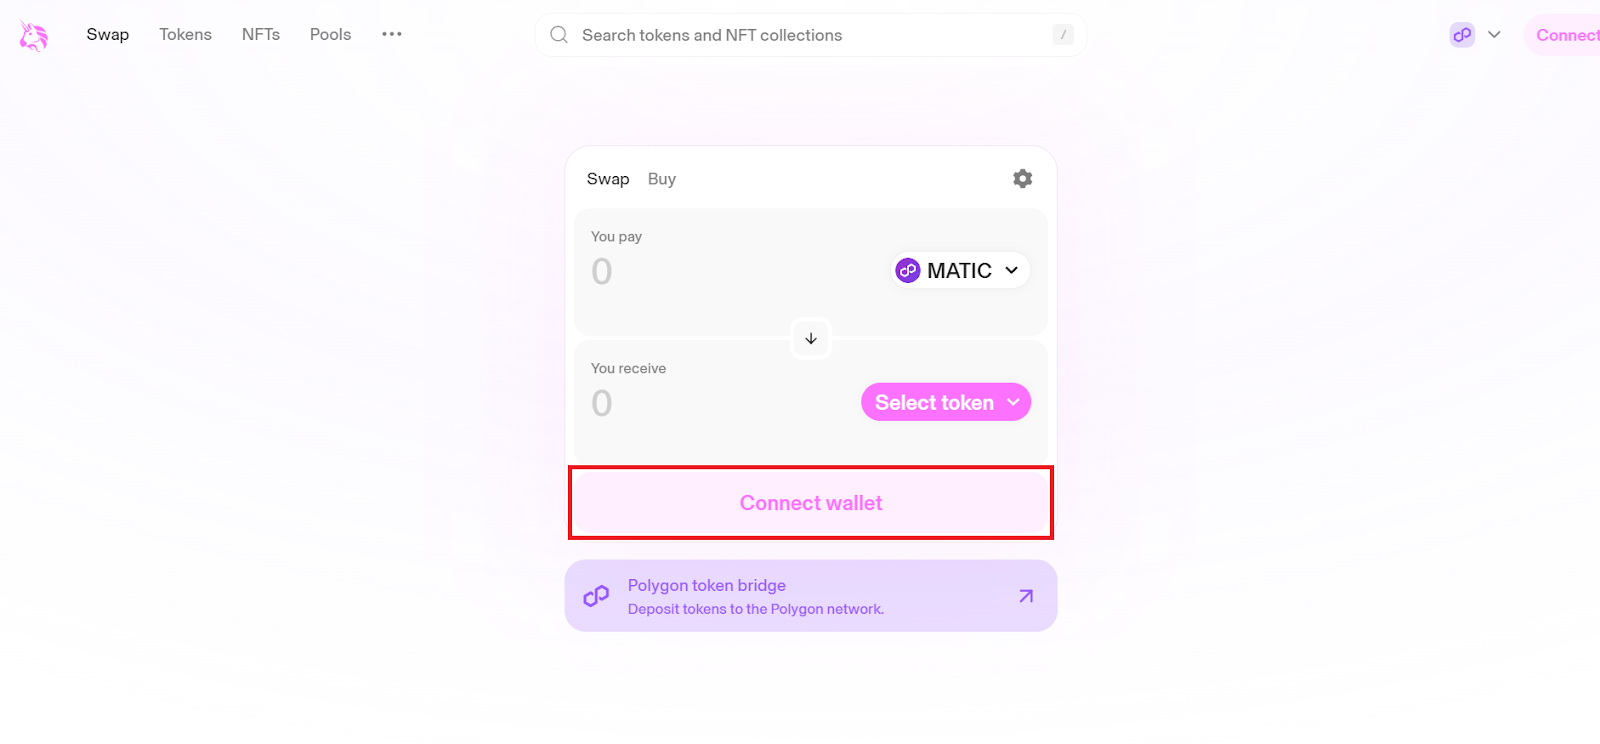
1. Go to the Uniswap exchange website and click on "Get Started".
2. Select the Polygon network.
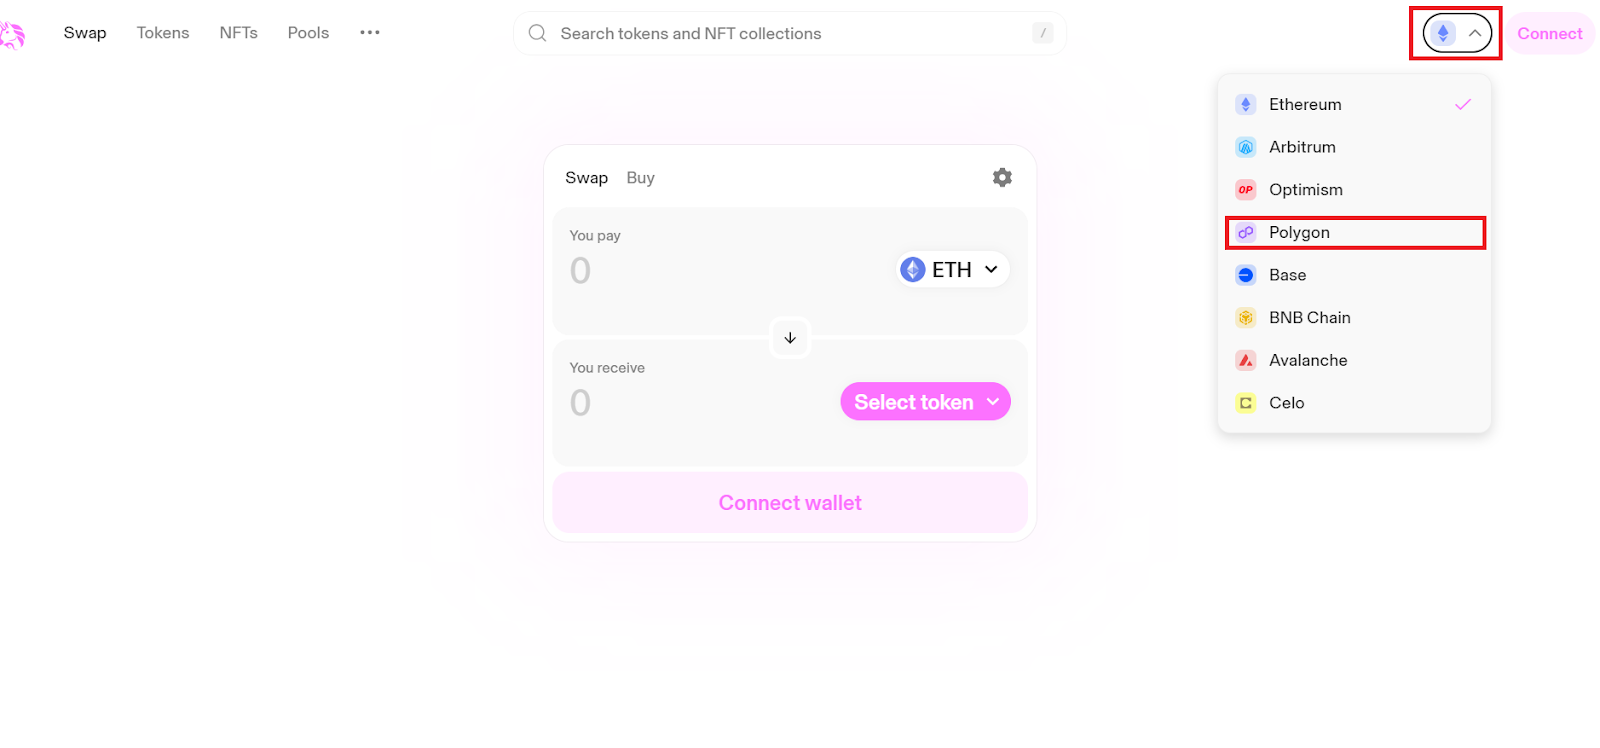
3. Click on "Connect wallet".
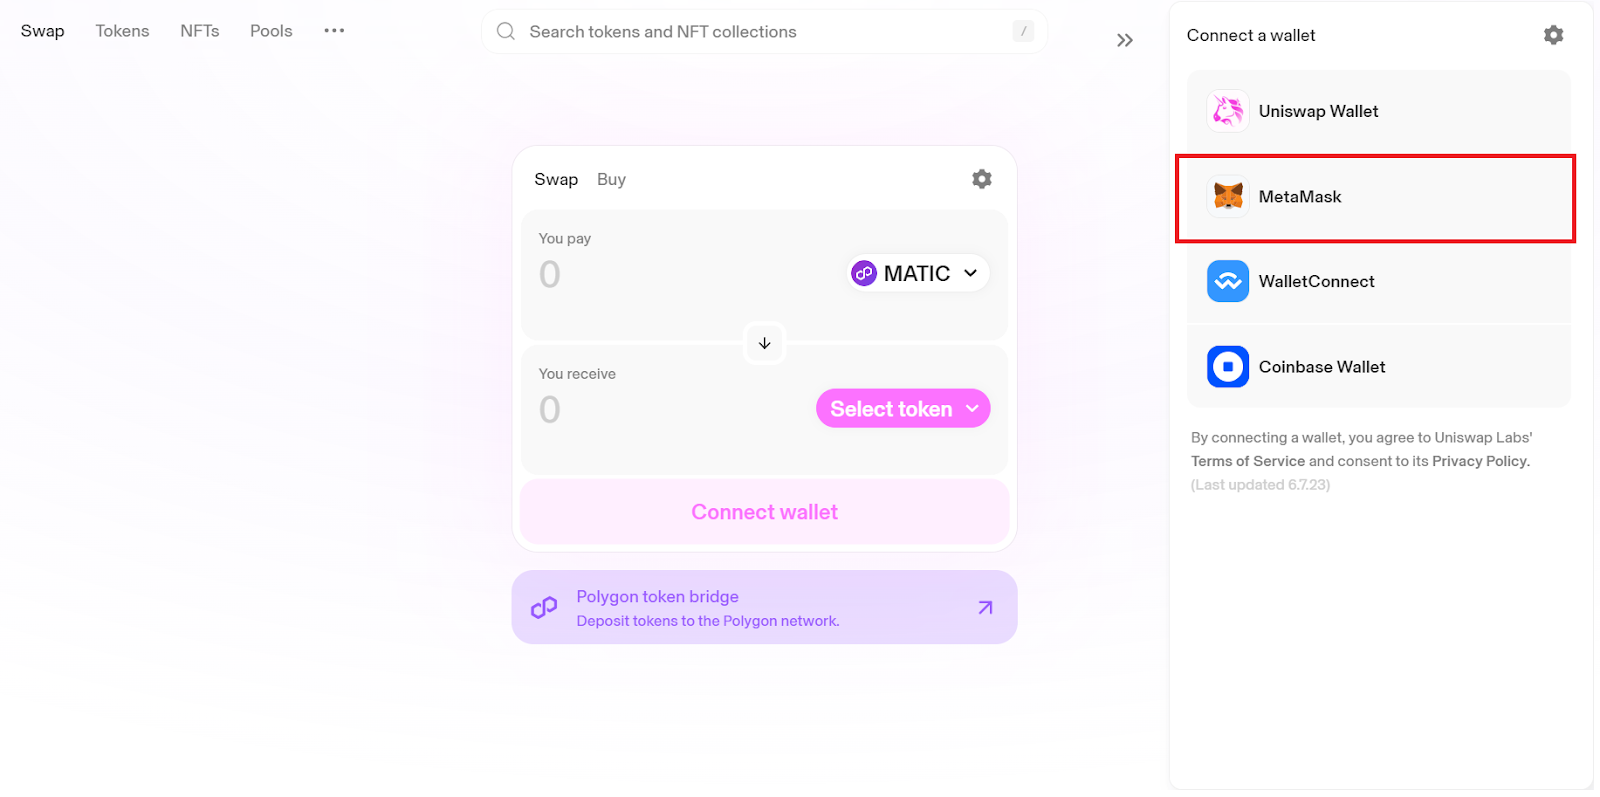
4. Choose MetaMask.
5. In the opened window, click on "Next".
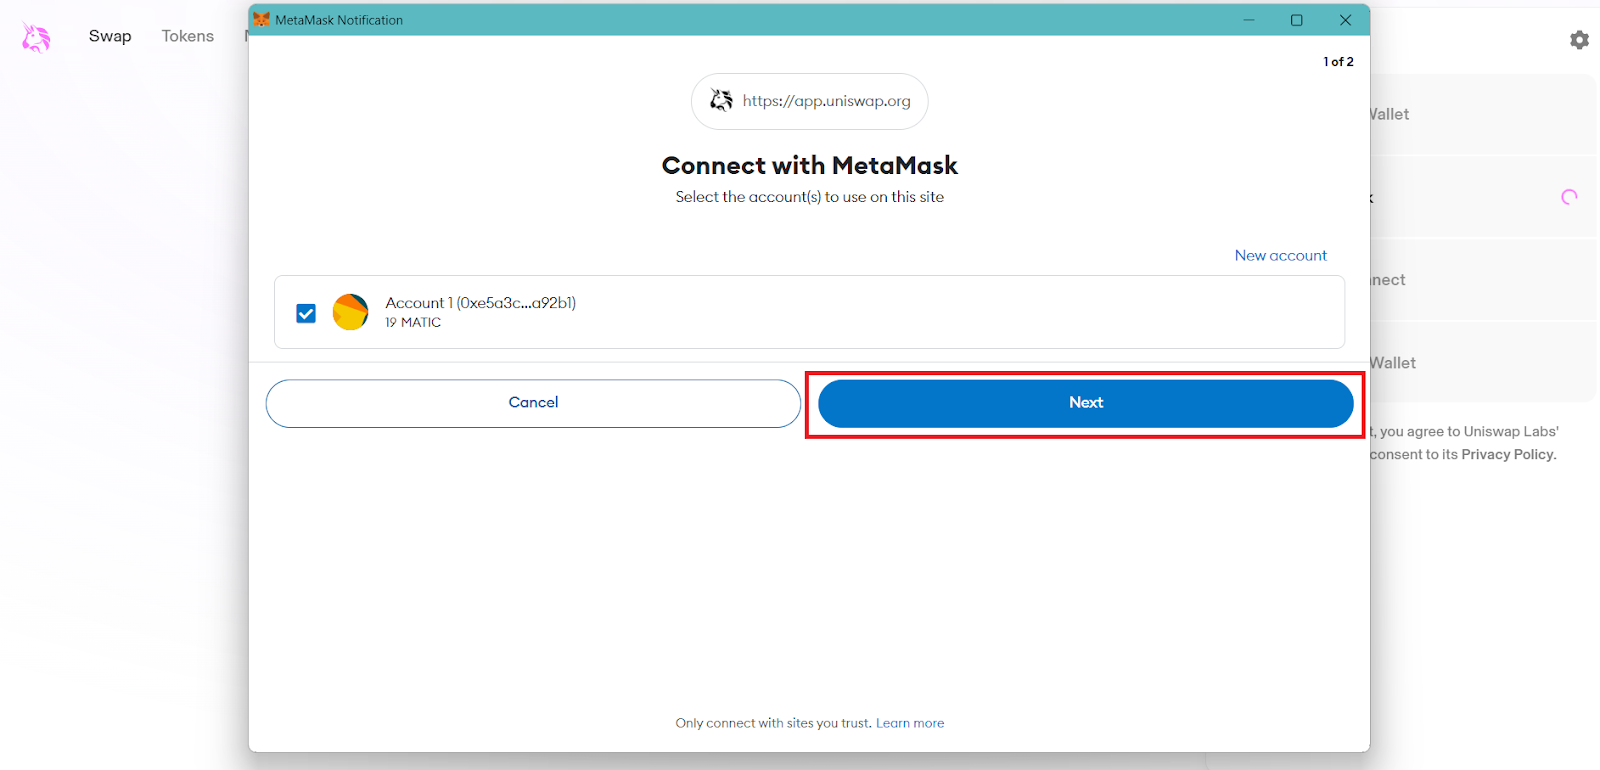
6. Then click on "Connect".

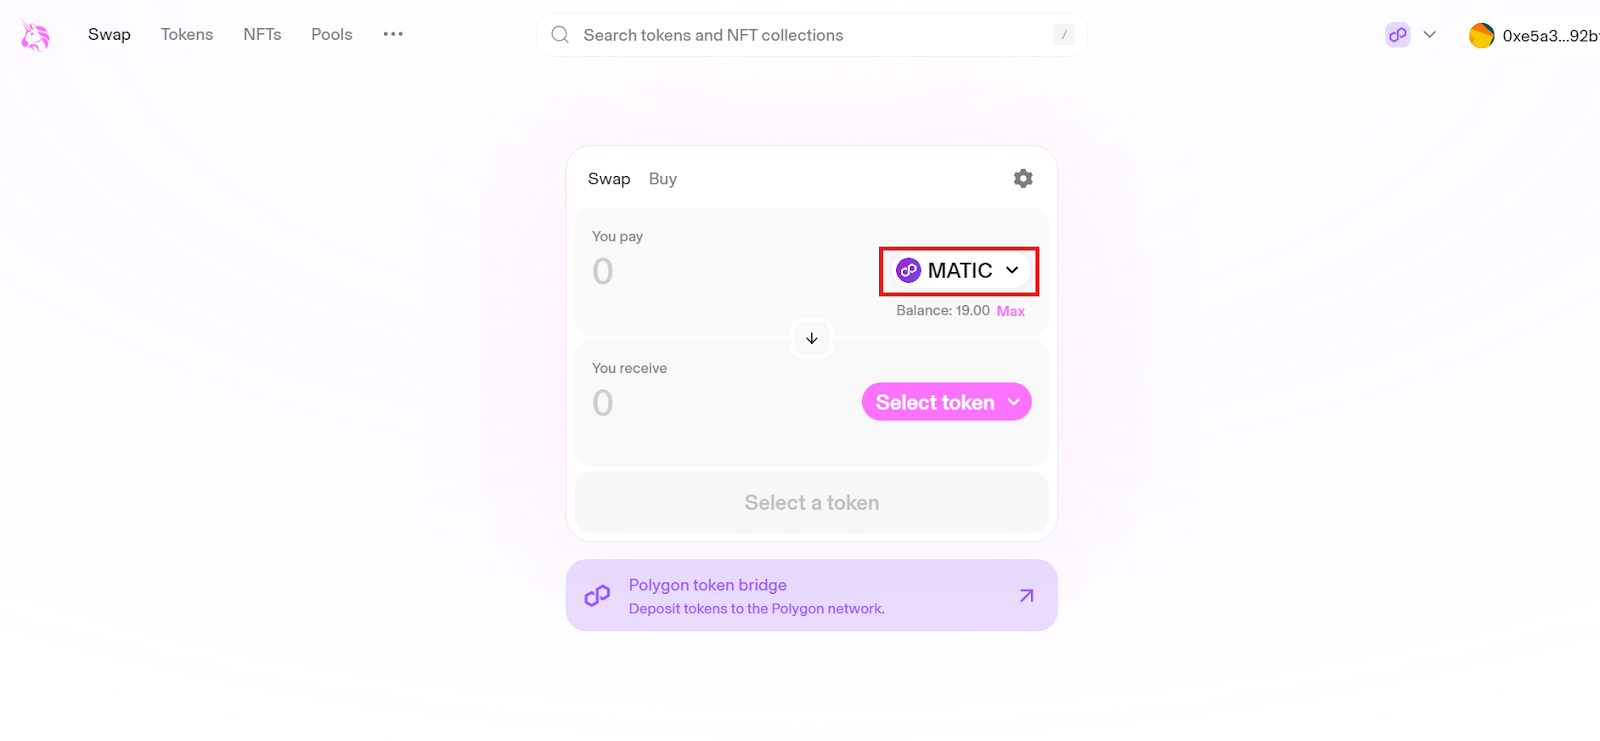
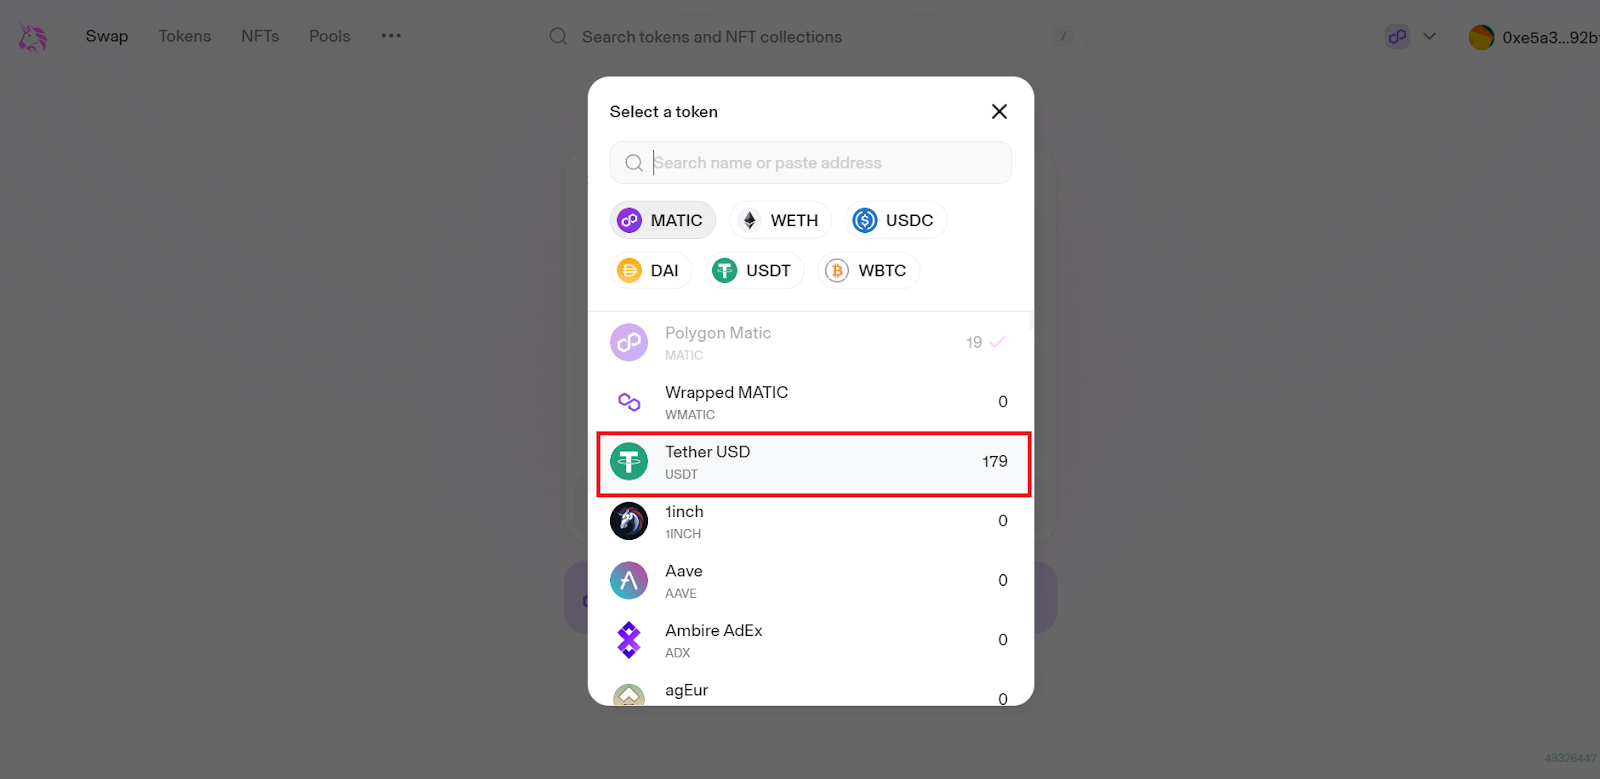
7. Click on the token you want to exchange for $SABAI token.
8. From the list provided, select Tether USDT (full name USDT).
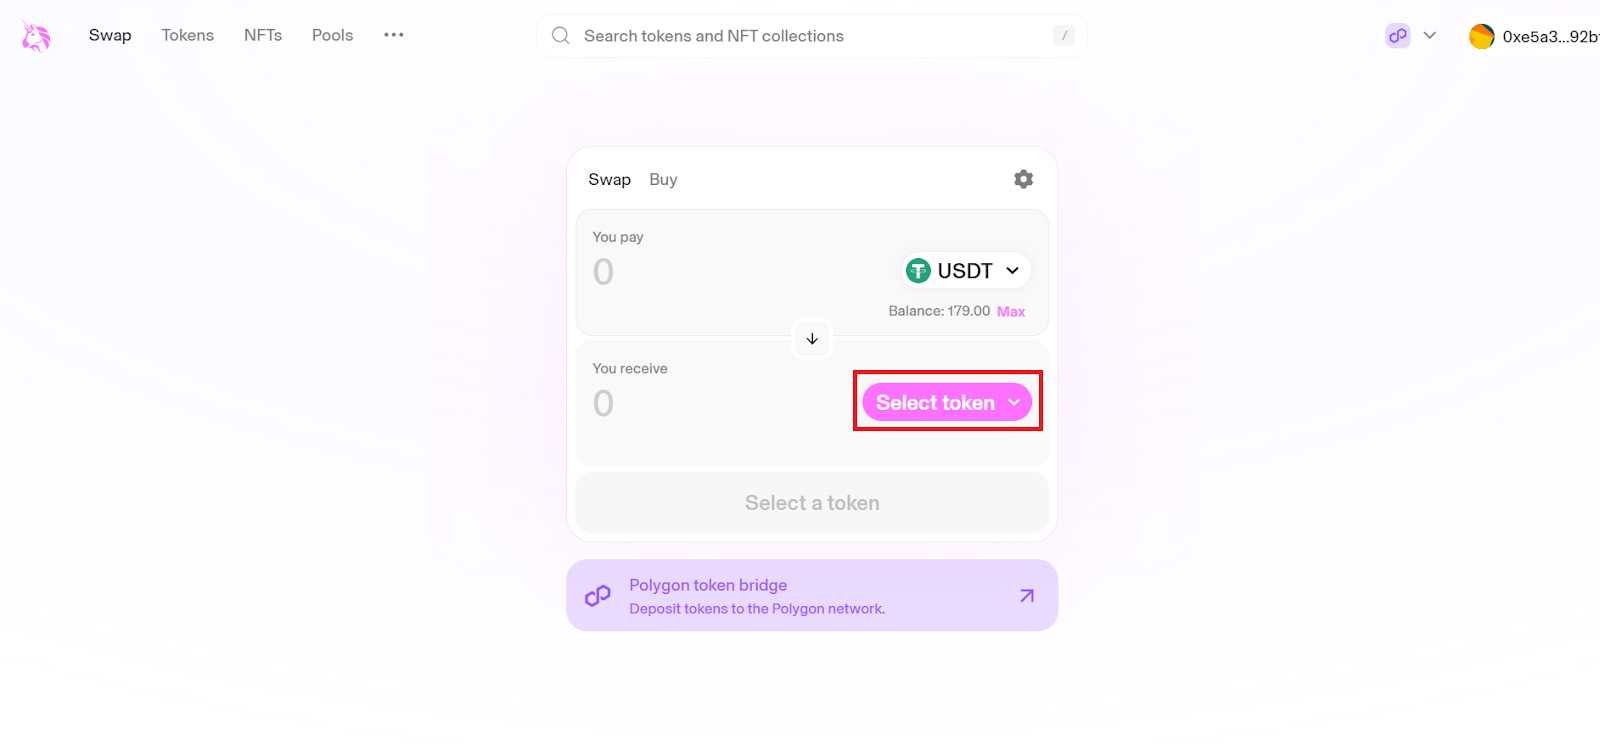
9. Then click on "Select token" to choose the token you want to buy.
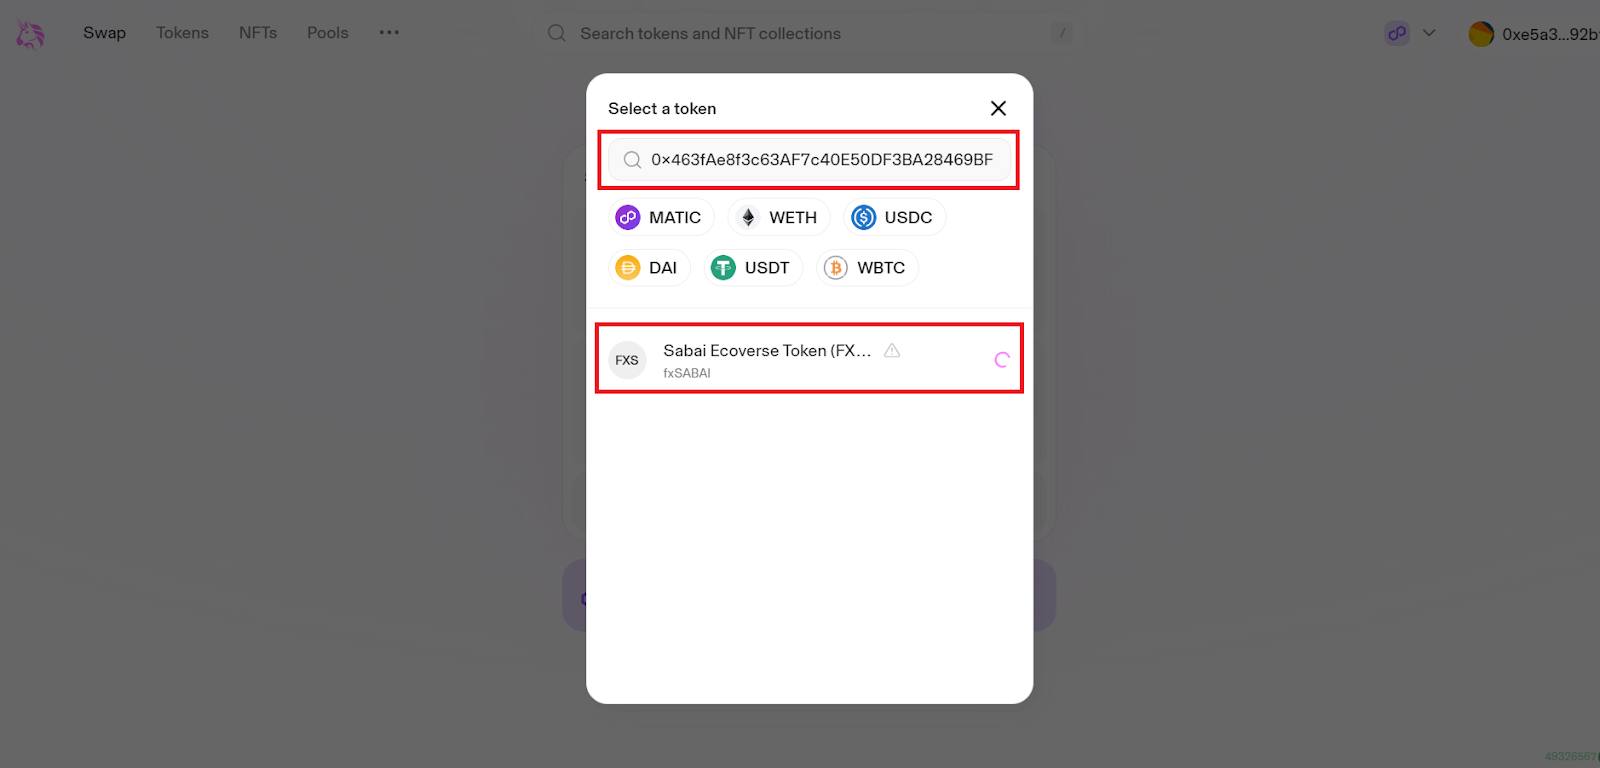
10. In the opened window, enter the contract address for $SABAI token (0x463fAe8f3c63AF7c40E50DF3BA28469BF9942f69) and click on the suggested token.
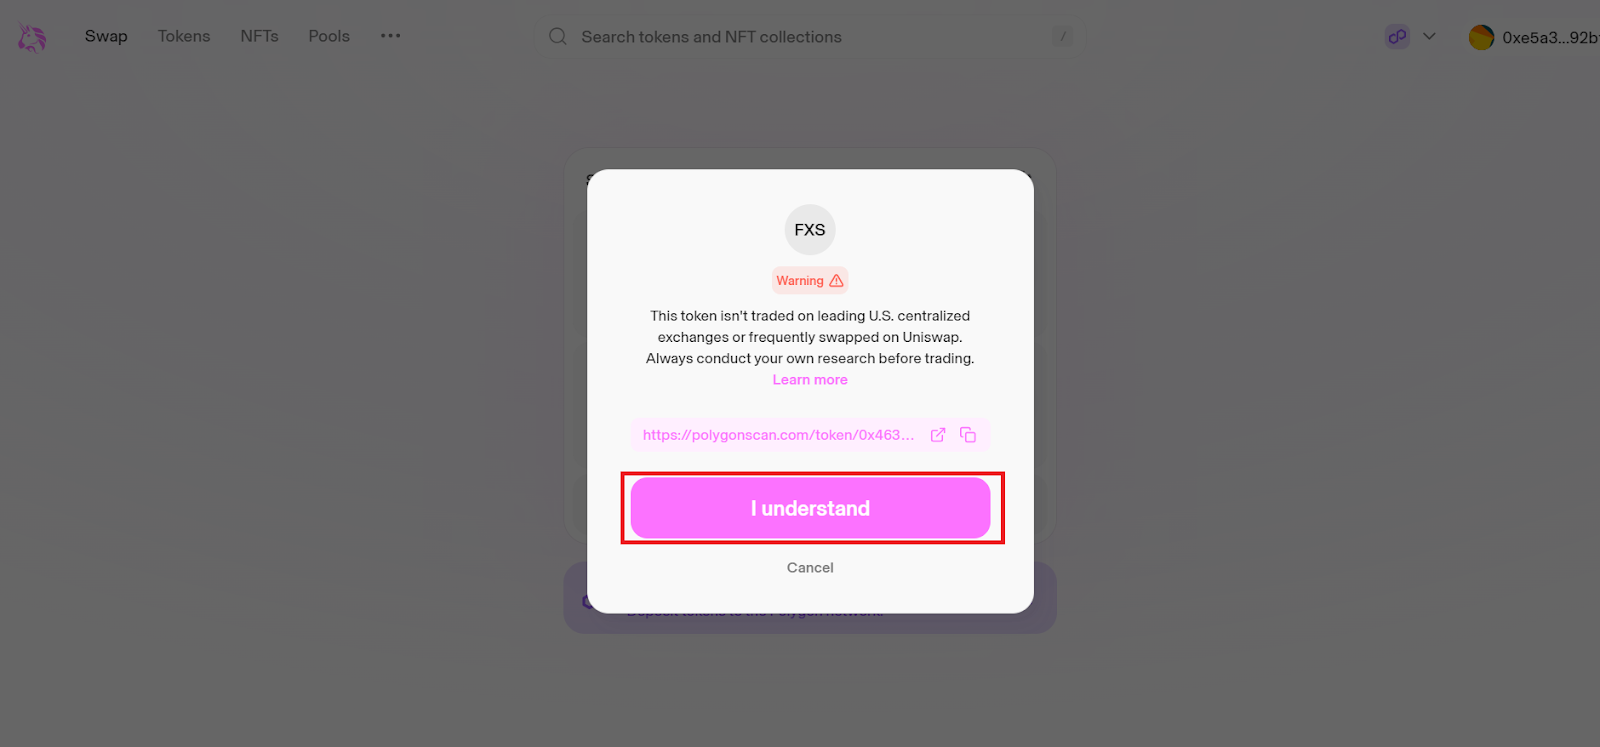
11. Then review the information and click on "I Understand".
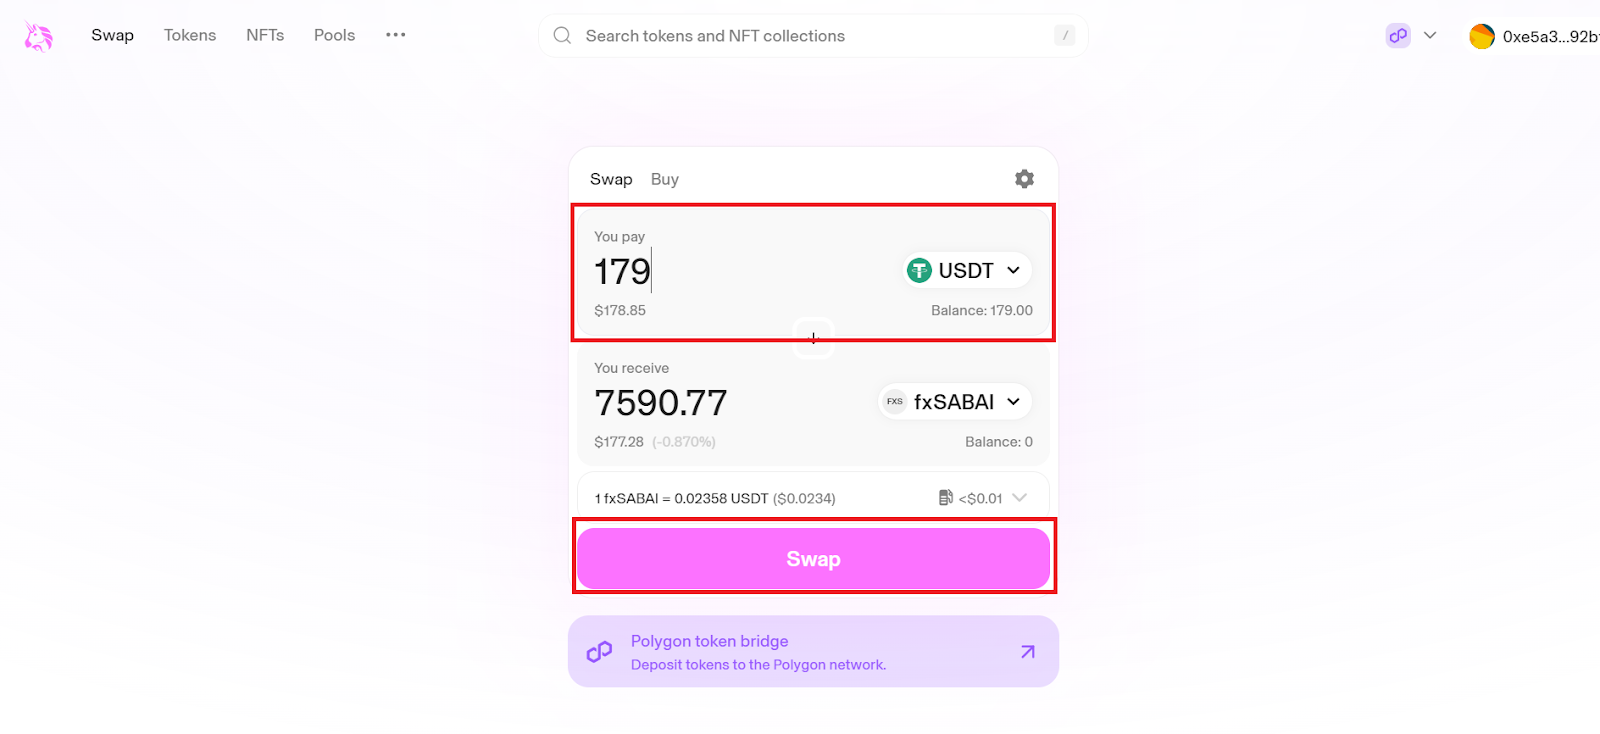
12. Specify the amount of USDT you want to exchange. Then click on "Swap".
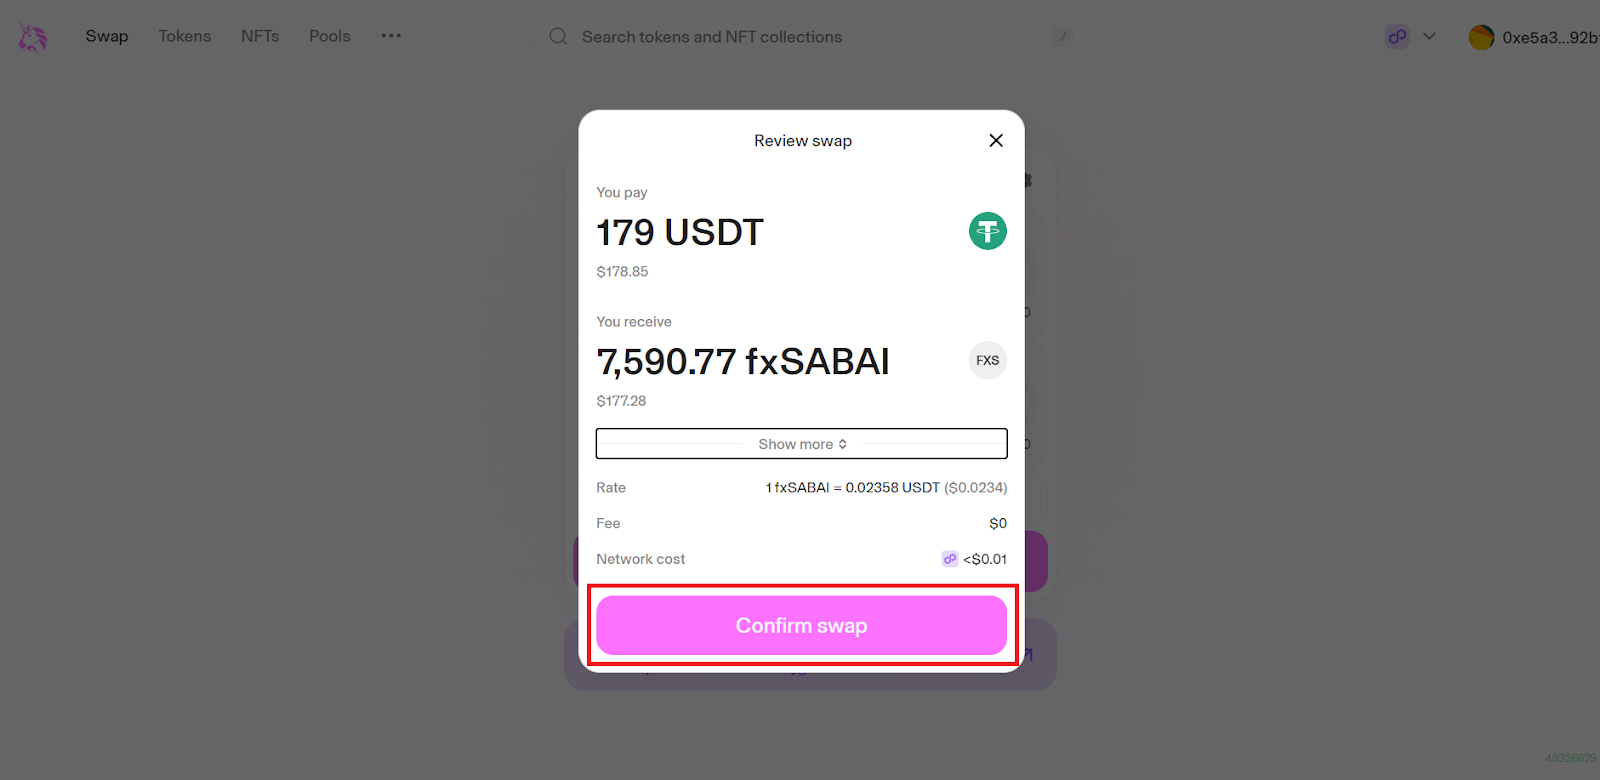
13. Next, click on Confirm Swap.
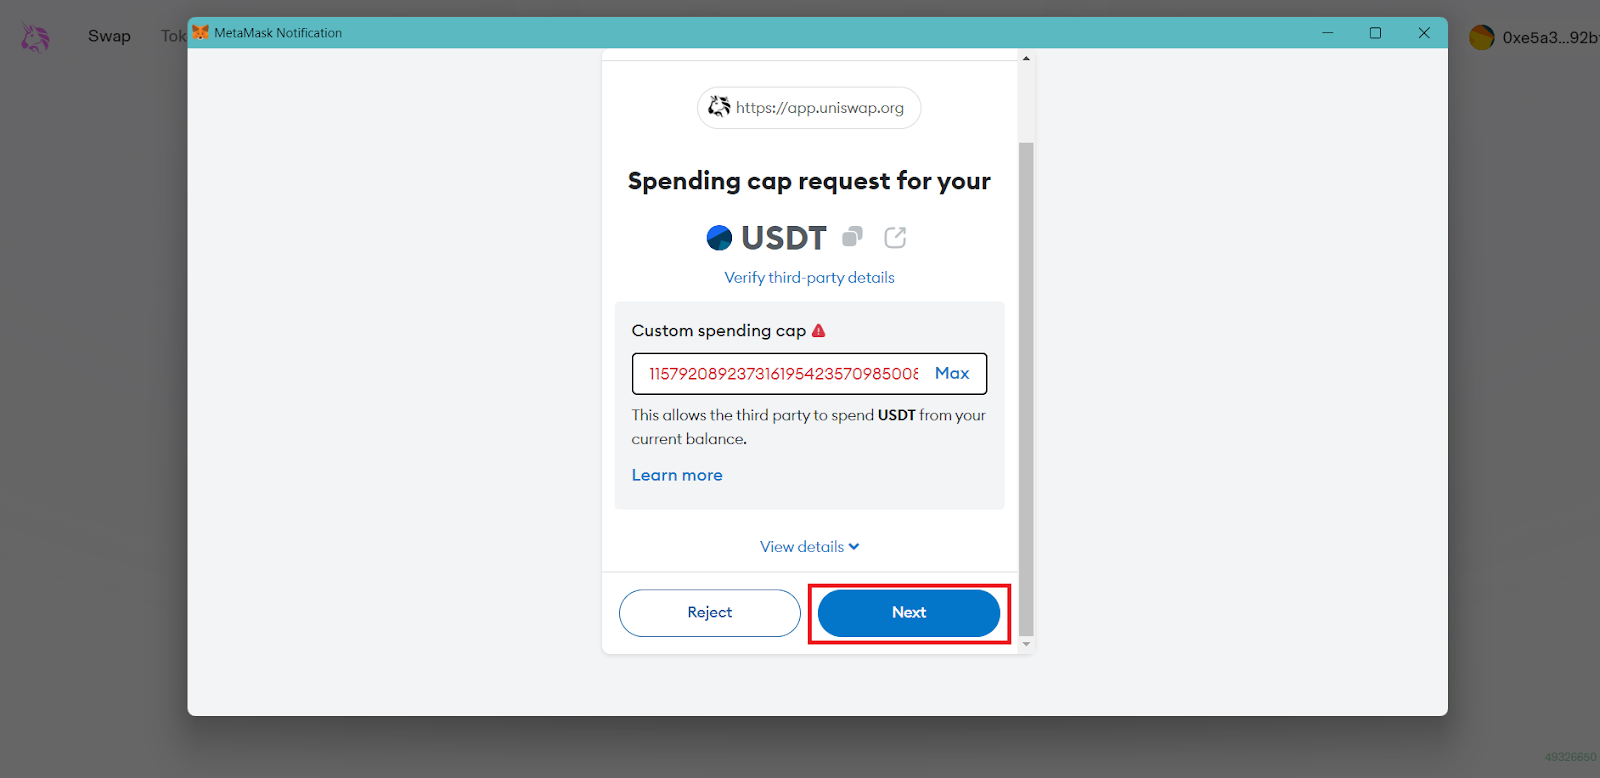
14. In the opened window, click on "Next".
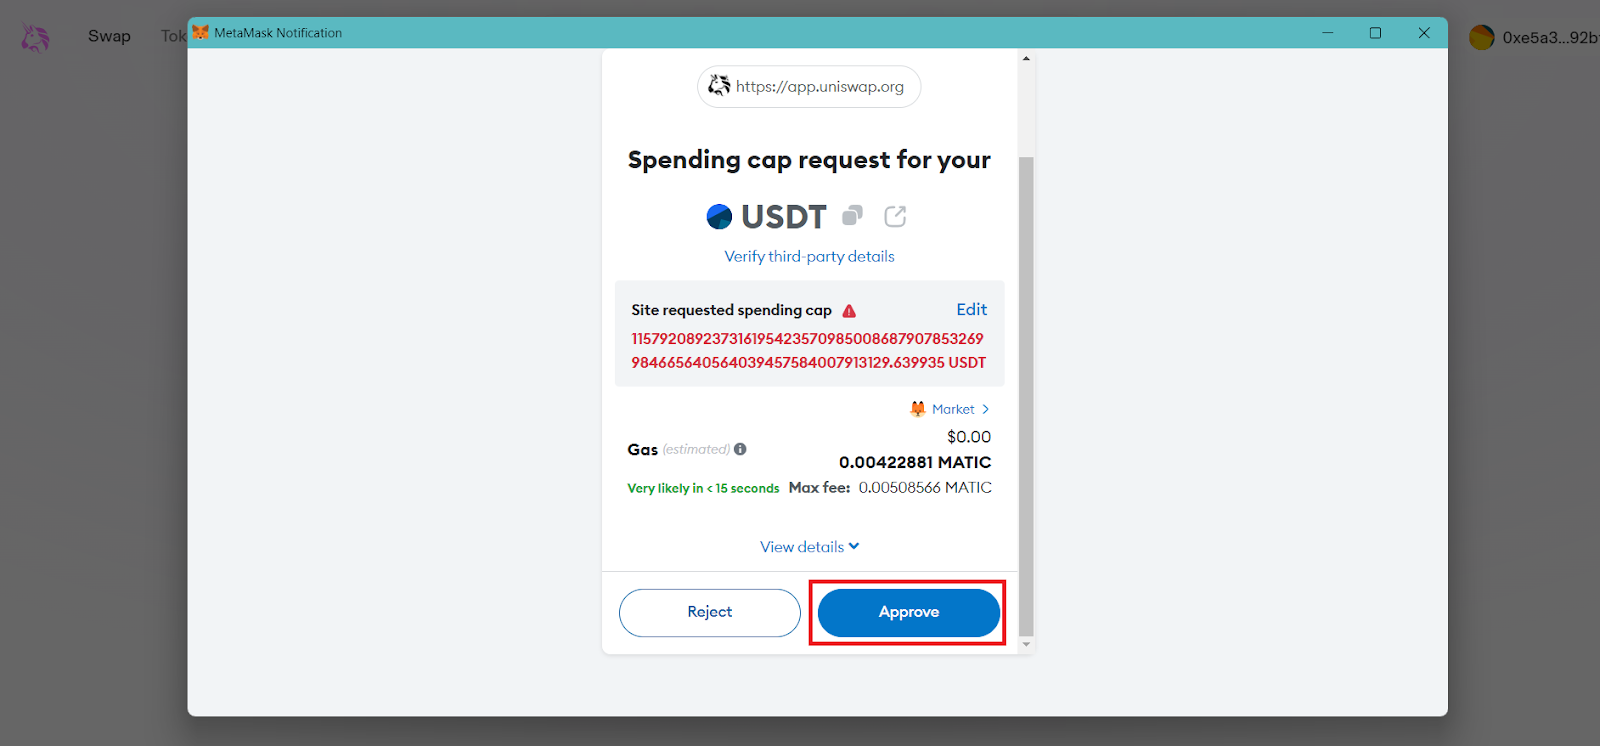
15. Then click on "Approve".
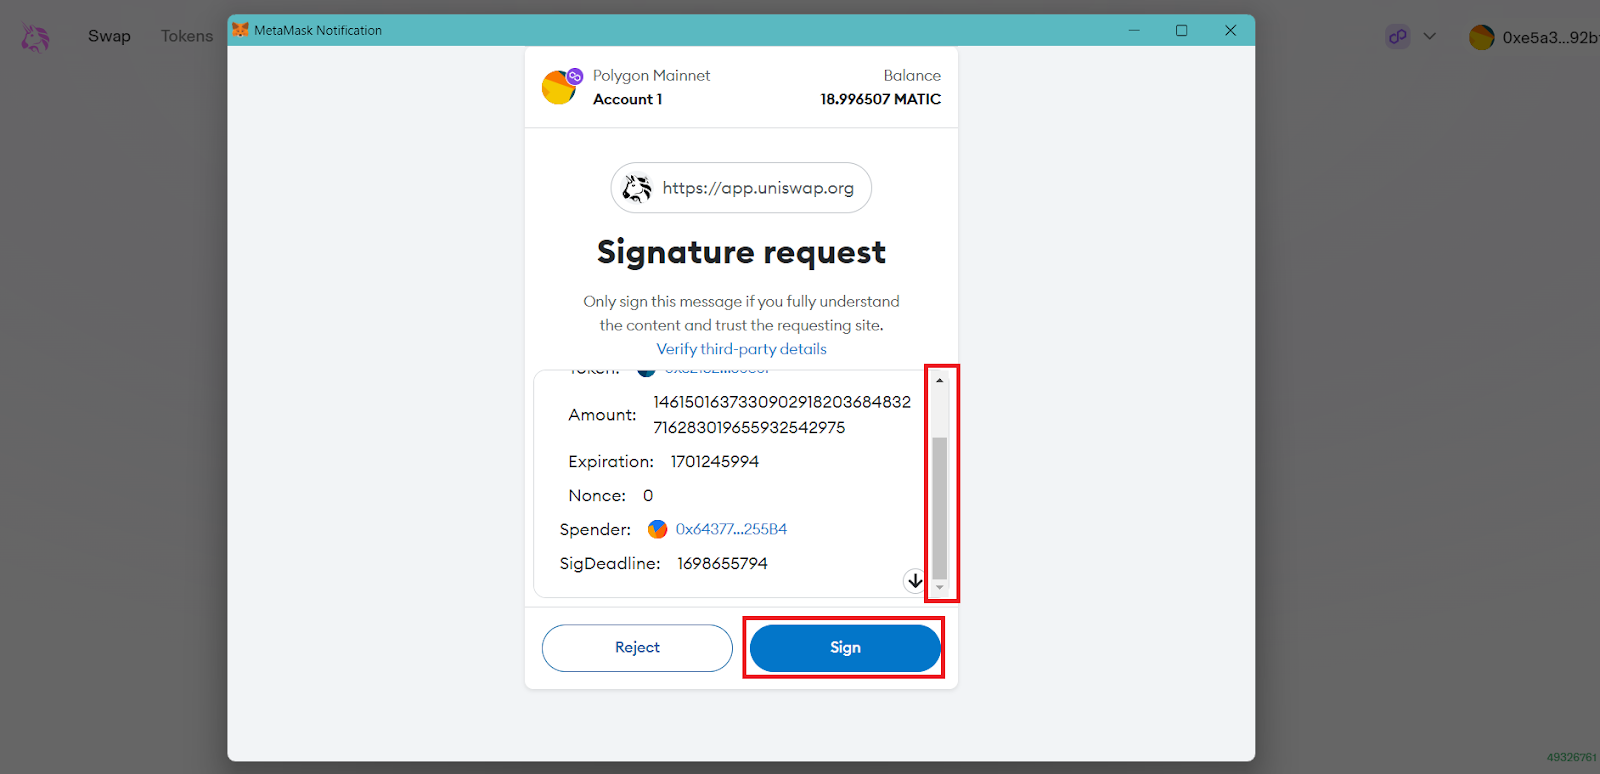
16. Wait for a new window to appear. Read the information in full and click on "Sign".
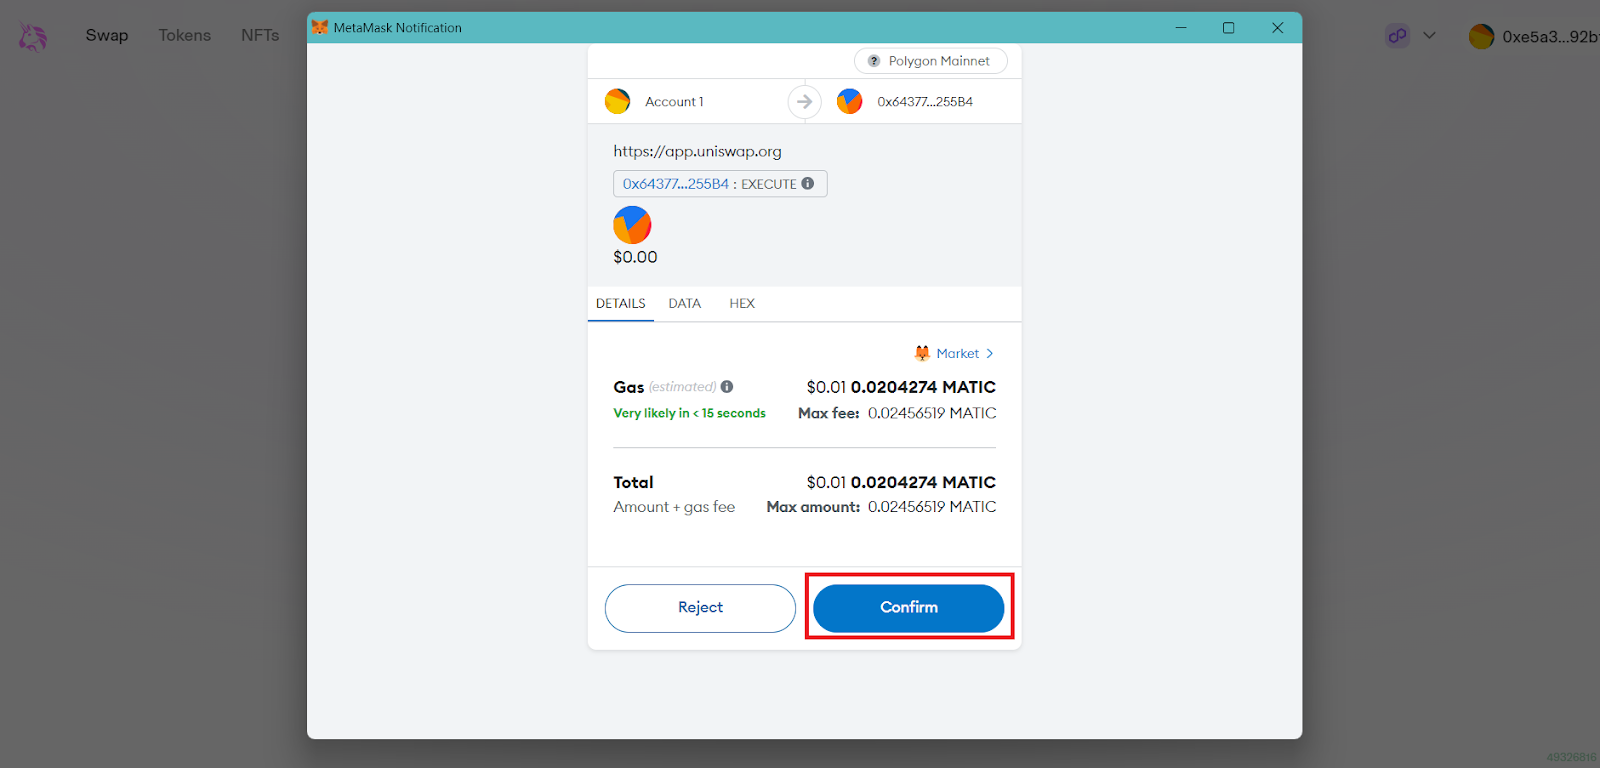
17. Then click on "Confirm".
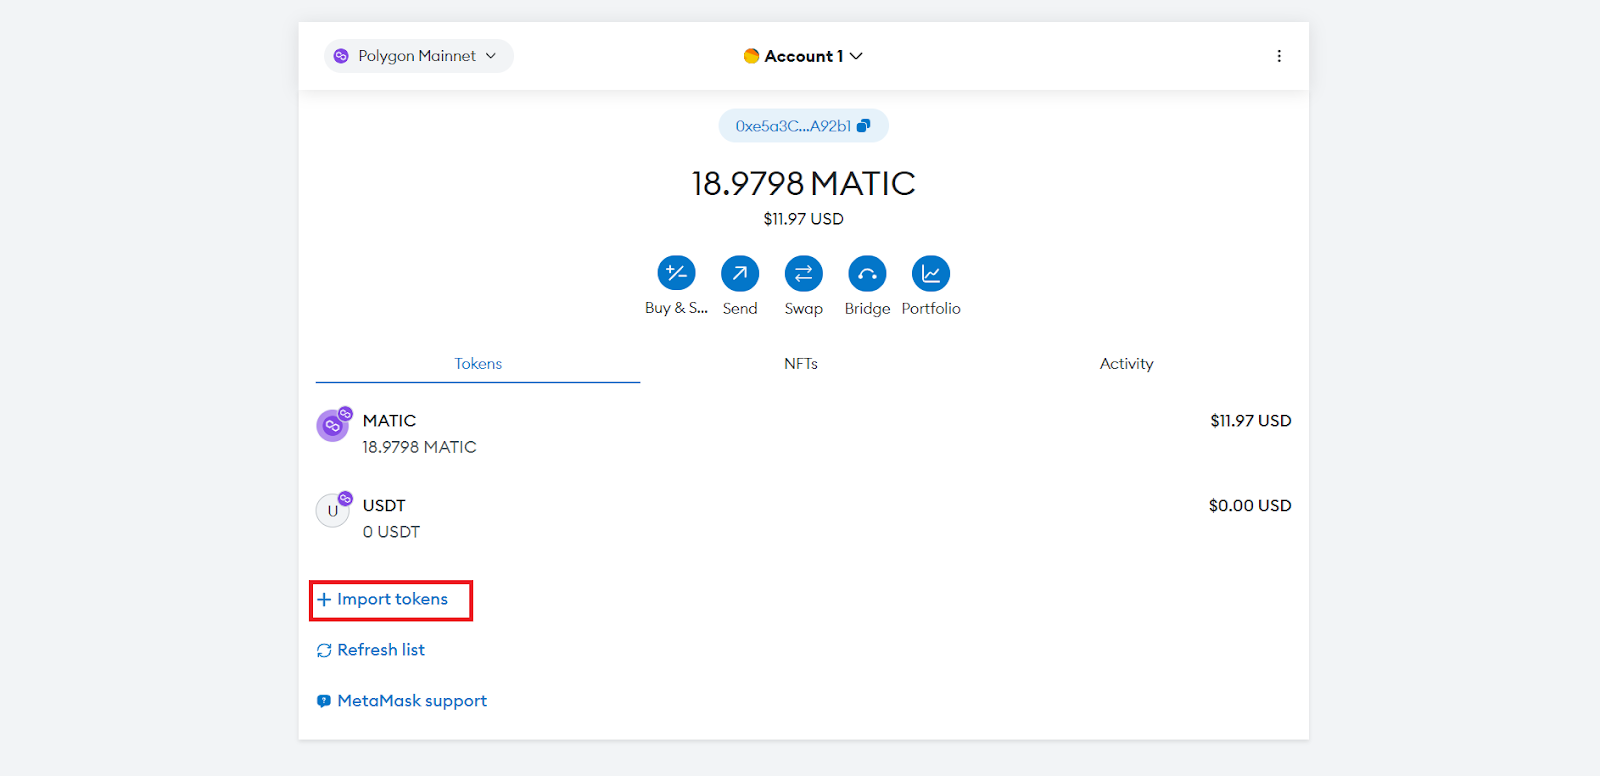
18. Congratulations! You have successfully acquired SABAI tokens. To see them in your wallet, go to MetaMask and click on Import tokens.
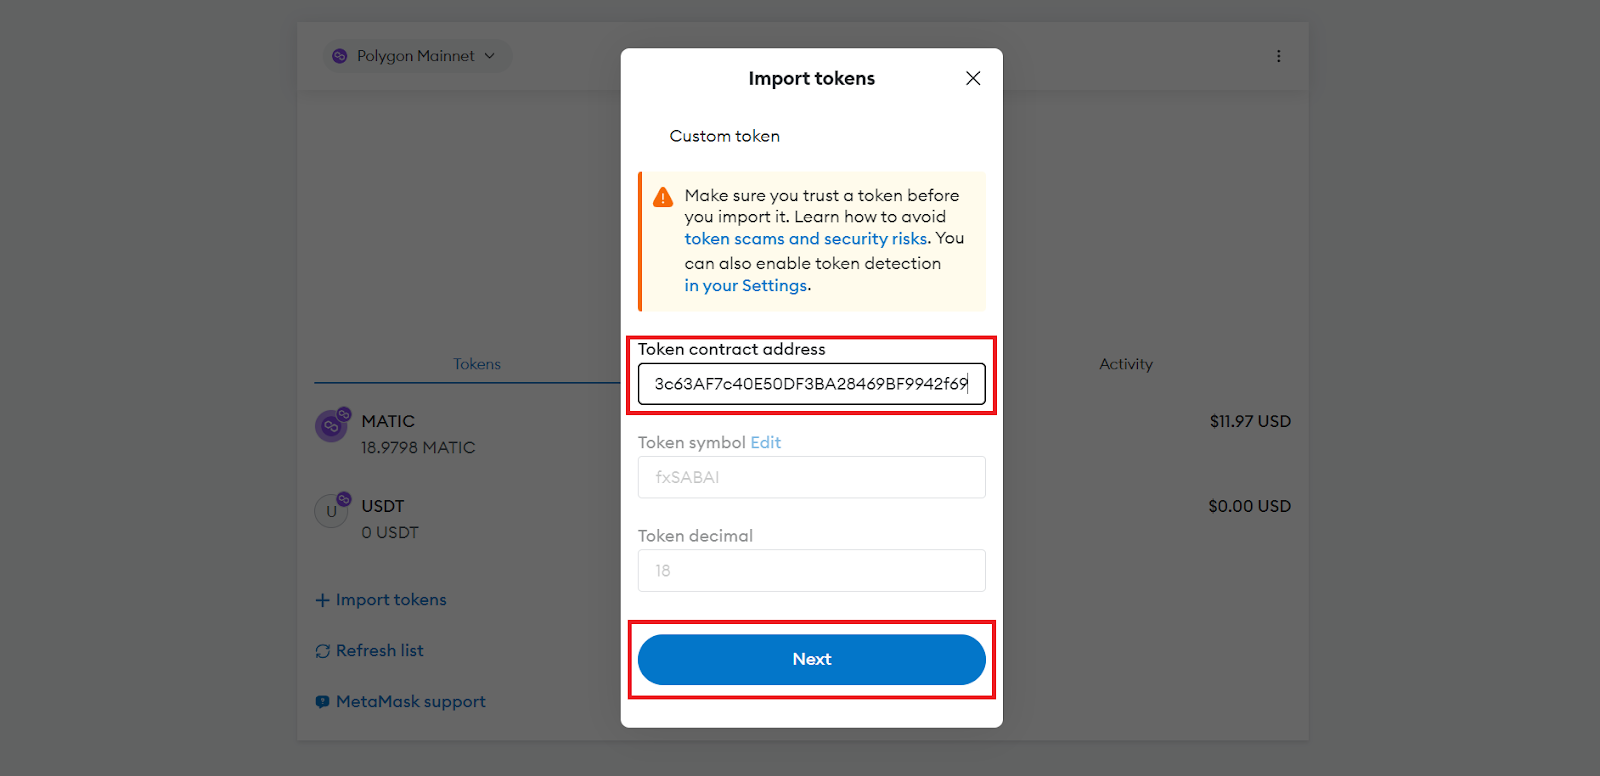
19. In the opened window, enter the contract address for $SABAI token (0x463fAe8f3c63AF7c40E50DF3BA28469BF9942f69) and click on "Next".
20. Then click on "Import".
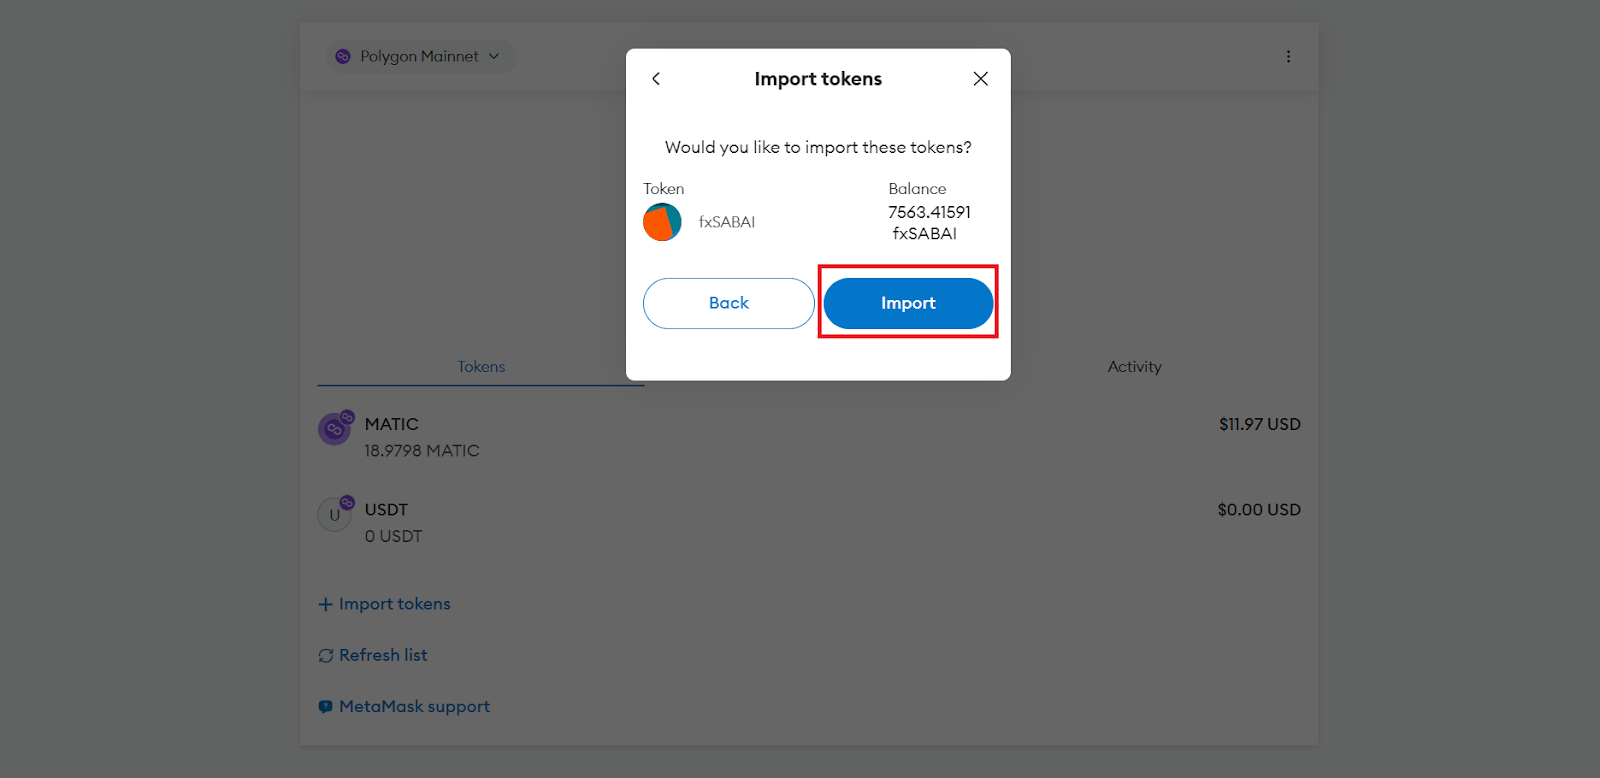
21. Make sure that the $SABAI tokens have been received in your wallet.

22. Congratulations on the acquisition of $SABAI tokens!
Step 5: Level Up Your Rank in Sabai Light to Level 5 - 25
1. Log into your Sabai ID and start playing Sabai Light by going to the "Ecosystem" section, then the "Sabai Light" subsection, and click on "Play now".
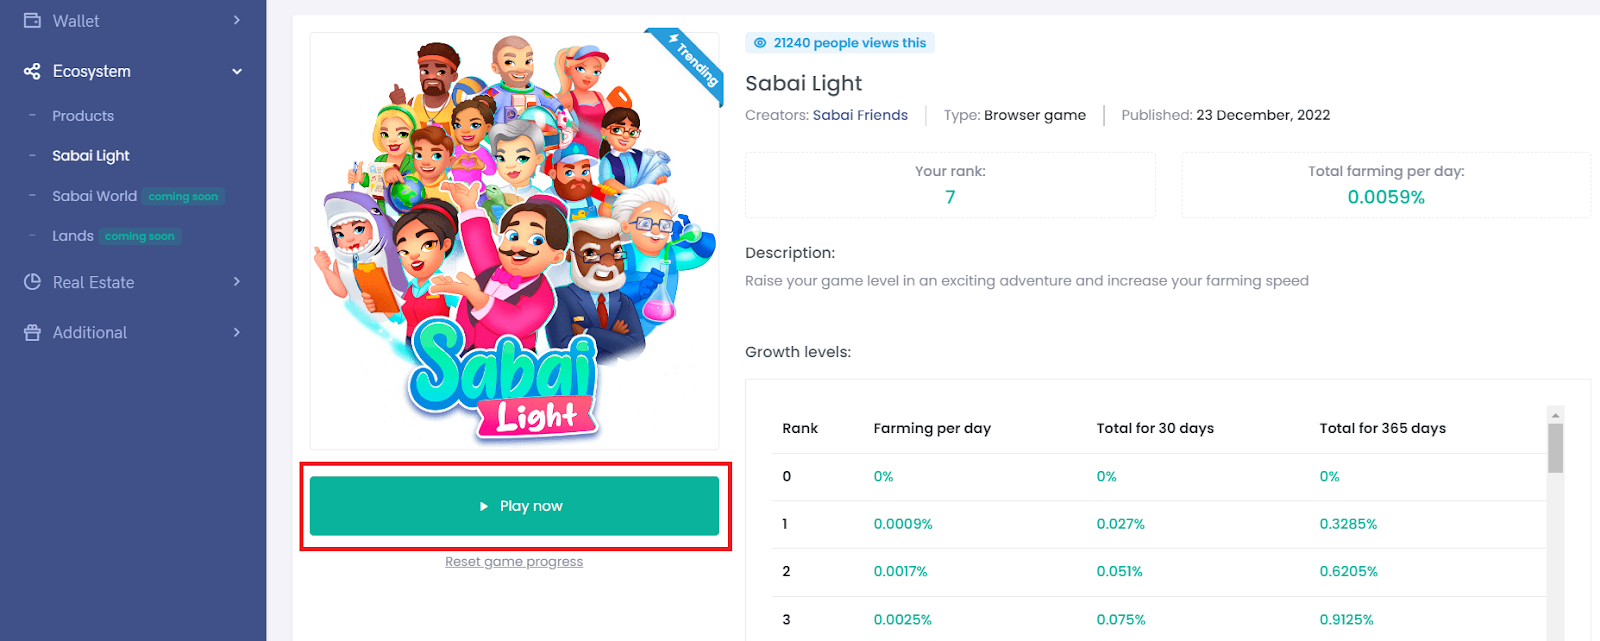
2. Then follow the simple in-game instructions:
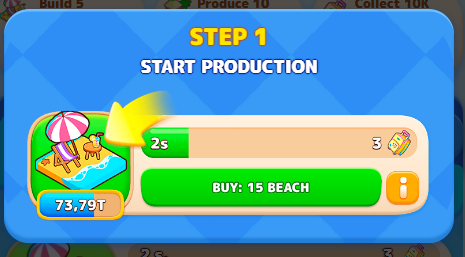


You can read more about the Sabai Light game here for more details.
3. You can check your current rank in the "Ecosystem" section, under the "Sabai Light" subsection or in the game itself.
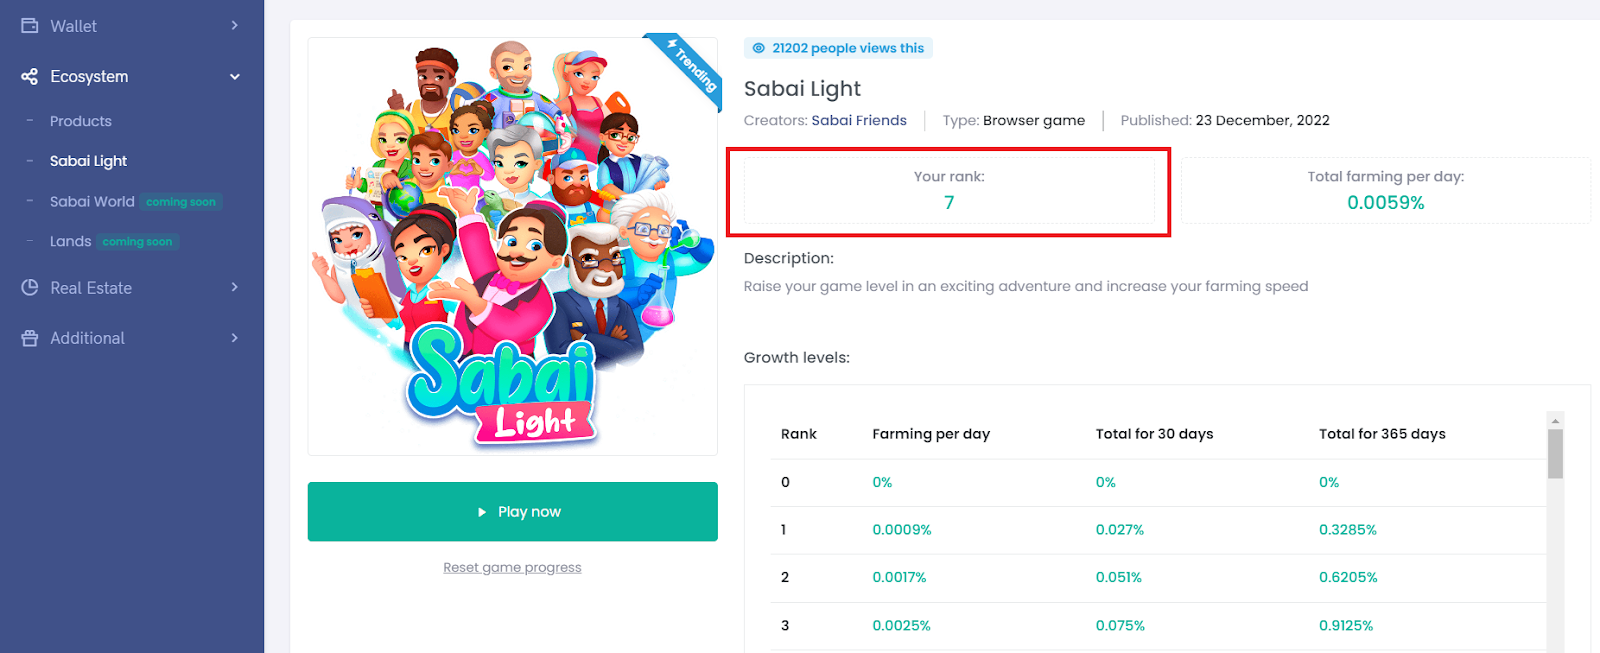
4. To activate the booster, you need to reach level 5 in the Sabai Light game. As your rank increases, your earnings will grow, so keep playing even after activating the booster!
Step 6: Start Staking
You have already reached rank 5 in Sabai Light and have access to the booster, now you can start staking $SABAI tokens and activate the booster for earnings!
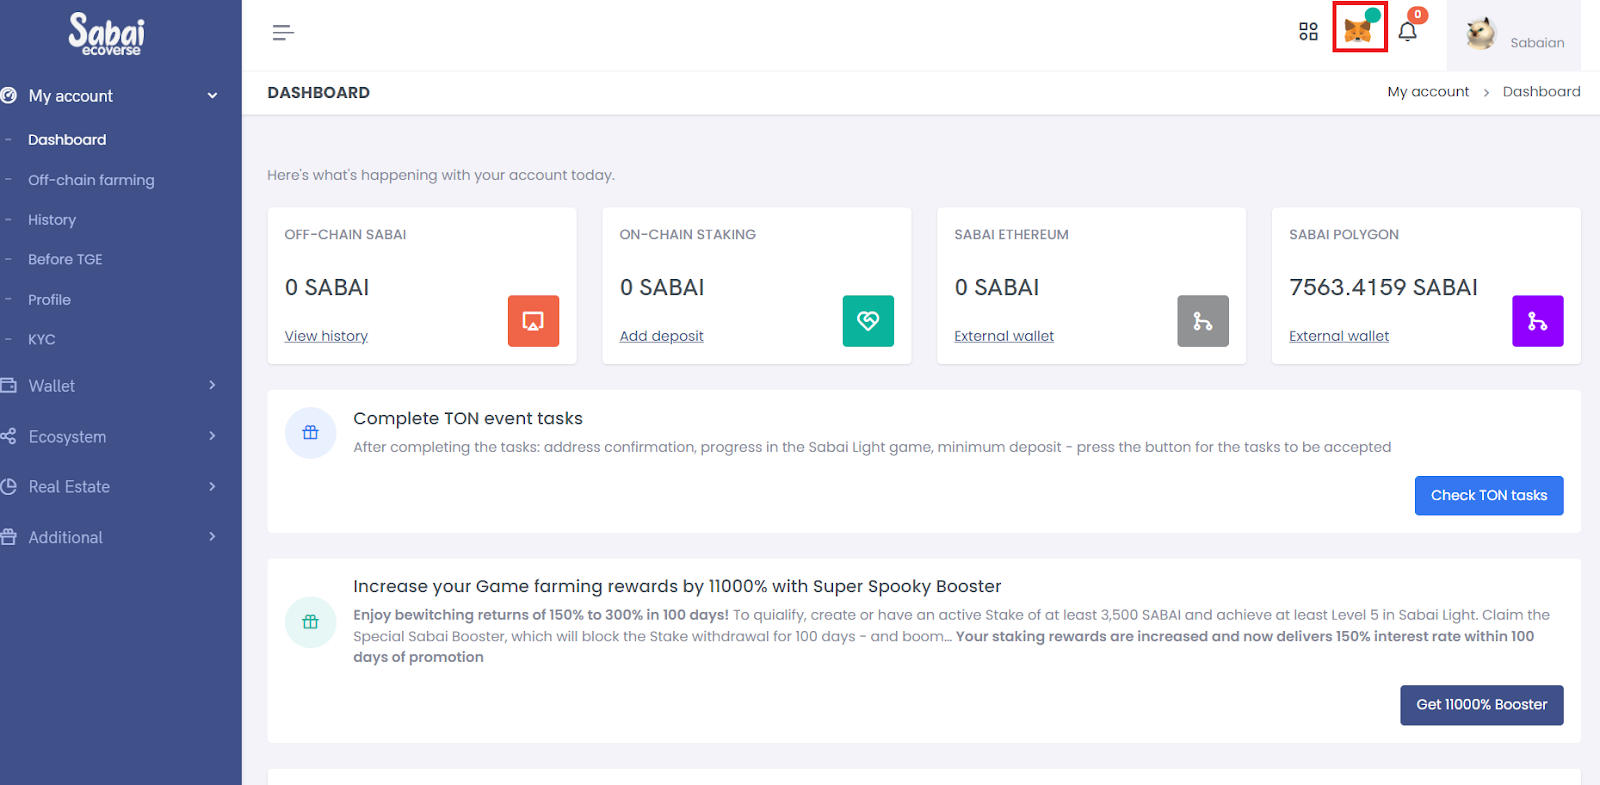
1. To start staking $SABAI tokens, go to your Sabai ID. Make sure that the MetaMask connection is active (green indicator). If the indicator is red, click on the MetaMask logo.
2. Go to the "Wallet" section, then the "On-chain staking" subsection.
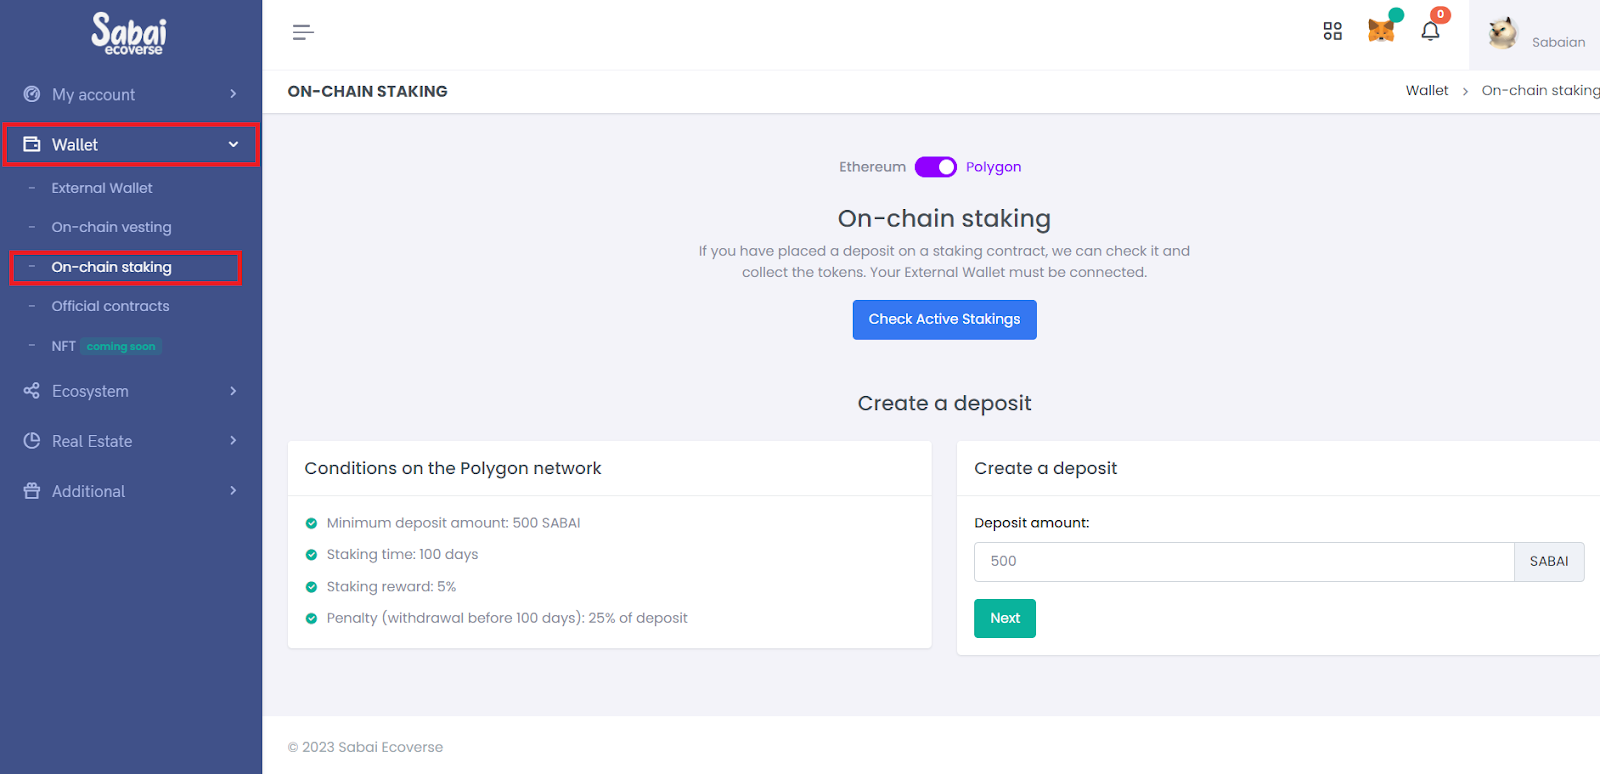
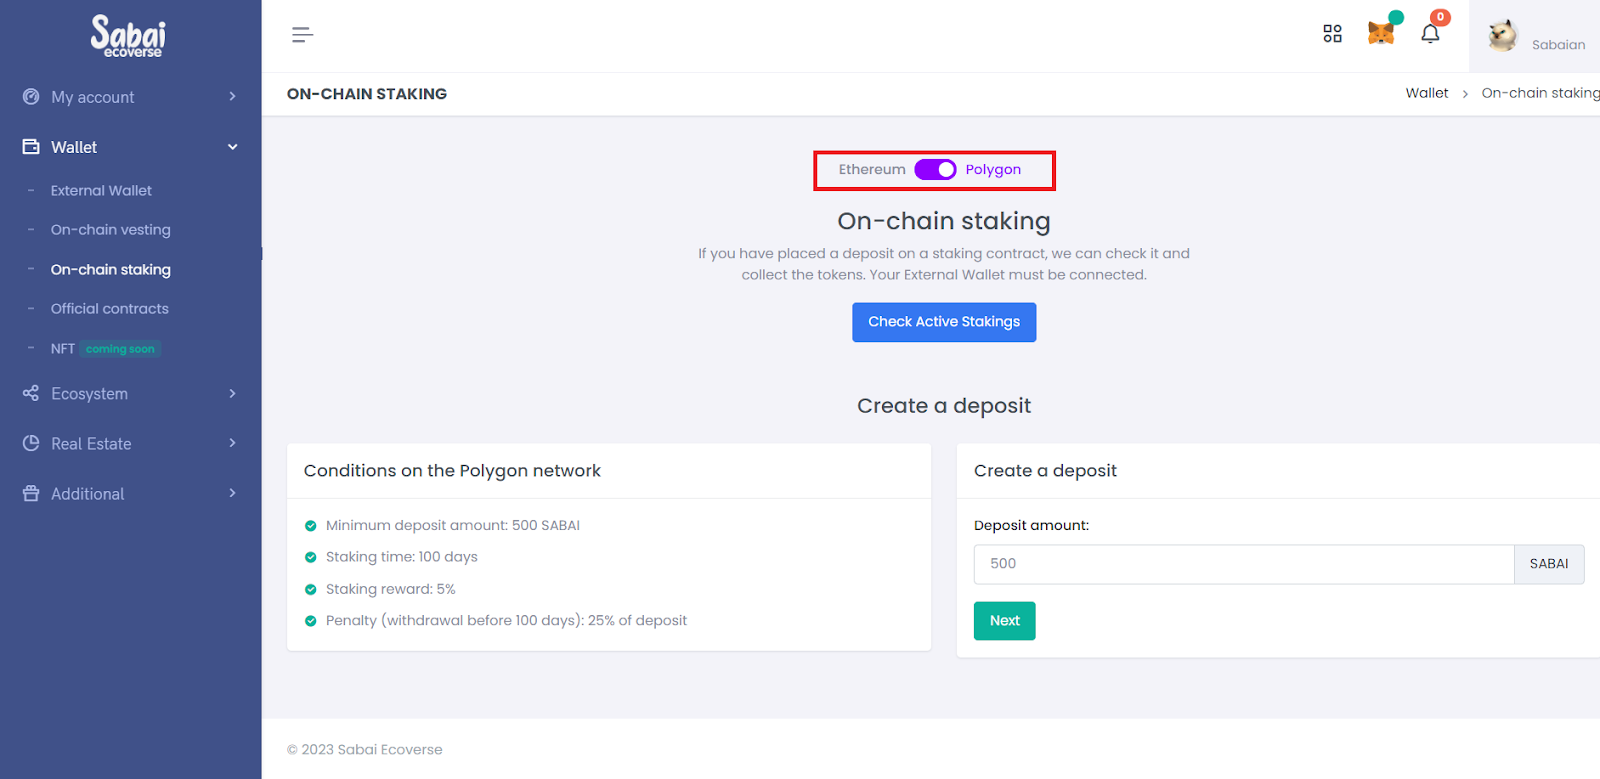
3. Make sure that the Polygon network is selected (purple indicator). If not, switch to the Polygon network.
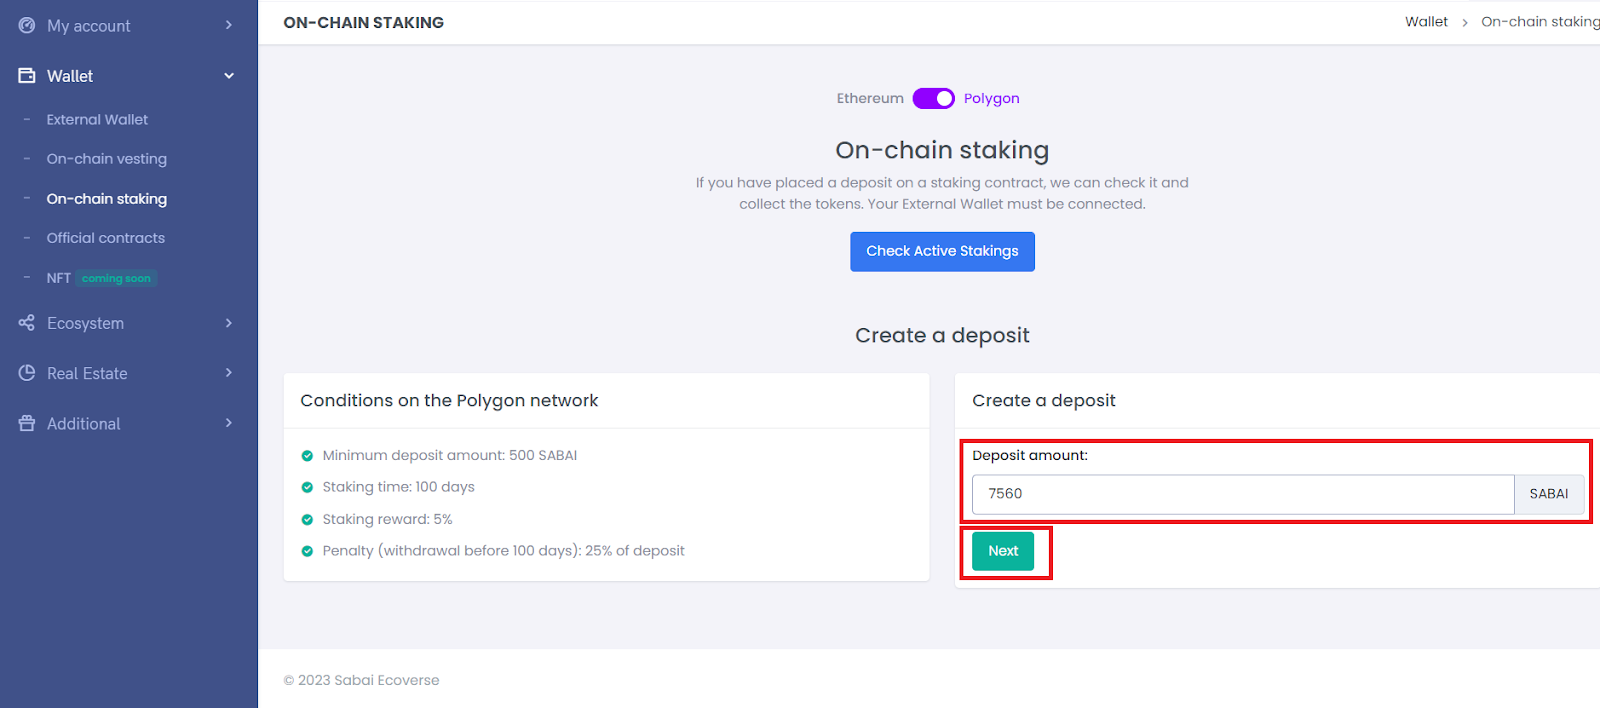
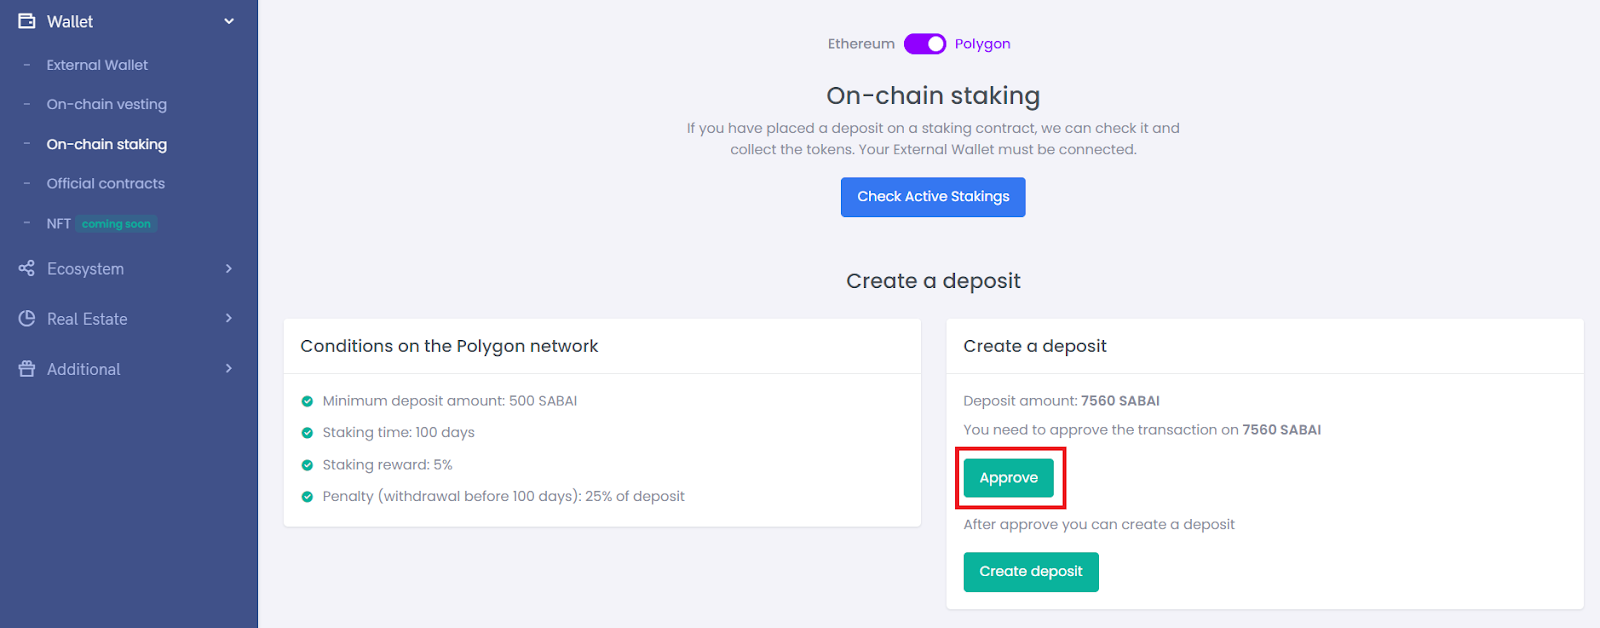
4. Enter the amount of SABAI tokens you want to stake and click "Next". Remember that the minimum deposit to activate the booster is 3500 $SABAI tokens.
5. Click "Approve".
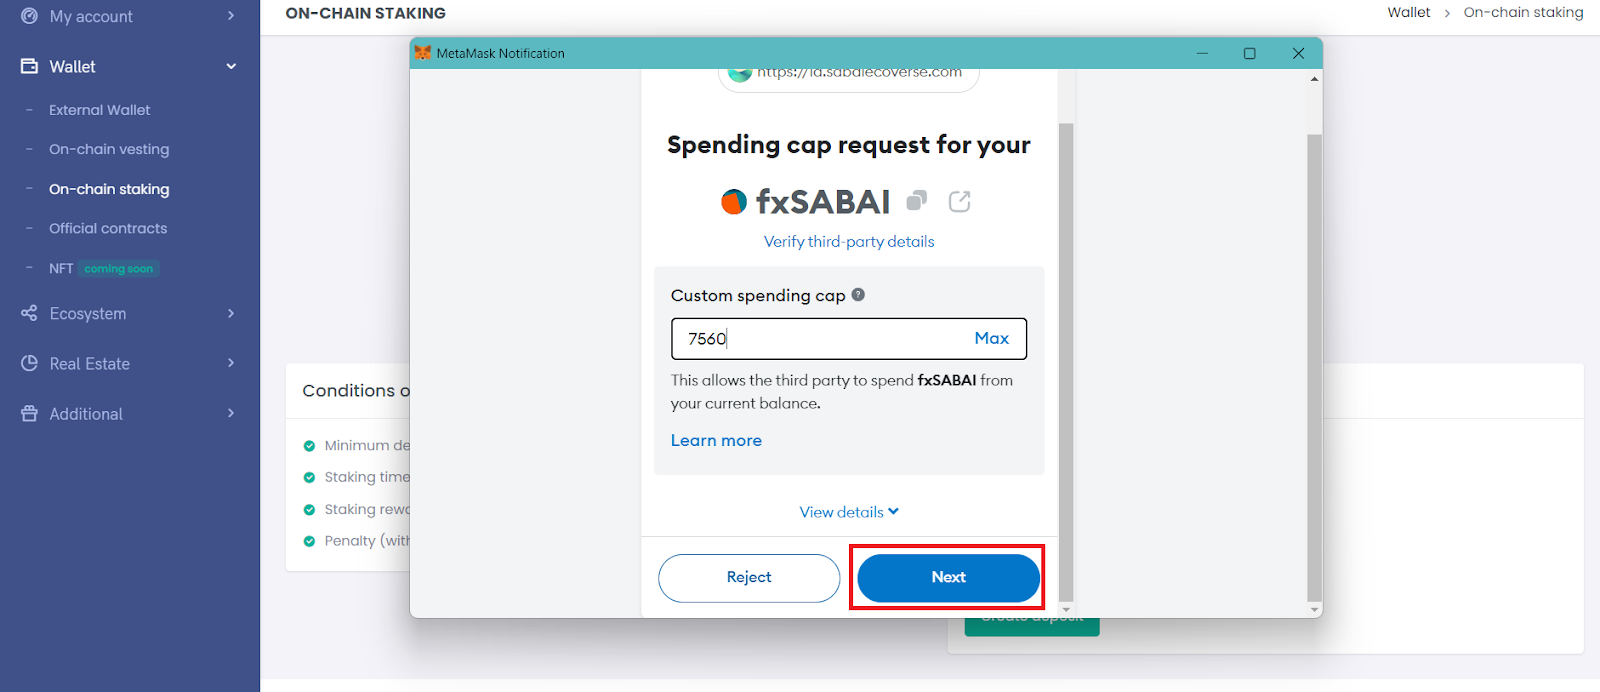
6. In the pop-up window, click "Next"
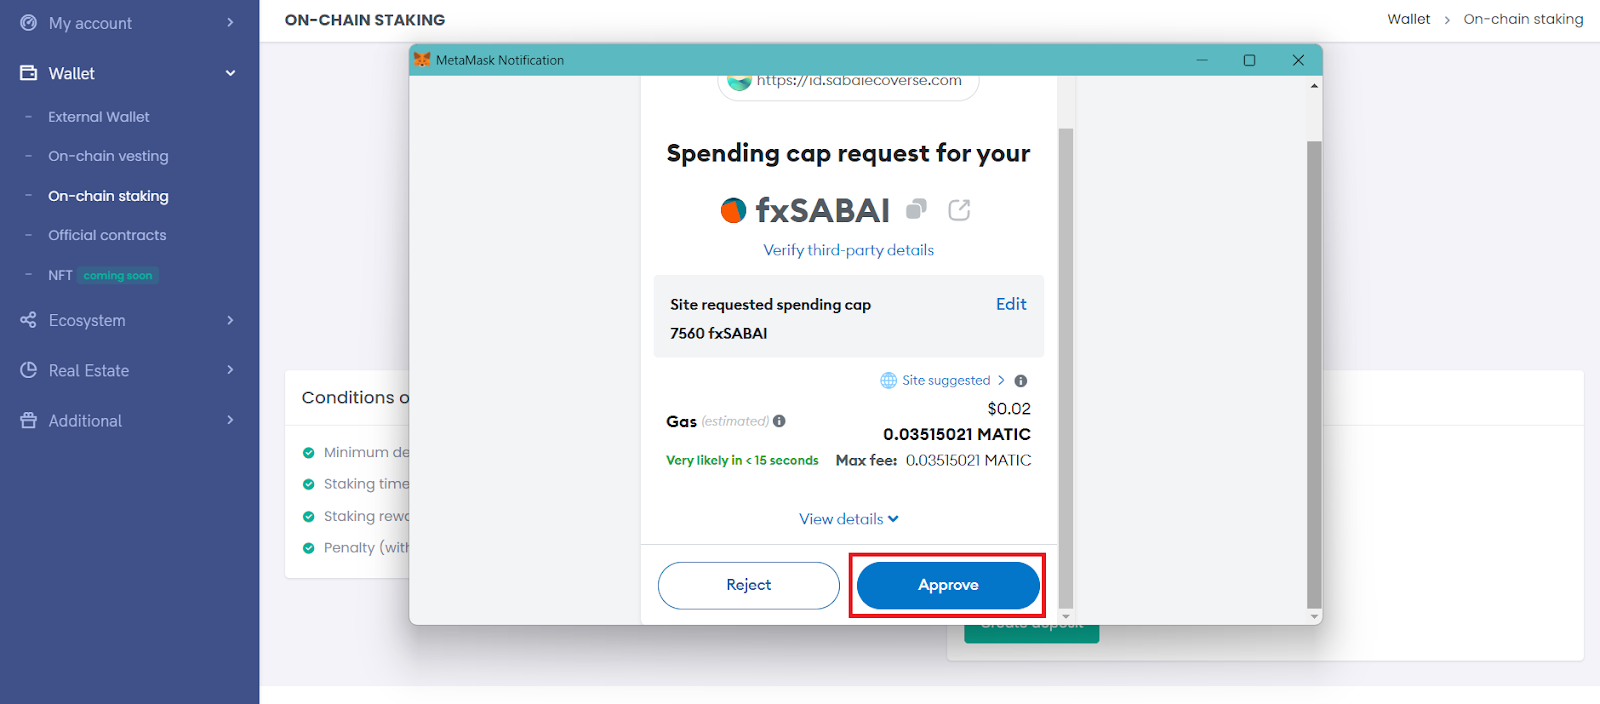
7. Then click "Approve".
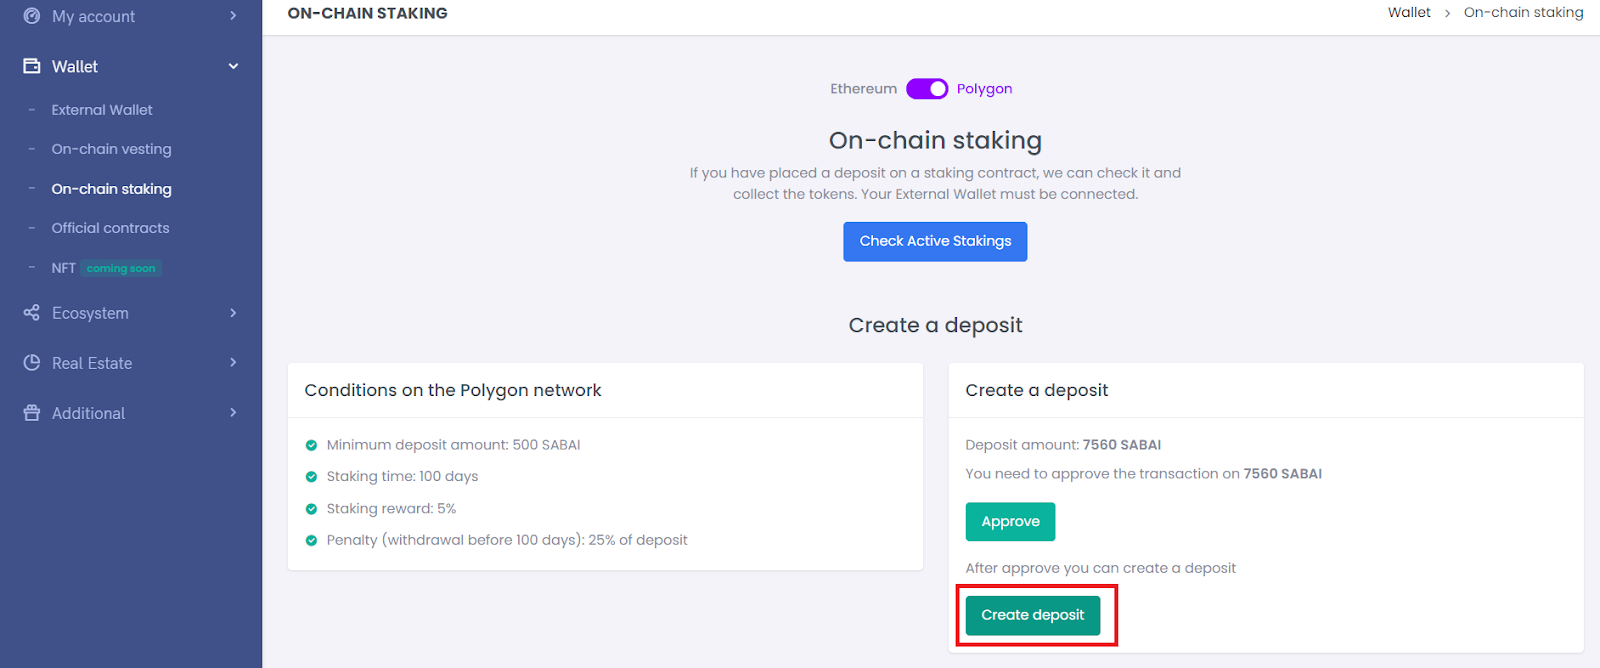
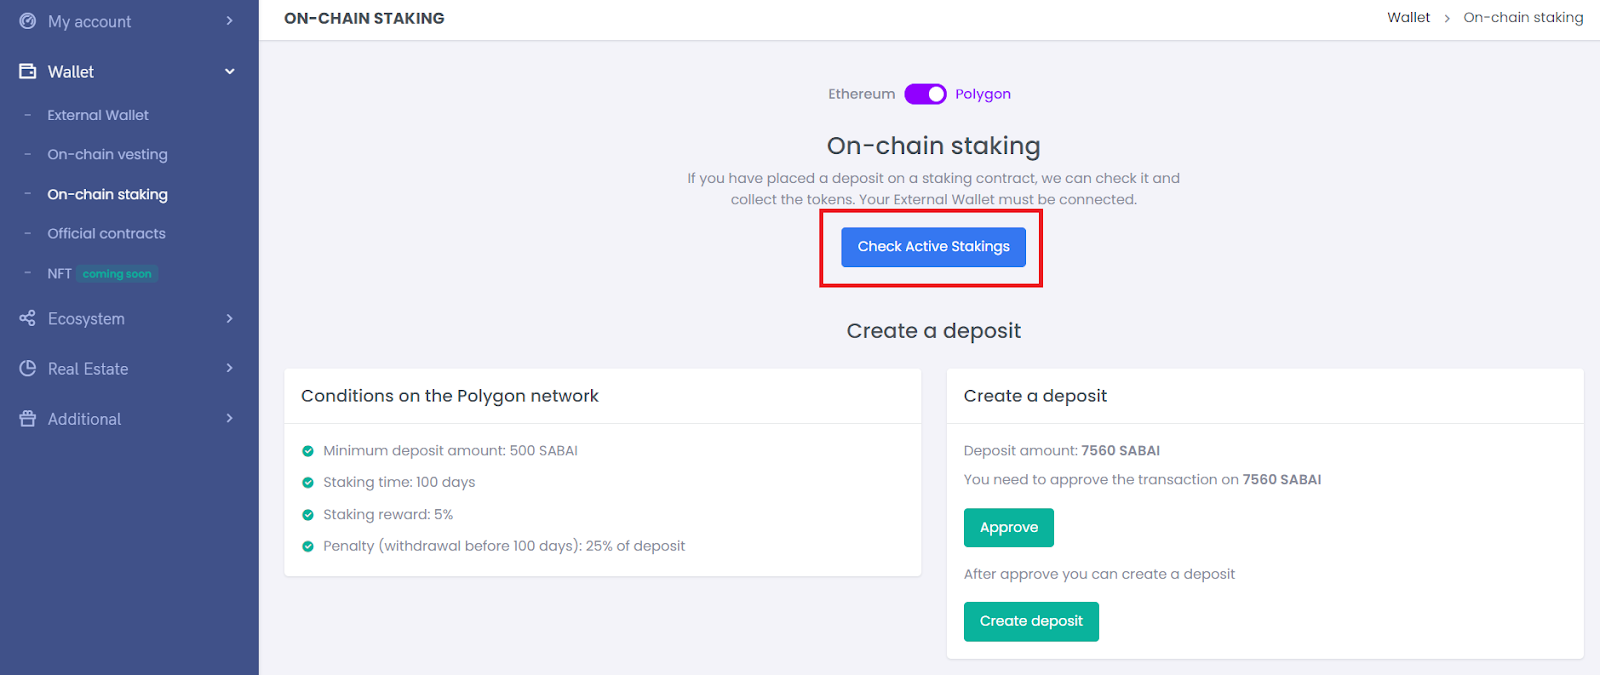
8. Click "Create deposit".
9. In the pop-up window, click "Confirm".
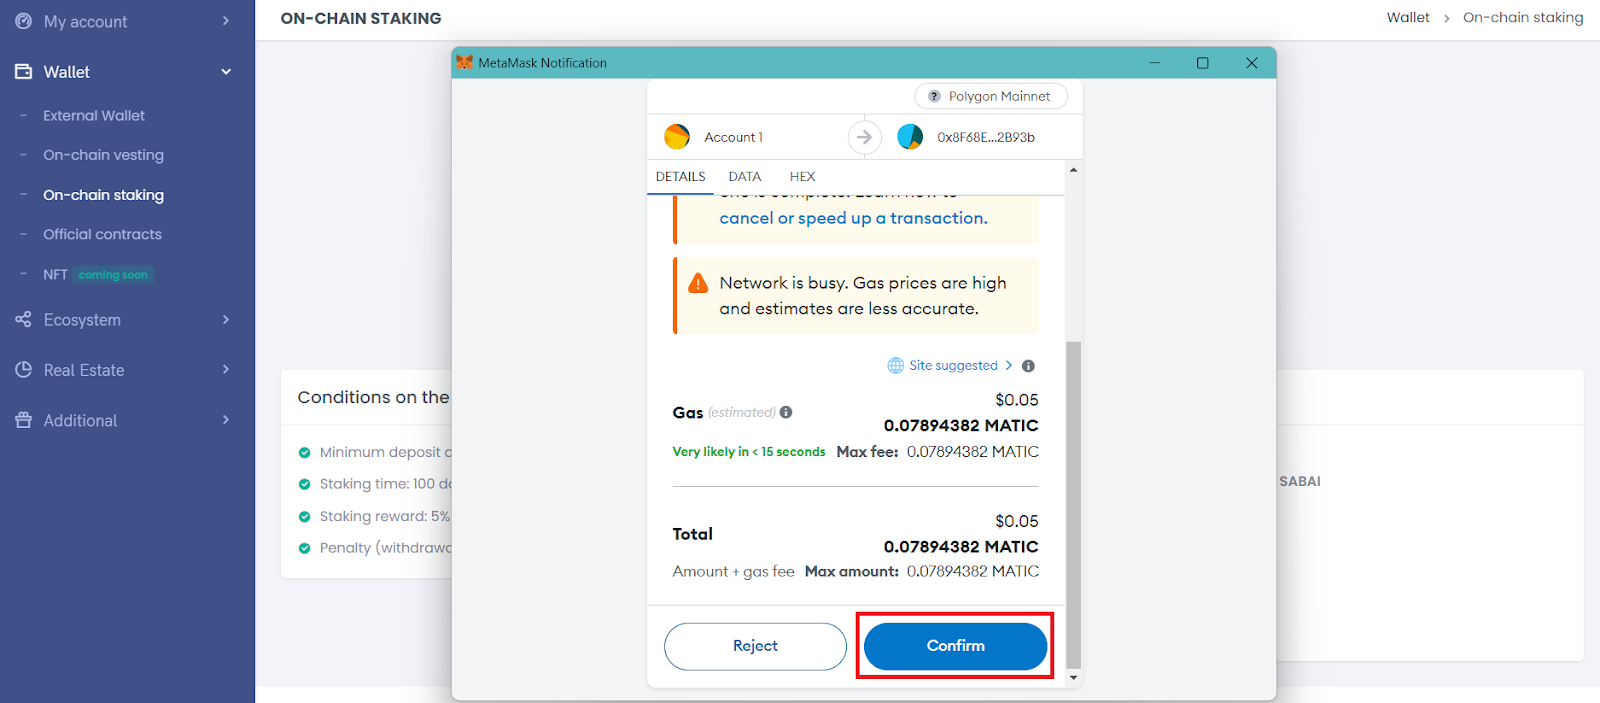
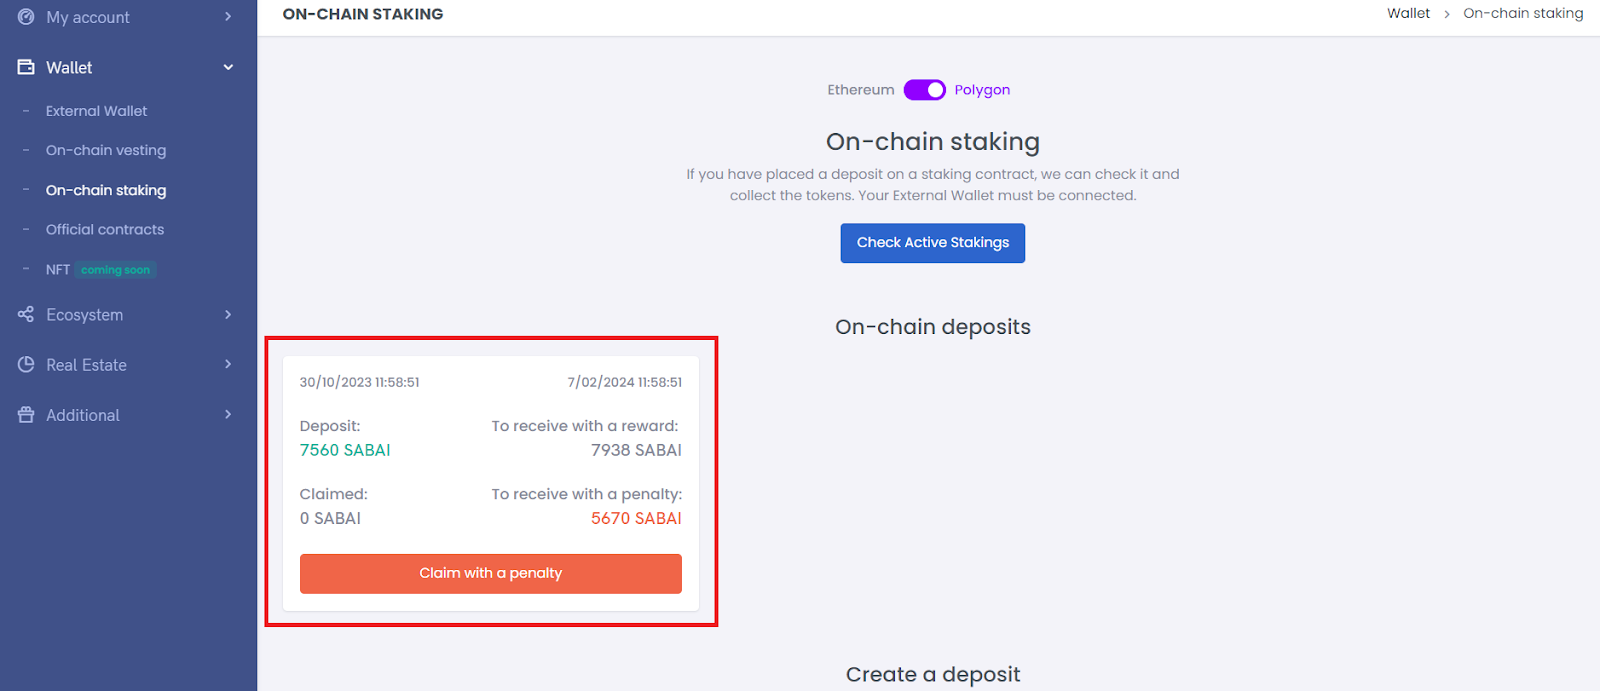
10. Congratulations! Your SABAI tokens will be staked in a couple of minutes, you can check this by clicking "Check Active Stakings".
11. After that, you will see active stakings and their conditions.
Please note that in other sections of Sabai ID, such as the Dashboard, staked tokens will be displayed after 5-10 minutes.
Step 7. Activate the Booster
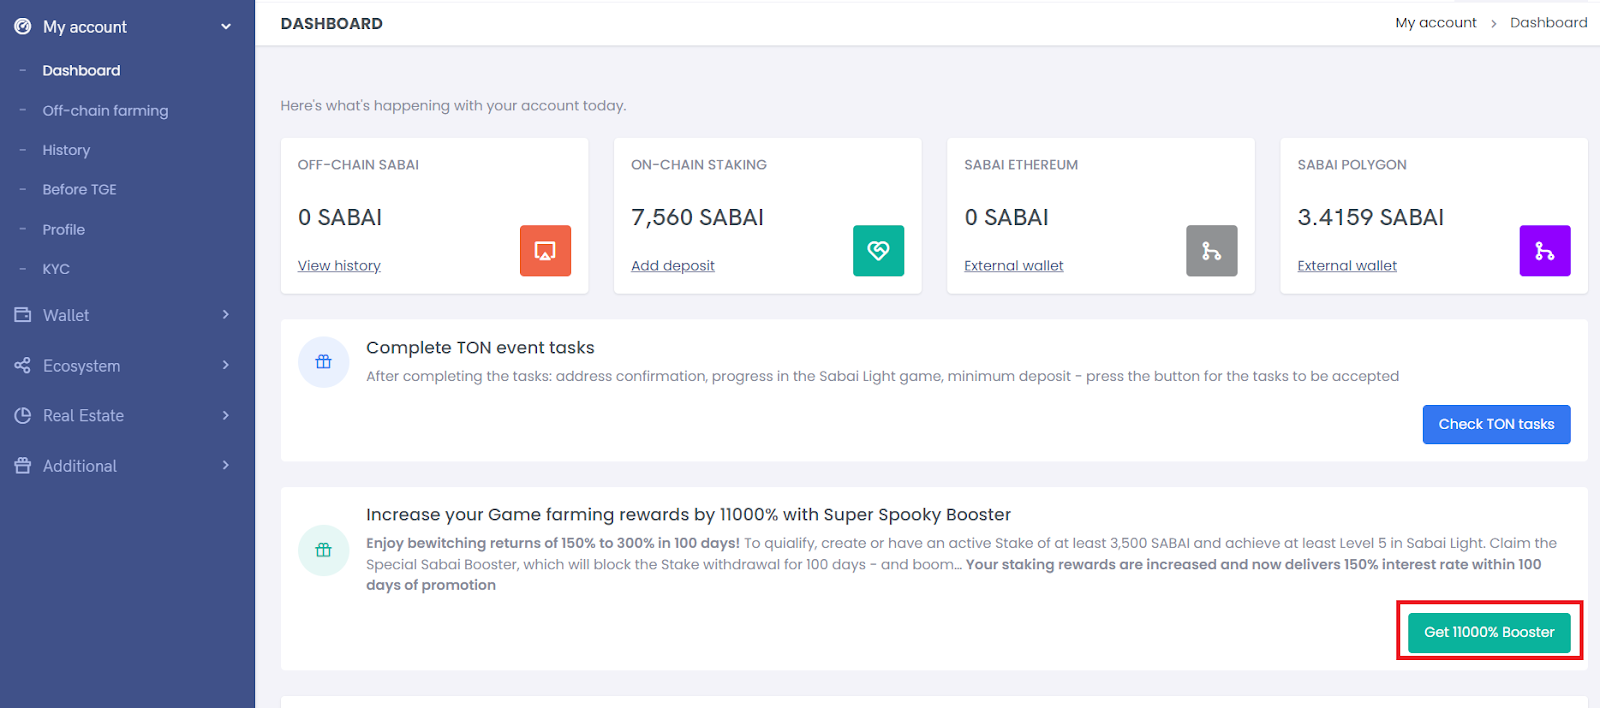
1. Log in to your Sabai ID and go to the "My Account" section, sub-section "Dashboard".
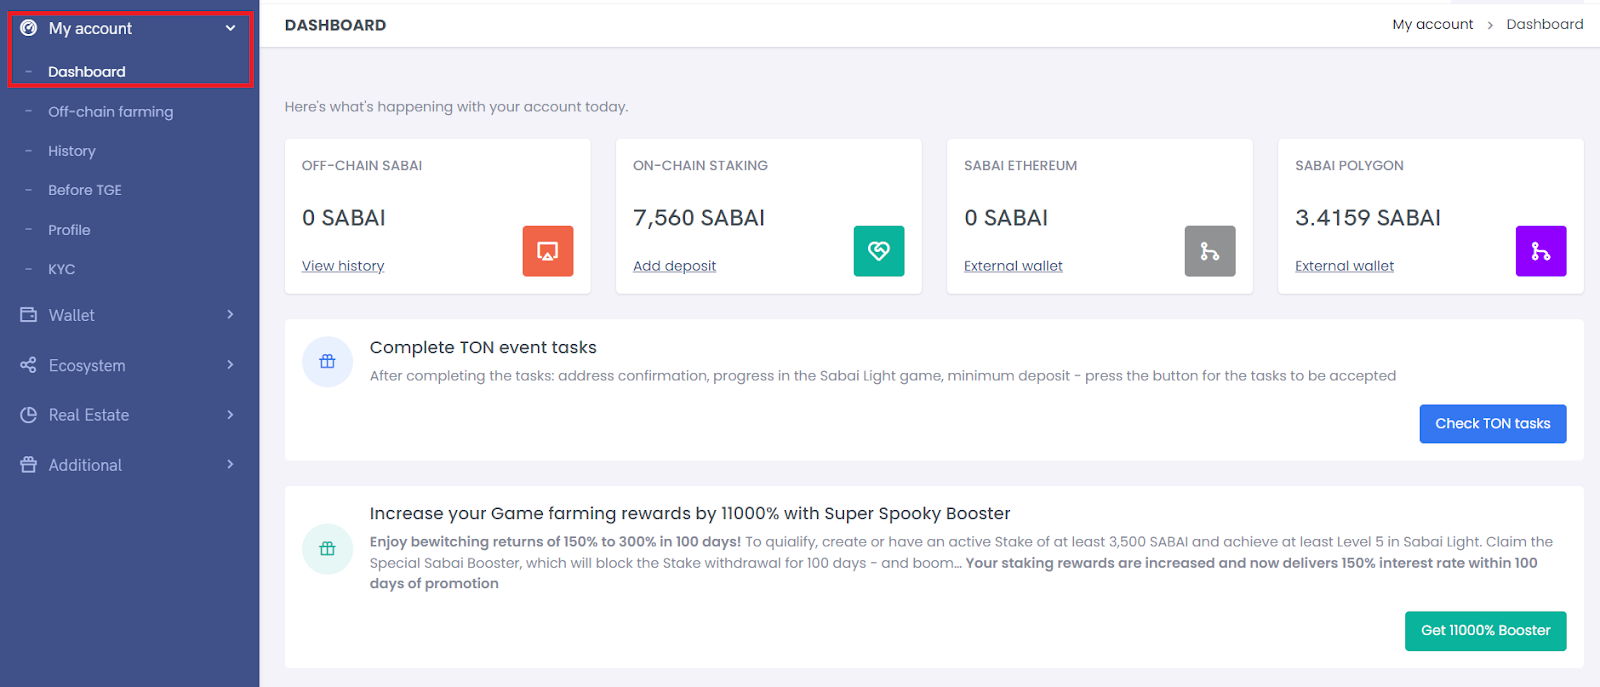
2. Click on the "Get 11000% Booster" button.
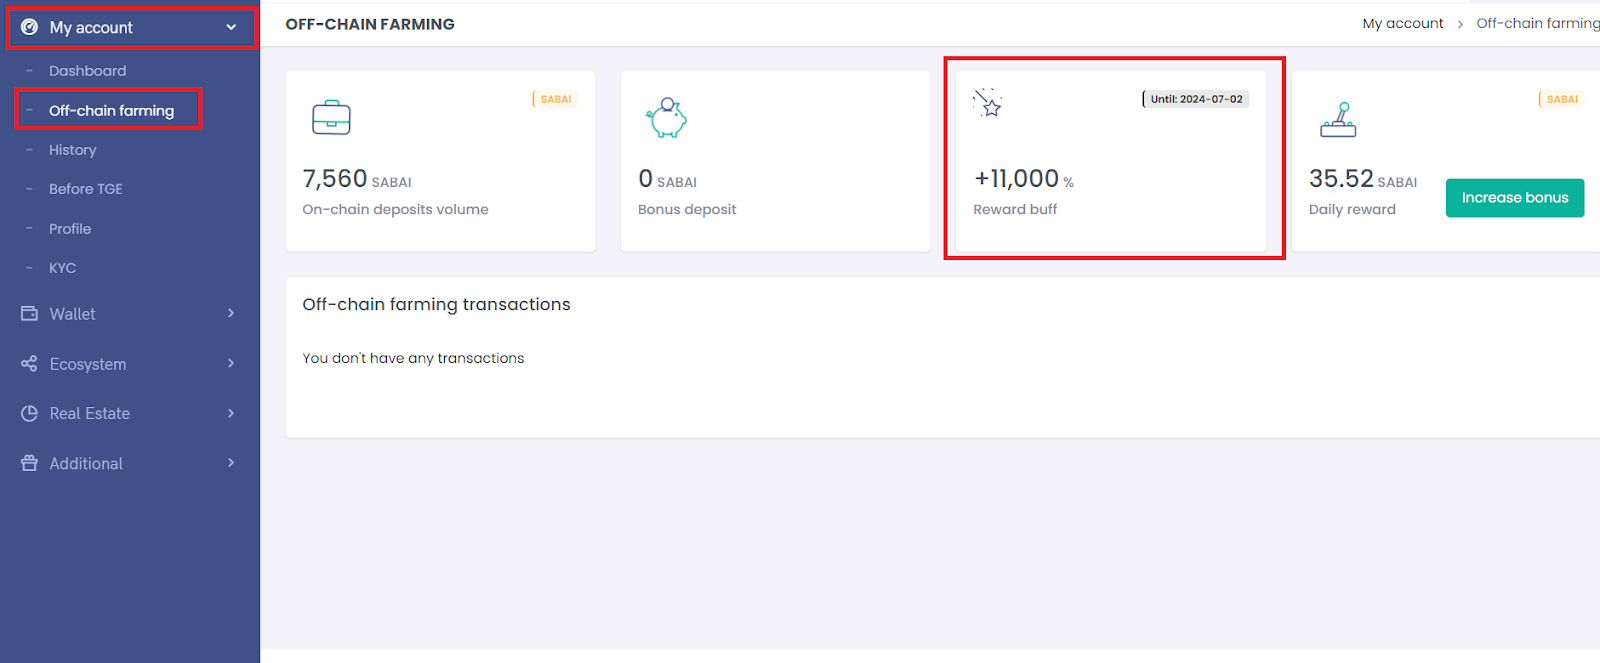
3. To ensure that the booster is activated, go to the "My Account" section, sub-section "off-chain farming". The "Reward buff" cell should display "11,000%".
Congratulations! You have completed this journey! Now, after 100 days, you will enjoy a profit of 150-300% in $SABAI tokens!
► Sabai Academy — a place where studying blockchain, crypto, fractional ownership, and real estate investments becomes a catalyst for capital growth!
Sabai Academy
BOOST your knowledge with our FREE crypto courses!
Related Articles
What is Bitcoin, and How Did the First Cryptocurrency Appear?